


Introduction
In the world of web development and data management, MySQL stands as one of the most popular and powerful relational database management systems. Its latest version, MySQL 8.0, comes with enhanced features that provide better performance, security, and scalability. If you’re looking to set up a powerful and reliable database management system on your Ubuntu Server 22.04, MySQL 8.0 is an excellent choice. In this step-by-step guide, we will walk you through the process of installing MySQL 8.0 on your Ubuntu Server, using familiar language to ensure that even beginners can follow along easily.
Table of Contents
- Introduction
- Prerequisites
- Installing MySQL 8.0 on Ubuntu Server 22.04
- Step 1: Update System Packages
- Step 2: Searching and Show for MySQL 8.0 server packages
- Step 3: Add MySQL APT Repository
- Step 4: Install MySQL on Ubuntu Server 22.04
- Step 5: Check Status and Enable MySQL
- Step 6: Secure MySQL Installation
- Step 7: Check MySQL Version
- Step 9: Configure Firewall
- Step 10: Connect Remotely
- MySQL Clean up
- Install Desktop Database Management Tool
- Conclusion
MySQL is an open-source relational database management system (RDBMS) that is widely used for managing and organizing structured data. It is one of the most popular and widely adopted database systems in the world. MySQL is known for its ease of use, scalability, and performance.
Prerequisites
Before we dive into the Installing MySQL 8.0 on Ubuntu 22.04 process, there is prerequisite you need to ensure are in place:
- Ubuntu Server: Make sure you have a clean installation of Ubuntu Server. To set this up, follow our guide Initial Setup Ubuntu Server 22.04. You can deploy this on a physical machine or a virtual environment like VMware or VirtualBox.
Installing MySQL 8.0 on Ubuntu Server 22.04
Here’s a simple guide on how to install and configure MySQL 8.0 on Ubuntu Server 22.04. By following these steps, you can tap into the advantages it offers:
Step 1: Update System Packages
Start by updating your system’s package list and upgrading existing packages:
samm@mysql:~$ sudo apt-get update
samm@mysql:~$ sudo apt-get upgrade
Step 2: Searching and Show for MySQL 8.0 server packages
Use the apt-cache command as follows to search for MySQL server and client packages on your Ubuntu Server 22.04
samm@mysql:~$ apt-cache search mysql-server
The system will return a list of available options :
mysql-server - MySQL database server (metapackage depending on the latest version)
mysql-server-8.0 - MySQL database server binaries and system database setup
mysql-server-core-8.0 - MySQL database server binaries
default-mysql-server - MySQL database server binaries and system database setup (metapackage)
default-mysql-server-core - MySQL database server binaries (metapackage)
mariadb-server-10.6 - MariaDB database server binaries
mariadb-server-core-10.6 - MariaDB database core server files
Next find out more about MySQL server package named, use the following commands:
samm@mysql:~$ sudo apt show mysql-server
Output:
Package: mysql-server
Version: 8.0.33-0ubuntu0.22.04.4
Priority: optional
Section: database
Source: mysql-8.0
Origin: Ubuntu
Maintainer: Ubuntu Developers <[email protected]>
Original-Maintainer: Debian MySQL Maintainers <[email protected]>
Bugs: https://bugs.launchpad.net/ubuntu/+filebug
Installed-Size: 35.8 kB
Depends: mysql-server-8.0
Homepage: http://dev.mysql.com/
Task: lamp-server
Download-Size: 9,450 B
APT-Sources: http://id.archive.ubuntu.com/ubuntu jammy-updates/main amd64 Packages
Description: MySQL database server (metapackage depending on the latest version)
 This is an empty package that depends on the current "best" version of
 mysql-server (currently mysql-server-8.0), as determined by the MySQL
 maintainers. Install this package if in doubt about which MySQL
 version you need. That will install the version recommended by the
 package maintainers.
 .
 MySQL is a fast, stable and true multi-user, multi-threaded SQL database
 server. SQL (Structured Query Language) is the most popular database query
 language in the world. The main goals of MySQL are speed, robustness and
 ease of use.
Step 3: Add MySQL APT Repository
To install MySQL 8.0 on Ubuntu Server 22.04 you need to add MySQL APT Repository. MySQL provides an APT repository that contains the latest versions of MySQL. To add the repository, use the following commands:
samm@mysql:~$ wget https://repo.mysql.com/mysql-apt-config_0.8.25-1_all.deb
Once downloaded, install the repository by running the command below:
samm@mysql:~$ sudo dpkg -i mysql-apt-config_0.8.25-1_all.deb
During the Installing, you’ll be prompted to choose the MySQL version to install. Select “MySQL 8.0” and proceed.
Afterwards, on the MySQL product, select Ok and press TAB key to select Ok. Press ENTER to proceed to install the repository.
Step 4: Install MySQL on Ubuntu Server 22.04
Next, update packages and install MySQL
samm@mysql:~$ sudo apt update
samm@mysql:~$ sudo apt install mysql-server
Proceed to install MySQL packages and all its dependencies:
samm@mysql:~$ sudo apt install mysql-client mysql-server
Reading package lists... Done
Building dependency tree... Done
Reading state information... Done
The following additional packages will be installed:
  libmecab2 mecab-ipadic mecab-ipadic-utf8 mecab-utils mysql-client mysql-common mysql-community-client mysql-community-client-core mysql-community-client-plugins
  mysql-community-server mysql-community-server-core psmisc
The following NEW packages will be installed:
  libmecab2 mecab-ipadic mecab-ipadic-utf8 mecab-utils mysql-client mysql-common mysql-community-client mysql-community-client-core mysql-community-client-plugins
  mysql-community-server mysql-community-server-core mysql-server psmisc
0 upgraded, 13 newly installed, 0 to remove and 1 not upgraded.
Need to get 42.5 MB of archives.
After this operation, 362 MB of additional disk space will be used.
Do you want to continue? [Y/n] Y
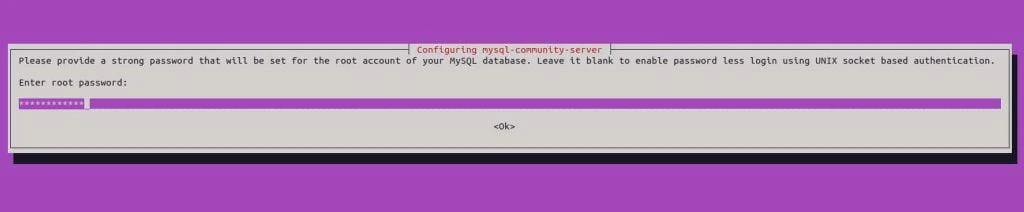
During the installation, you are prompted to set MySQL 8 root password
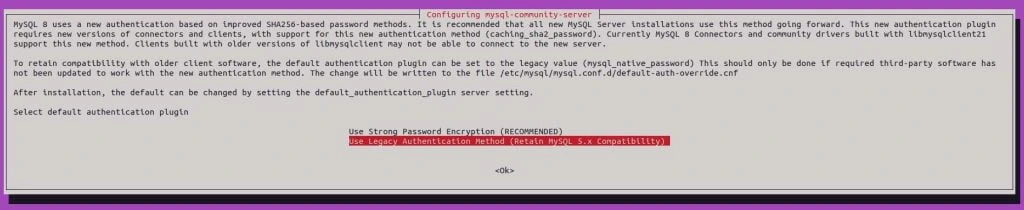
Set MySQL 8 default authentication plugin. For this tutorial we use “Use Legacy Authentication Method (Retain MySQL 5.x Compatibility)”
Check version installed using the apt-policy command:
samm@mysql:~$ apt policy mysql-server
mysql-server:
  Installed: 8.0.34-1ubuntu22.04
  Candidate: 8.0.34-1ubuntu22.04
  Version table:
 *** 8.0.34-1ubuntu22.04 500
        500 http://repo.mysql.com/apt/ubuntu jammy/mysql-8.0 amd64 Packages
        100 /var/lib/dpkg/status
     8.0.33-0ubuntu0.22.04.4 500
        500 http://id.archive.ubuntu.com/ubuntu jammy-updates/main amd64 Packages
     8.0.33-0ubuntu0.22.04.2 500
        500 http://id.archive.ubuntu.com/ubuntu jammy-security/main amd64 Packages
     8.0.28-0ubuntu4 500
        500 http://id.archive.ubuntu.com/ubuntu jammy/main amd64 Packages
Step 5: Check Status and Enable MySQL
Now run the following commands to check MySQL
samm@mysql:~$ sudo systemctl status mysql
● mysql.service - MySQL Community Server
     Loaded: loaded (/lib/systemd/system/mysql.service; enabled; vendor preset: enabled)
     Active: active (running) since Sun 2023-08-13 11:03:10 UTC; 21s ago
       Docs: man:mysqld(8)
             http://dev.mysql.com/doc/refman/en/using-systemd.html
   Main PID: 2500 (mysqld)
     Status: "Server is operational"
      Tasks: 38 (limit: 4556)
     Memory: 364.1M
        CPU: 1.397s
     CGroup: /system.slice/mysql.service
             └─2500 /usr/sbin/mysqld
Aug 13 11:03:09 mysql systemd[1]: Starting MySQL Community Server...
Aug 13 11:03:10 mysql systemd[1]: Started MySQL Community Server.
Now check is enable or not, to automatically start on system reboot
samm@mysql:~$ sudo systemctl is-enabled mysql
enabled
If not enabled, you can enable it using this command:
samm@mysql:~$ sudo systemctl enable mysql
Step 6: Secure MySQL Installation
MySQL ships with a security script called mysql_secure_installation that enables you to implement initial security of MySQL installation in the following ways:
- You can set a password for root accounts.
- You can remove root accounts that are accessible from outside the local host.
- You can remove anonymous-user accounts.
- You can remove the test database (which by default can be accessed by all users, even anonymous users), and privileges that permit anyone to access databases with names that start with test_.
The script can be simply execute by running:
samm@mysql:~$ mysql_secure_installation
When run, the script prompts you on whether you want to implement password complexity checks. Accept the choose the strength of the password;
VALIDATE PASSWORD COMPONENT can be used to test passwords
and improve security. It checks the strength of password
and allows the users to set only those passwords which are
secure enough. Would you like to setup VALIDATE PASSWORD component?
Press y|Y for Yes, any other key for No: y
There are three levels of password validation policy:
LOW    Length >= 8
MEDIUM Length >= 8, numeric, mixed case, and special characters
STRONG Length >= 8, numeric, mixed case, special characters and dictionary                  file
Please enter 0 = LOW, 1 = MEDIUM and 2 = STRONG: 2
...
After that set the root password and accept other prompts to remove anonymous database users, disallow remote root login, remove test databases and reload privileges tables to effect the changes on MySQL.
samm@mysql:~$ sudo mysql_secure_installation
Securing the MySQL server deployment.
Enter password for user root:
VALIDATE PASSWORD COMPONENT can be used to test passwords
and improve security. It checks the strength of password
and allows the users to set only those passwords which are
secure enough. Would you like to setup VALIDATE PASSWORD component?
Press y|Y for Yes, any other key for No: N
Using existing password for root.
Change the password for root ? ((Press y|Y for Yes, any other key for No) : N
New password: [YourNewPassword]
Re-enter new password: [YourNewPassword]
By default, a MySQL installation has an anonymous user,
allowing anyone to log into MySQL without having to have
a user account created for them. This is intended only for
testing, and to make the installation go a bit smoother.
You should remove them before moving into a production
environment.
Remove anonymous users? (Press y|Y for Yes, any other key for No) : Y
Success.
Normally, root should only be allowed to connect from
'localhost'. This ensures that someone cannot guess at
the root password from the network.
Disallow root login remotely? (Press y|Y for Yes, any other key for No) : Y
Success.
By default, MySQL comes with a database named 'test' that
anyone can access. This is also intended only for testing,
and should be removed before moving into a production
environment.
Remove test database and access to it? (Press y|Y for Yes, any other key for No) : Y
 - Dropping test database...
Success.
 - Removing privileges on test database...
Success.
Reloading the privilege tables will ensure that all changes
made so far will take effect immediately.
Reload privilege tables now? (Press y|Y for Yes, any other key for No) : Y
Success.
All done!
Step 7: Check MySQL Version
To check MySQL version, there are some ways:
samm@mysql:~$ mysql -V
mysql  Ver 8.0.34 for Linux on x86_64 (MySQL Community Server - GPL)
samm@mysql:~$ mysql -u root -p
Enter password: [Your Password]
Welcome to the MySQL monitor.  Commands end with ; or \g.
Your MySQL connection id is 10
Server version: 8.0.34 MySQL Community Server - GPL
Copyright (c) 2000, 2023, Oracle and/or its affiliates.
Oracle is a registered trademark of Oracle Corporation and/or its
affiliates. Other names may be trademarks of their respective
owners.
Type 'help;' or '\h' for help. Type '\c' to clear the current input statement.
mysql> SELECT VERSION();
+-----------+
| VERSION() |
+-----------+
| 8.0.33    |
+-----------+
1 row in set (0.00 sec)
mysql> SHOW VARIABLES LIKE "%version%";
+--------------------------+------------------------------+
| Variable_name            | Value                        |
+--------------------------+------------------------------+
| admin_tls_version        | TLSv1.2,TLSv1.3              |
| immediate_server_version | 999999                       |
| innodb_version           | 8.0.33                       |
| original_server_version  | 999999                       |
| protocol_version         | 10                           |
| replica_type_conversions |                              |
| slave_type_conversions   |                              |
| tls_version              | TLSv1.2,TLSv1.3              |
| version                  | 8.0.33                       |
| version_comment          | MySQL Community Server - GPL |
| version_compile_machine  | x86_64                       |
| version_compile_os       | Linux                        |
| version_compile_zlib     | 1.2.13                       |
+--------------------------+------------------------------+
13 rows in set (0.01 sec)
mysql>
Create Database MySQL
To create a database in MySQL, login as shown above and run the below command.
#Create a new database
mysql> CREATE DATABASE sammlinux_db;

#If the database with the same exists
mysql> CREATE DATABASE sammlinux_db;
ERROR 1007 (HY000): Can't create database 'sammlinux_db'; database exists

#Create a database if already exits
mysql> CREATE OR REPLACE DATABASE sammlinux_db;
Query OK, 2 rows affected (0.009 sec)

#First check if a database exists
mysql> CREATE DATABASE IF NOT EXISTS sammlinux_db;
Query OK, 1 row affected, 1 warning (0.000 sec)

# Check Databases MySQL
mysql> SHOW DATABASES;
MySQL add User and Grant Privileges
To create a user and grant privileges;
#Create user MySQL
CREATE USER 'sammlinux-user'@'localhost' IDENTIFIED BY 'your-password';

#Grant all privileges to the user
GRANT ALL PRIVILEGES ON *.* TO 'sammlinux-user'@'localhost' IDENTIFIED BY 'your-password';

#Grant privileges to a specific database
GRANT ALL PRIVILEGES ON 'sammlinux_db'.* TO 'sammlinux-user'@'localhost';

#Remember to refresh the privileges
FLUSH PRIVILEGES;

#To check user grants in MySQL
SHOW GRANTS FOR 'sammlinux-user'@'localhost';
Create a Table and Add Data MySQL
Once you have created a database, you can create table and add data into it
CREATE TABLE articles (articles_id INT, name VARCHAR(20), channel VARCHAR(20));
INSERT INTO articles (id,name,email) VALUES(56701,"samm","Linux")
Step 8: Enabling MySQL Remote Access (Optional)
By default, MySQL 8.0 is configured to listen only on the localhost (127.0.0.1). To allow remote connections, you need to modify the MySQL configuration to listen on your server’s IP address. Open the MySQL configuration file using a text editor (e.g., nano or vim):
samm@mysql:~$ sudo vi /etc/mysql/mysql.conf.d/mysqld.cnf
Look for the line that starts with bind-address and change it to your server’s IP address or the IP range you want to allow. For example :
bind-address = 172.32.1.0/24
Save the file and exit the text editor, next restart your mysql with following commands:
samm@mysql:~$ sudo systemctl restart mysql
Next, you’ll need to create a MySQL user that’s allowed to connect from a remote host. Log in to your MySQL server as the root user:
samm@mysql:~$ mysql -u root -p
Enter your root password when prompted. Then, run the following SQL command to create a new user and grant it remote access:
#Create user MySQL
CREATE USER 'samm'@'%' IDENTIFIED BY 'your-password';
#Grant all privileges to the user
GRANT ALL PRIVILEGES ON *.* TO 'samm'@'%' IDENTIFIED BY 'your-password';
#Grant privileges to a specific database
GRANT ALL PRIVILEGES ON 'sammlinux_db'.* TO 'samm'@'%';
#Remember to refresh the privileges
FLUSH PRIVILEGES;
#To check user grants in MySQL
SHOW GRANTS FOR 'samm'@'%';
Replace 'samm' and 'your_password' with your desired username and password.
Step 9: Configure Firewall
To allow incoming connections to MySQL from remote hosts, you need to configure your server’s firewall to permit traffic on the MySQL port (default is 3306). Use the following commands to allow incoming connections:
samm@mysql:~$ sudo ufw allow 3306/tcp
samm@mysql:~$ sudo ufw reload
Step 10: Connect Remotely
Now you should be able to connect to your MySQL server from a remote machine using your MySQL client of choice. Use the following command, replacing your_server_ip with your server’s actual IP address:
$ mysql -u your_username -h your_server_ip -p
Enter the password for the user you created earlier when prompted.
Security Note
Enabling remote access poses security risks. To minimize these risks, consider the following practices:
- Use strong passwords for MySQL users
- Limit access to specific IP addresses rather than using
%to allow connections from any host. - Consider using SSH tunnels for secure remote access.
MySQL Clean up
To completely remove MySQL, run the following commands.
samm@mysql:~$ sudo apt purge mysql-server
samm@mysql:~$ sudo rm -rf /var/lib/mysql/
Install Desktop Database Management Tool
If working with MySQL command line is not your thing, then consider installing a Database Tool to help you. Check out our guide below:
Conclusion
Finally in this tutorial, we’ve walked you through the process of installing MySQL 8.0 on your Ubuntu Server 22.04. You’ve also learned how to secure your installation, create a database, and grant user privileges.
Now, you’re ready to harness the power of MySQL for your applications. Whether you’re setting up a website, building an app, or managing data, MySQL is a reliable and robust choice.
So, there you have it – a complete guide to installing MySQL 8.0 on Ubuntu Server 22.04. We hope you found this tutorial helpful, even if you’re not a tech expert. Now go ahead and make the most of your new MySQL database!
Also Read Our Other Guides :
- How To Install MySQL 8.0 on Debian 11
- How To Install MySQL 8.0 on Rocky Linux 9
- How To Install MariaDB 10.9 on Debian 11 Server
- How To Install MariaDB 10.6 on Debian 11 Server
- How To Install MariaDB 10.6 on Ubuntu Server 22.04
As I have shown, now you have learned how to install MySQL 8.0 on Ubuntu Server 22.04.


