


Are you ready to embark on a journey into the world of Debian 11 (Bullseye)? Whether you’re a seasoned Linux enthusiast or a complete beginner, this step-by-step guide will handhold you through the installation process. Debian 11, affectionately known as Bullseye, comes loaded with exciting features and enhancements. So, let’s dive in and explore how to install Debian 11 (Bullseye) Server – with pictures, comprehensive step-by-step guide on your system.
Table of Contents
- Prerequisites
- Installing Debian 11 (Bullseye) Step by Step
- Step 1: Boot from the Installation Medium
- Step 2: Select Language and Region
- Step 3: Configure Your Network
- Step 4: Create User dan Password
- Step 5: Partition Your Disk
- Step 6: Start Install Debian 11 the Base System
- Step 7: Configure the Package Manager
- Step 8: Select Install Additional Software on Debian 11
- Step 9: Install the GRUB Bootloader for Debian 11
- Step 10: Finishing Install Debian 11 (Bullseye) Server
- Step 11: Post-Installation Tasks
- Conclusion
Prerequisites
Before we begin to install Debian 11 (Bullseye) Server, let’s ensure you have all the prerequisites in place:
- Download Debian 11 (Bullseye): Head over to the official website and grab the ISO image for Debian 11 that matches your system’s architecture.
- Create a Bootable Medium: You’ll need either a bootable USB drive or a DVD with Debian 11’s ISO image. Tools like Rufus (for Windows) or dd (for Linux) will help you create one with ease.
- Backup Your Data: It’s crucial to have a backup of all your important data before you embark on any installation journey.
Now, let’s initiate the installation process.
Installing Debian 11 (Bullseye) Step by Step
Here’s a simple guide on how to install Debian 11 (Bullseye) on your machine. By following these steps, you can tap into the advantages it offers:
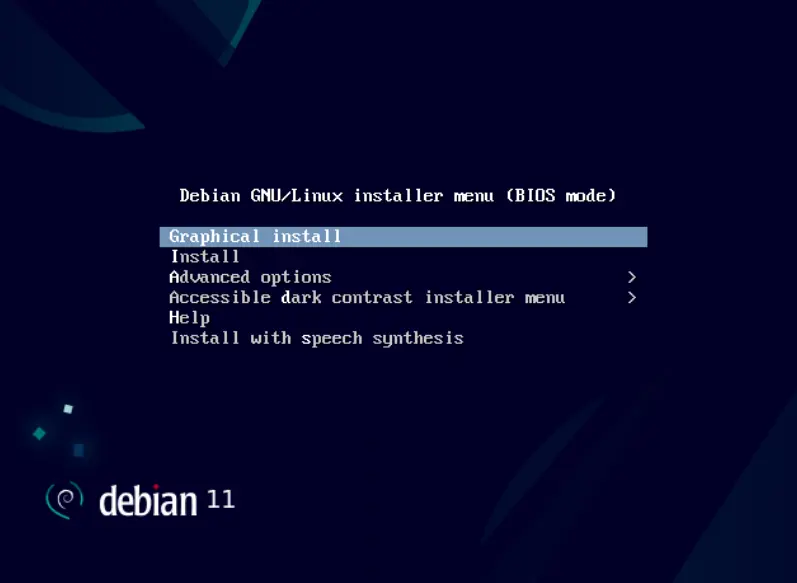
Step 1: Boot from the Installation Medium
Basically to install Debian 11 (Bullseye), insert the bootable USB drive or DVD into your computer and restart it. Most modern systems will automatically boot from the installation media. However, if it doesn’t, be sure to modify the boot order in your system’s BIOS settings.
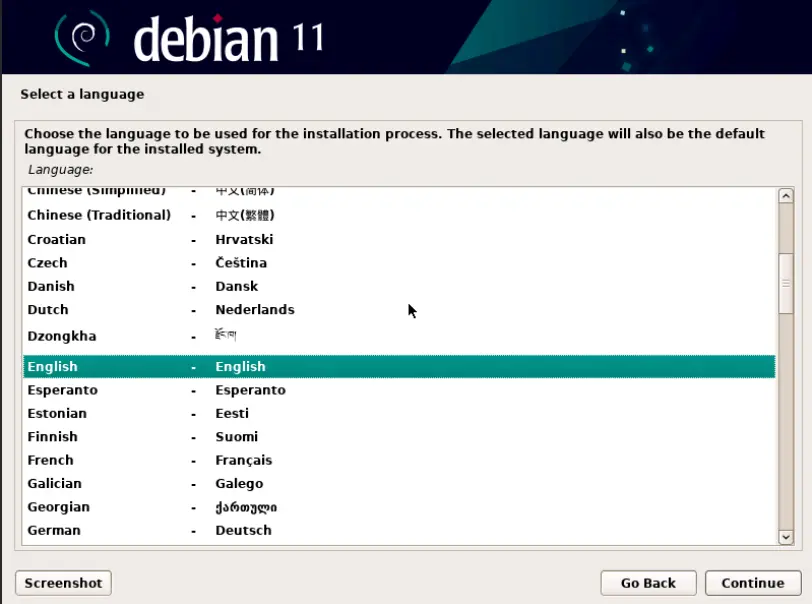
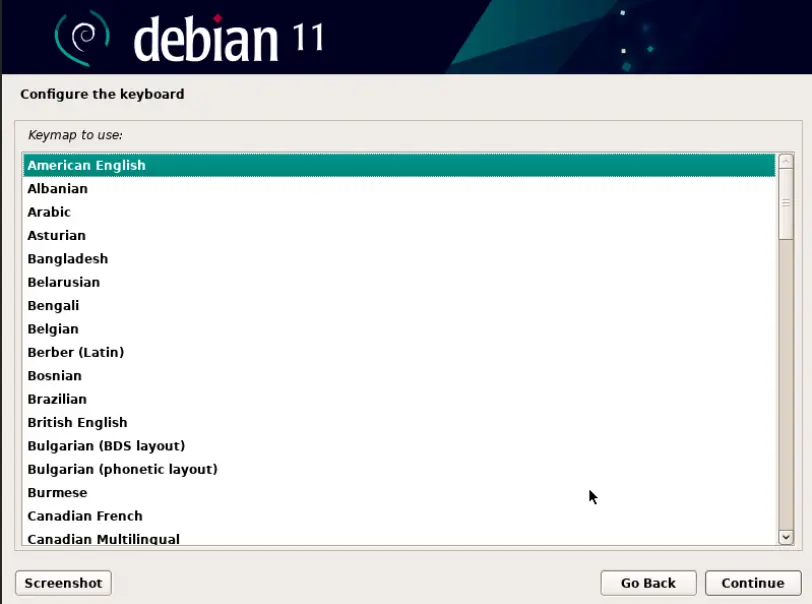
Step 2: Select Language and Region
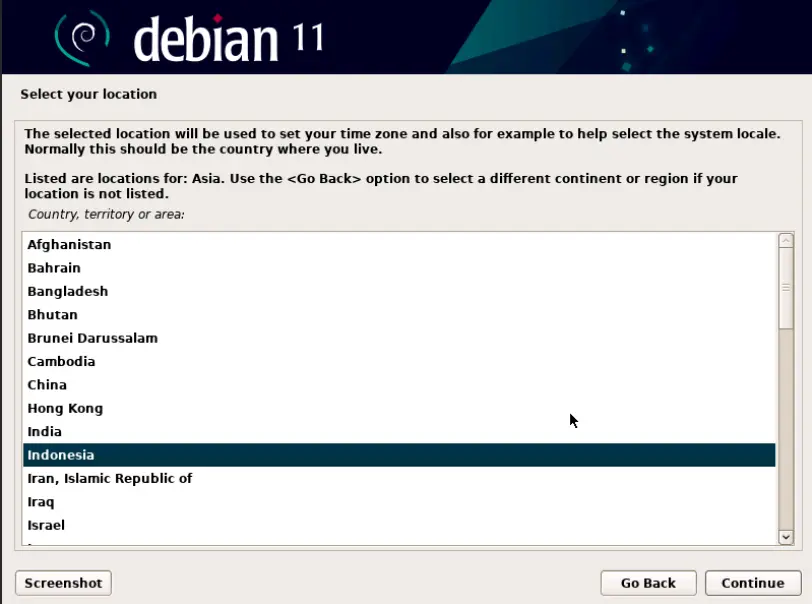
Once Debian 11 (Bullseye) boots up, you’ll be prompted to choose your preferred language and region. Pick the ones that suit you best.
Choose the location where you live, and then click “Continue” to make the system time adjust automatically based on your region.
Decide on your keyboard layout by picking the language you want to use for it. Once you’ve chosen the language, simply click “Continue” to proceed.
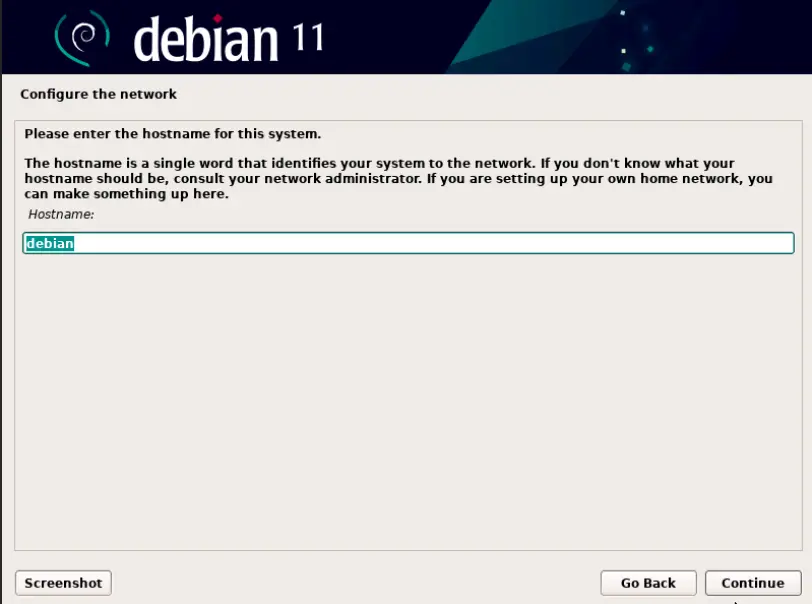
Step 3: Configure Your Network
Debian will make an attempt to configure your network settings automatically. If you’re using Wi-Fi, you may need to provide your Wi-Fi credentials.
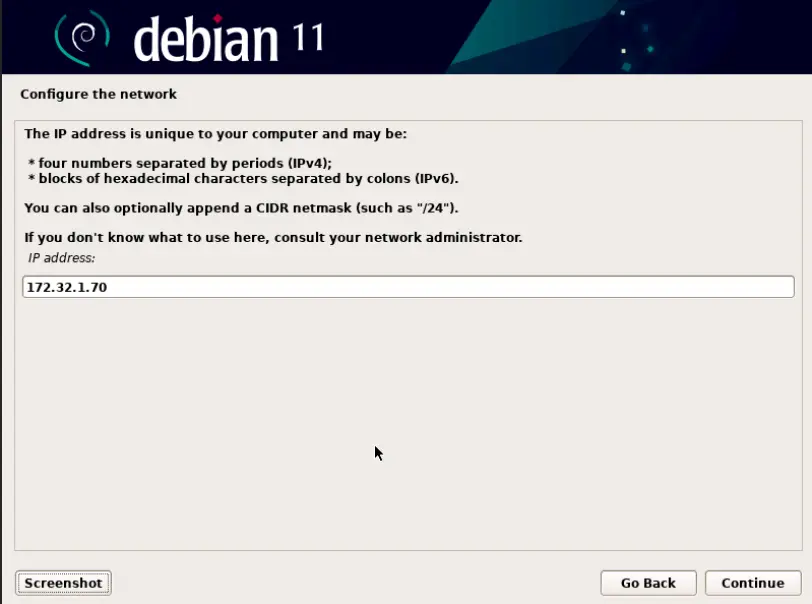
After that, as you reach this point, the installer will prompt you to choose a hostname, which is essentially your system’s identity on the network. After you’ve done that, simply click on the “Continue” option.
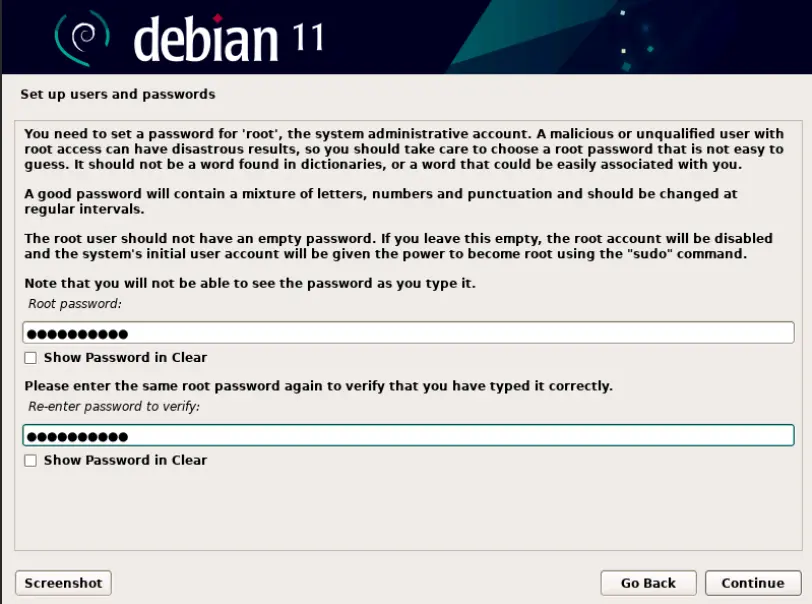
Step 4: Create User dan Password
In this phase, the goal is to establish a password. It’s advisable to create a strong and intricate password to boost security. Additionally, it’s essential to refrain from sharing the root password under any circumstances since the root user holds significant control over system management.
Create a new username and click on the “Continue” button after entering the full local Username.
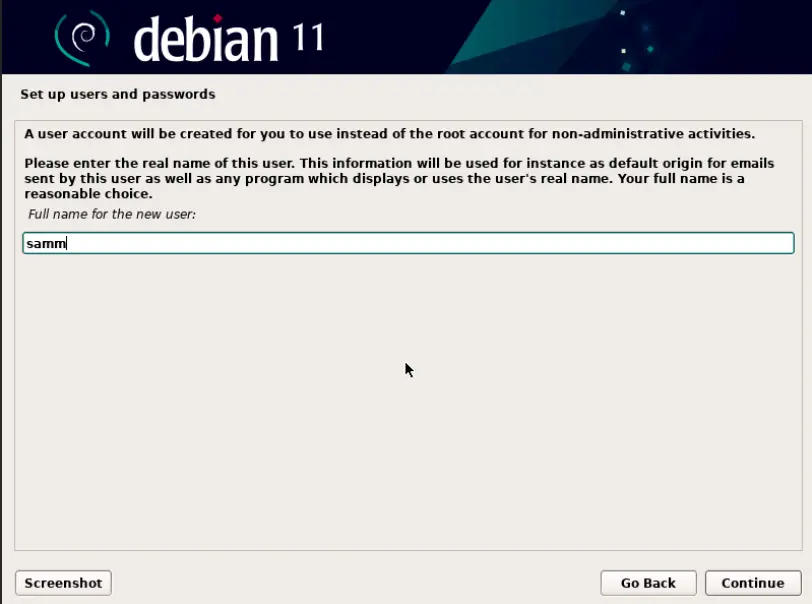
After that set your Username on the next page.
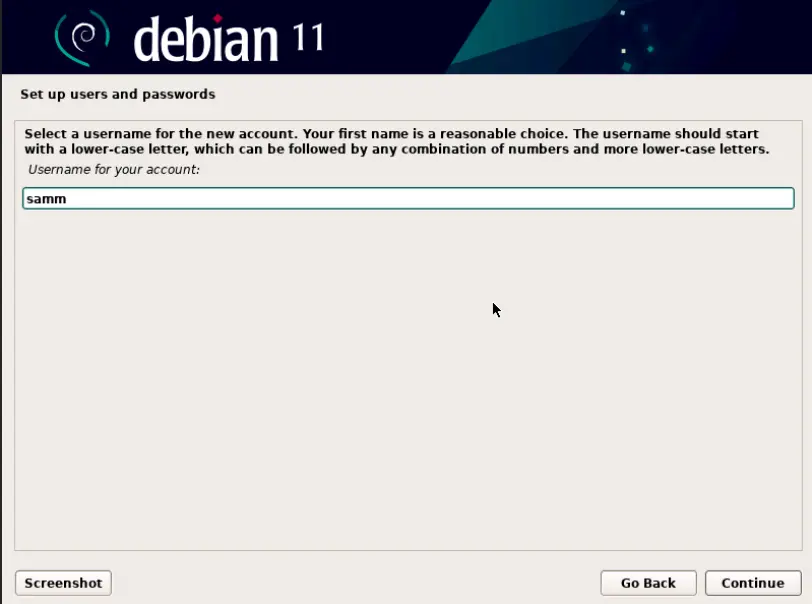
When you click on “Continue,” a new page will pop up, allowing you to set the password for the local user. Once you’ve entered the password, simply press “Enter.”

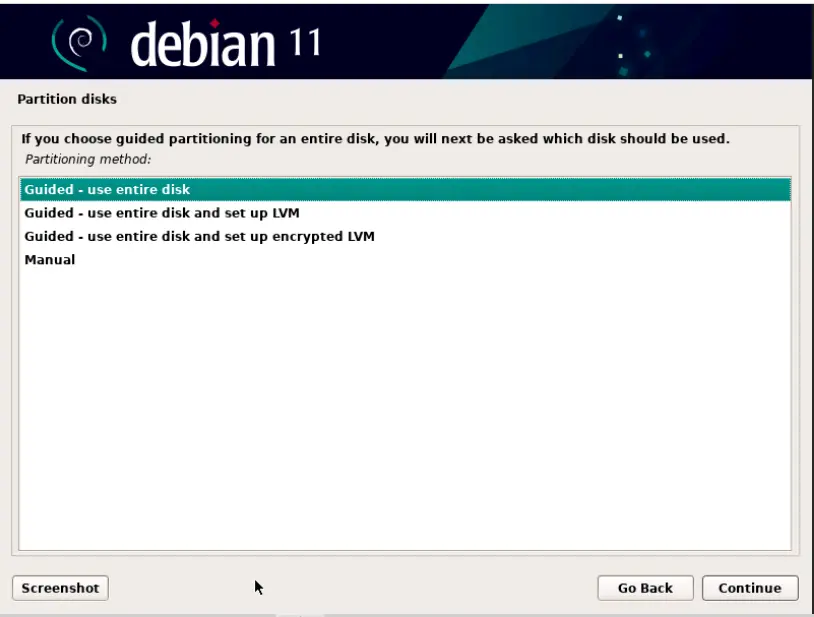
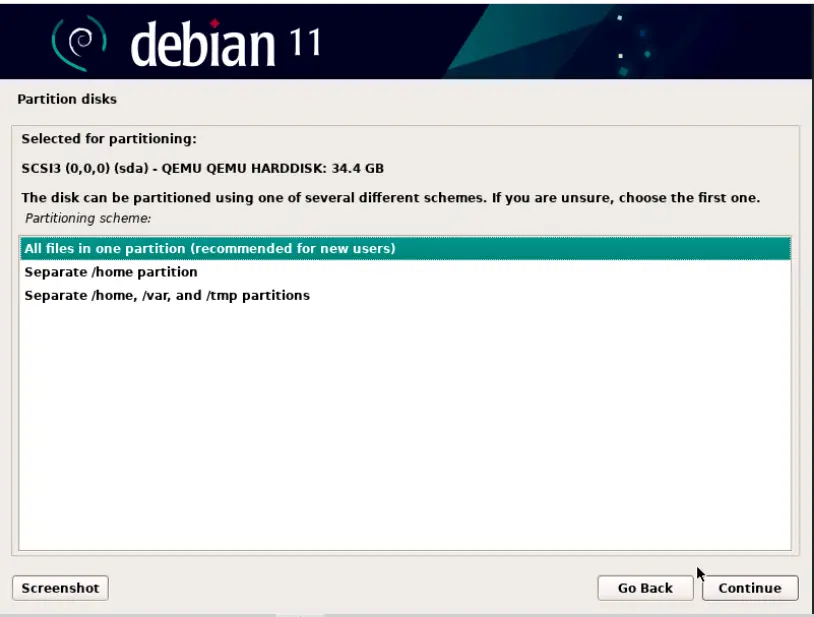
Step 5: Partition Your Disk
Now, let’s talk about how you can choose the partitioning method. You’ve got a few options here:
- Guided – Use Entire Disk: This choice will automatically create a partition on the whole disk for you.
- Guided – Use Entire Disk and Set Up LVM: This option not only creates a partition on the entire disk automatically but also uses Logical Volume Management (LVM) to manage the partitions.
- Guided – Use Entire Disk and Set Up Encrypted LVM: With this option, your disk will be partitioned based on LVM, and those partitions will be encrypted for added security.
- Manual: If you want more control and prefer to customize your partitions, this is the way to go.
So, considering these options, pick the one that suits your installation needs best. In this guide, we’ll go with the Guided – Use Entire Disk option. After that, click on “Continue” to move forward with the installation.
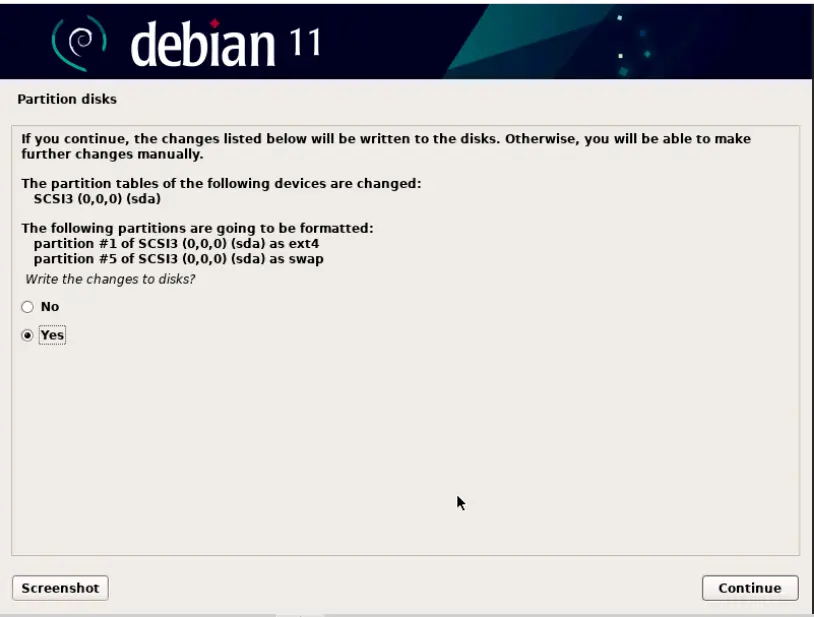
In the open window, pick the specific disk where you want to create partitions for your Debian system.
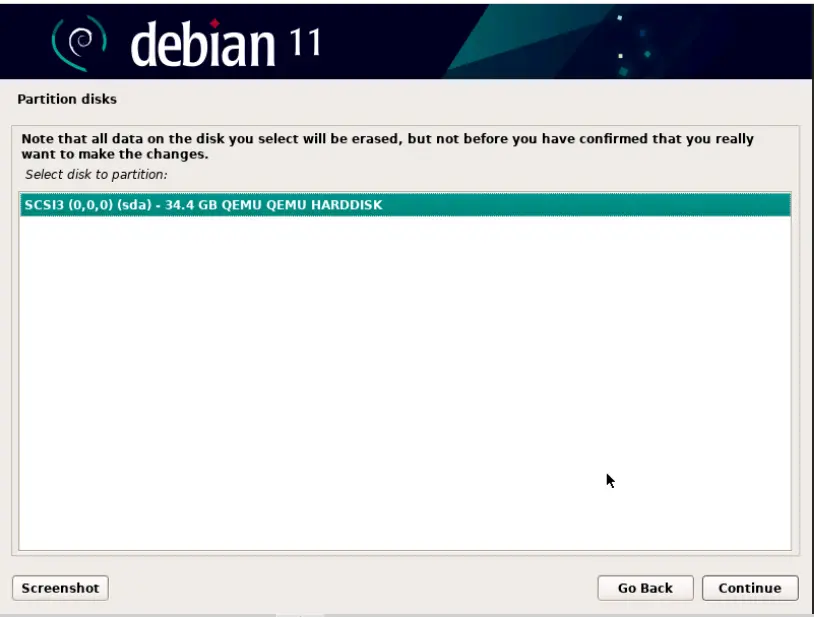
In this step, you determine the partition plan based on the disk size and requirements.
You’ll see a new page pop up, prompting you to confirm whether you want to begin making changes to the disk and configuring. Go ahead and choose “Yes” to confirm, then click “Continue.”
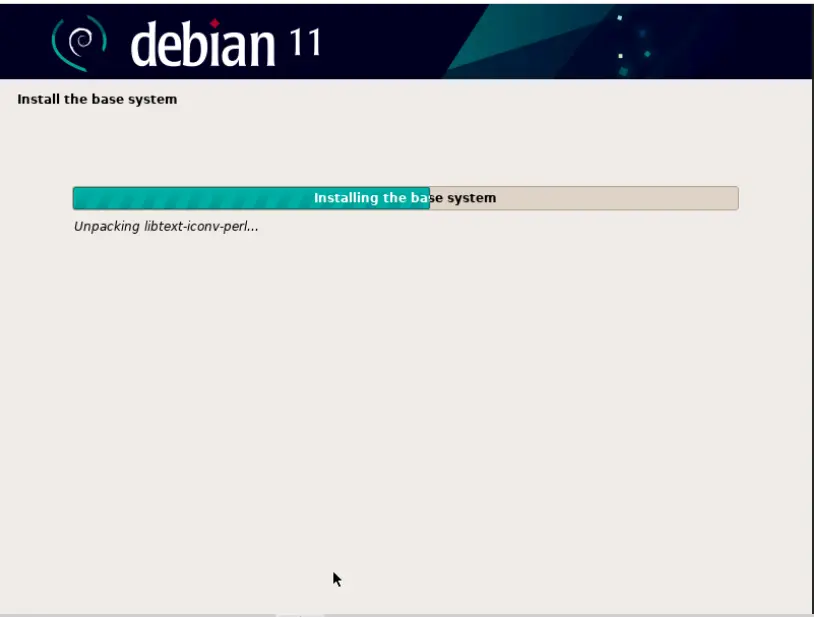
Step 6: Start Install Debian 11 the Base System
Debian will commence the installation of the base system files. This process might take a few minutes.
In a little while, a window will appear, requesting that you scan the installation media. To keep the installation moving forward, choose “No” and then click on “Continue.”
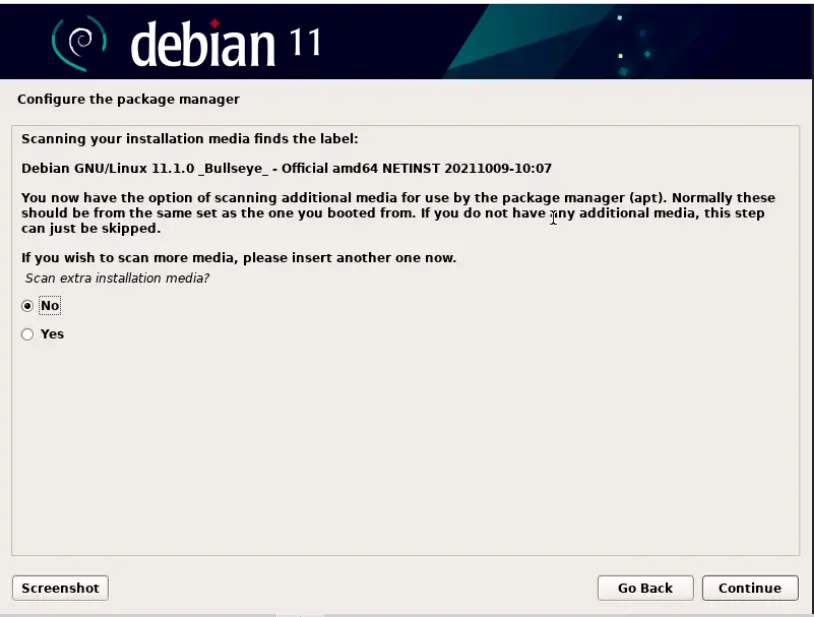
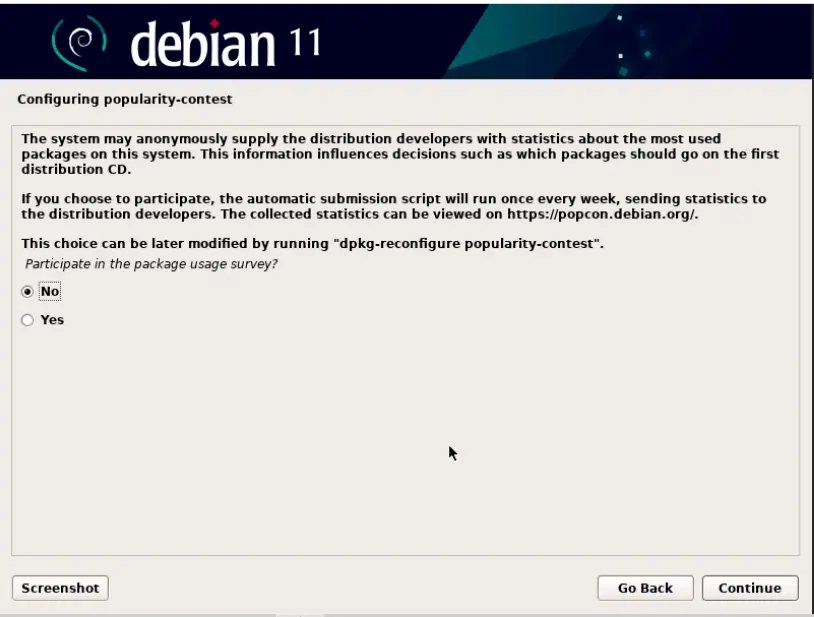
Step 7: Configure the Package Manager
Debian employs the Advanced Package Tool (APT) as its package manager. You’ll be asked to configure your package manager and software repositories. This is essential for keeping your system up to date. You can choose following options
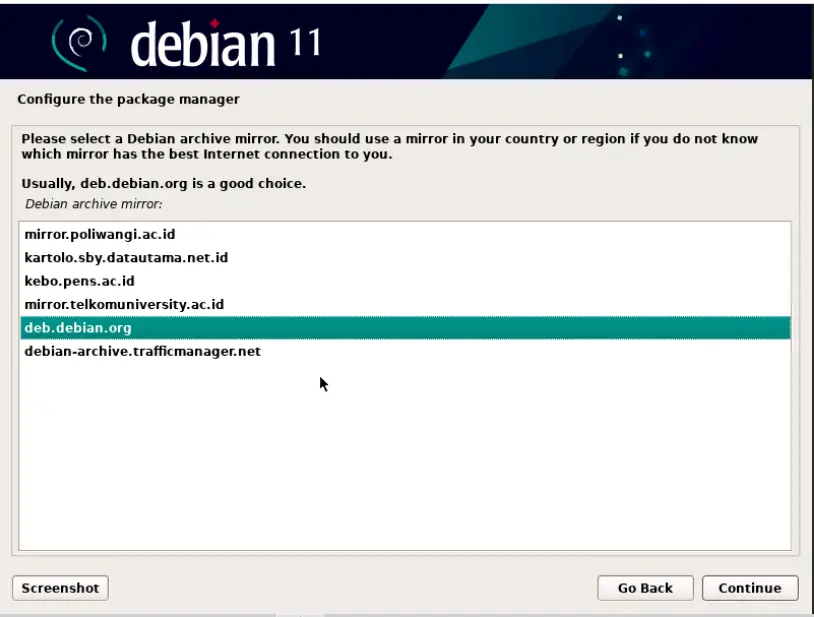
Hit “Continue” to move on to the next step. A page will show up where you can take part in the package survey. If you’d rather not participate, just click “No” and carry on.
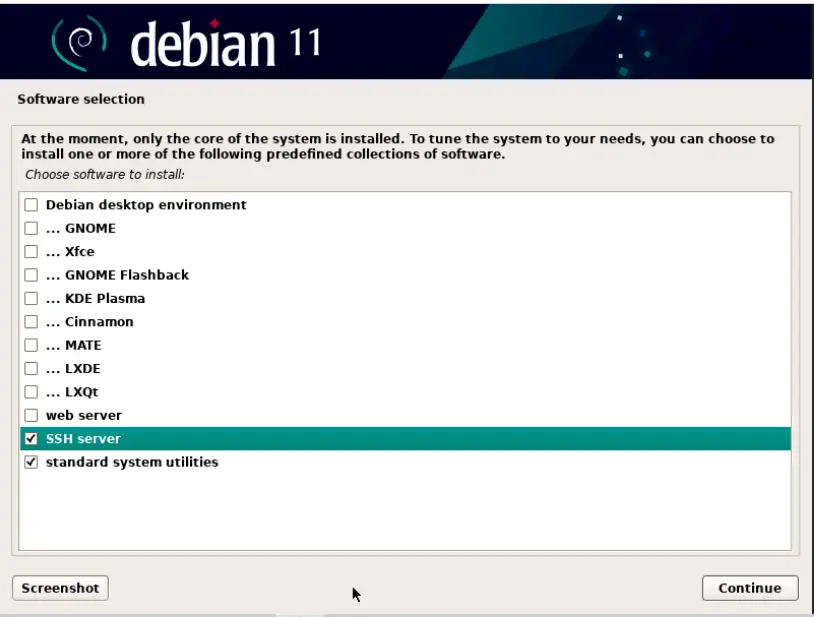
Step 8: Select Install Additional Software on Debian 11
Afterwards, you have the opportunity to select additional software packages to install. Choose the ones that align with your needs. Remember, you can always install more software later.
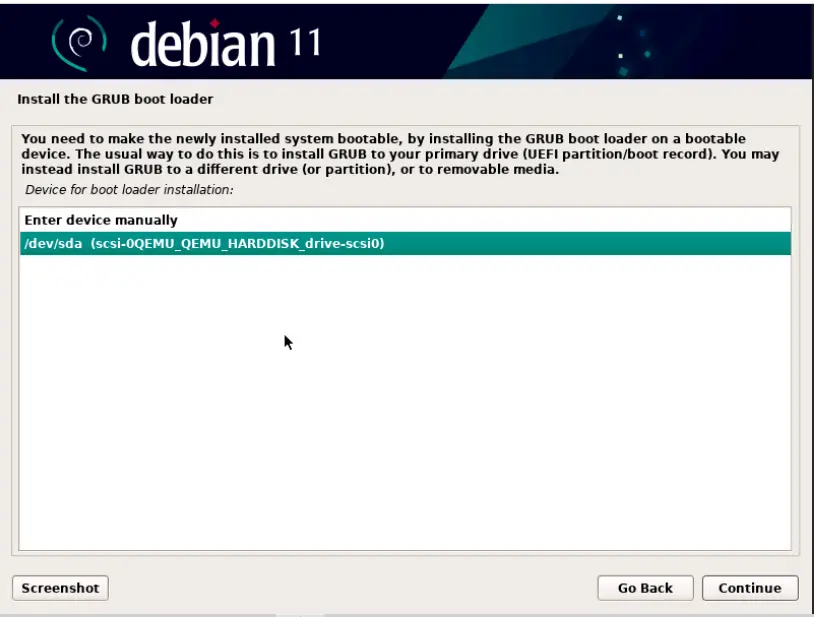
Step 9: Install the GRUB Bootloader for Debian 11
Generally Debian will inquire if you want to install the GRUB bootloader. Accept this option, as it’s crucial for booting your system.
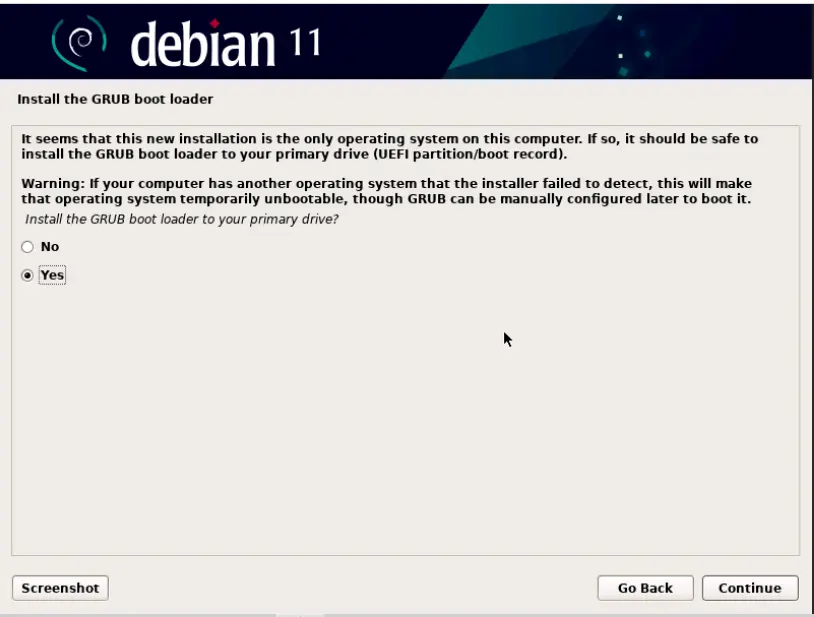
Now, for this step, you need to specify the disk where the grub loader will be installed. After that, click “Continue” and then press the Enter key to finish the installation process smoothly.
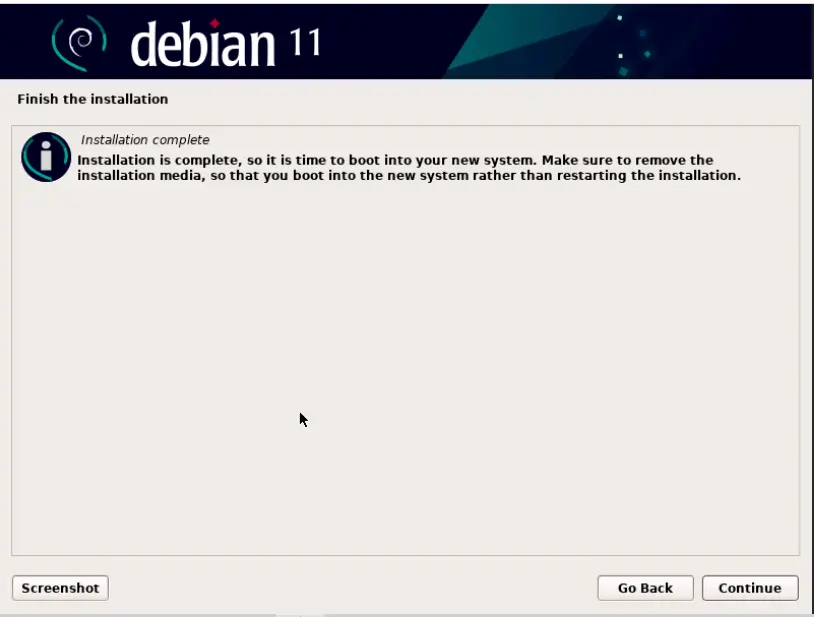
Step 10: Finishing Install Debian 11 (Bullseye) Server
Once the GRUB bootloader is installed, Debian will prompt you to remove the installation media and press Enter. Follow these instructions, and your system will gracefully reboot into Debian 11 (Bullseye).
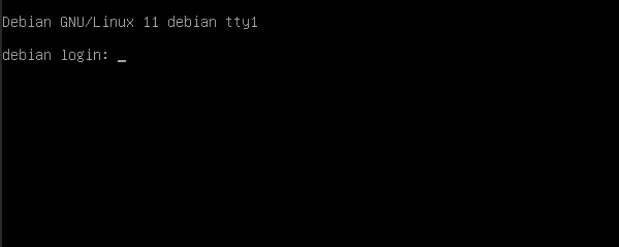
Once the installation is finished, it’s time to log in to your Debian Server. Here’s how: When you’ve completed the Debian 11 installation, your system will automatically restart to the GNU GRUB page. Just choose the first option and press the “Enter” key to move on to the next step.
Step 11: Post-Installation Tasks
Congratulations! Debian 11 (Bullseye) Server now graces your system. However, there are a few post-installation tasks to consider:
- Update and Upgrade: Execute
sudo apt updatefollowed bysudo apt upgradeto ensure your system is up to date. - Install Additional Software: Use
aptto install any additional software you require. For instance, to install a web browser, usesudo apt install firefox. - Customize Your Desktop: Debian offers various desktop environments. Pick one that resonates with your preferences and personalize it to your heart’s content.
- Secure Your System: Configure your firewall, optionally install antivirus software, and adhere to best practices for bolstering your system’s security.
Conclusion
Congratulations! You’ve successfully installed Debian 11 (Bullseye) Server. This user-friendly step-by-step guide has helped you through the entire process, from creating a bootable installation media to configuring your system.
Debian 11 is a versatile and stable Linux distribution that you can now explore and use for various purposes. Whether you’re a developer, a server administrator, or simply a Linux enthusiast, Debian 11 has something to offer.
Remember that Debian has a vast community and extensive documentation, so if you encounter any issues or want to explore advanced configurations, there’s a wealth of resources available to assist you on your Debian journey.
So go ahead, enjoy your Debian 11 experience, and keep exploring the open-source world!
Also Read Our Other Guides :
- How To Install Rocky Linux 9.2 Server with Screenshots
- How To Install Ubuntu Server 22.04 LTS with Screenshots
- How To Set Up a Firewall with UFW on Debian 11
- Initial Setup Debian 11 Server: Secure and Efficient
- Initial Setup CentOS 7 Server: Secure and Efficient
- Initial Setup Ubuntu Server 22.04: Secure and Efficient
- Initial Setup Rocky Linux 9 Server: Secure and Efficient
Finally, now you have learned how to install Debian 11 Server.


