


Are you tired of juggling multiple USB drives, each with a different operating system or tool? Creating a multiboot USB drive can save you time and space. In this step-by-step guide, we’ll show you installation of how to create multiboot USB drive with Ventoy in Linux. You’ll no longer need a stack of USB drives when you have the power of Ventoy bootable USB at your fingertips.
Table of Contents
What is Ventoy?
At the present time Ventoy is a free and open-source tool that simplifies the process of creating a multiboot USB drive. With Ventoy, you can simply copy ISO files to your USB drive, and it will automatically detect and display them in a boot menu when you start your computer from the bootable USB drive. This means you can have multiple operating systems and utility tools on a single USB drive, making it incredibly convenient.
Features of Ventoy
Ventoy includes numerous beneficial features, as detailed below.
- Easy to use and does not require high technical knowledge
- Comes with many configuration options
- Supports encryption and password protection to protect USB drives
- Free and open-source, so it can be downloaded and used by anyone
- Bootable USB drive that can load multiple operating systems or ISO files
- Works with various file system types, such as FAT32, NTFS, and exFAT
- Supports various types of ISO files, including operating systems, applications, and utilities
- No need to format or recreate the USB drive
- Available as CLI, native GUI and Web-based GUI.
Prerequisites
Before we dive into creating a multiboot USB drive with Ventoy, make sure you have the following:
- A USB drive with enough storage capacity to hold the ISO files of the operating systems and tools you want to include.
- A computer running a Linux distribution. This guide is focused on Linux, but Ventoy also works on Windows and macOS.
- Internet access to download Ventoy.
Create Multiboot USB Drives with Ventoy In Linux
Installation or creating bootable or multiboot USB drives in Linux using Ventoy is a convenient way to carry multiple operating systems and utilities in a single portable device. Ventoy is a user-friendly tool that simplifies the process. In this guide, we’ll walk you through the steps to create a multiboot USB drive using Ventoy in Linux. As I have said, Ventoy is accessible in CLI, native GUI, and Web-GUI versions.
Method 1: Create Multiboot USB Drive with Ventoy CLI
To begin installation of Ventoy, firstly you should identify the name of your USB drive. You can consult the following guide to explore various methods for obtaining disk drive information in Linux.
We will use the ‘fdisk’ command to discover the details of USB drive.
$ sudo fdisk -l

Disk /dev/sdb: 28.65 GiB, 30765219840 bytes, 60088320 sectors
Disk model: Cruzer Blade
Units: sectors of 1 * 512 = 512 bytes
Sector size (logical/physical): 512 bytes / 512 bytes
I/O size (minimum/optimal): 512 bytes / 512 bytes
Disklabel type: dos
Disk identifier: 0x774e7a77
As can be seen, the USB drive name is /dev/sdb.
Step 1: Download Ventoy
To get started, you need to download Ventoy. Open your web browser and visit the official Ventoy website. Look for the “Download” section and select the Linux download option. This will download a ZIP file containing the Ventoy installation package.
Step 2: Extract the Ventoy Files
Once the download is complete, then navigate to the directory where the .tar.gz file is located and extract its contents. You can do this using the archive manager or by running the following command in your terminal:
$ tar zxvf ventoy-1.0.96-linux.tar.gz
Step 3: Install Ventoy to the USB Drive
Before proceeding, plug in your USB drive. Be cautious, as all the data on the drive will be erased during this process. To install Ventoy to the USB drive, open your terminal and navigate to the directory where you extracted the Ventoy files. Then, run the following command:
$ cd ventoy-1.0.96/
Now, run the following command to create multiboot USB drive:
$ sudo sh Ventoy2Disk.sh -I /dev/sdb
Make sure to replace /dev/sdb with the actual device path of your USB drive. You can check the device path using the lsblk or fdisk -l command as I have shown.
Here, opting for an uppercase ‘I’ will ensure the installation of Ventoy on ‘sdb,’ regardless of its current status. Conversely, selecting lowercase ‘i’ will attempt to install Ventoy on ‘sdb’ but will fail if Ventoy is already present on the disk.
To enable support for secure boot, add the ‘-s’ flag to your command. It’s worth noting that, by default, this option is disabled.
$ sudo sh Ventoy2Disk.sh -I /dev/sdb
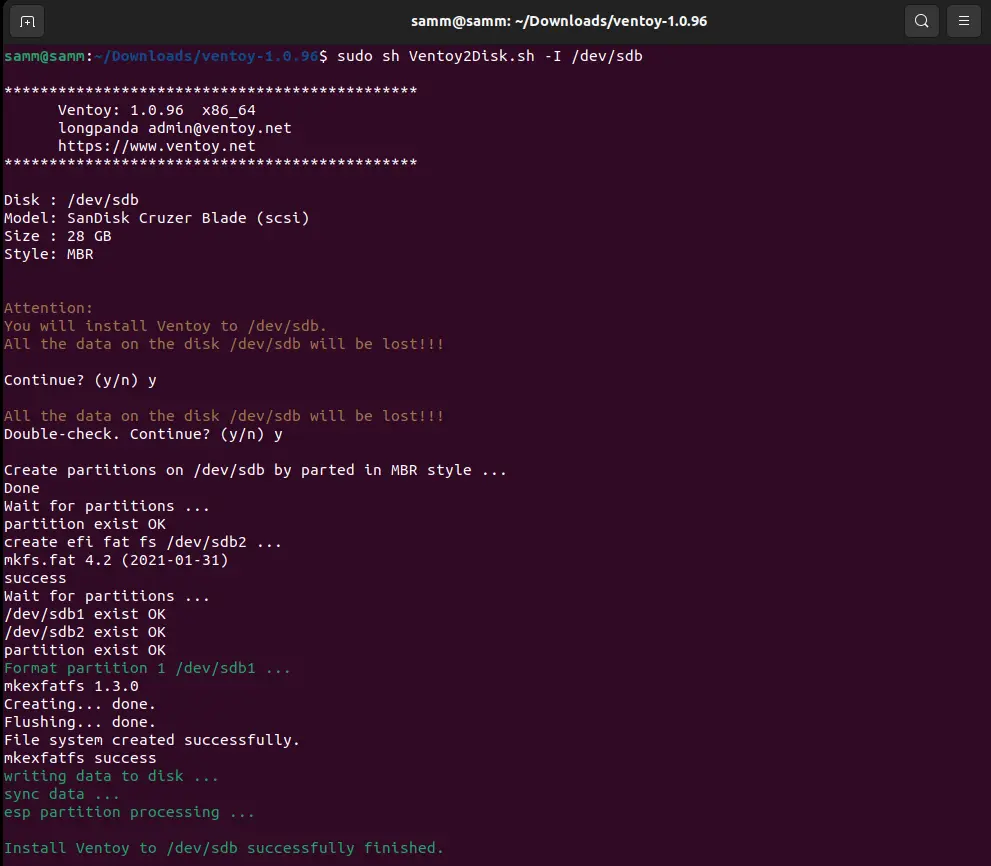
In just a few seconds, the multiboot USB drive will be generated. Subsequently, the command above will establish two partitions, which you can confirm using the ‘fdisk’ command.
$ sudo fdisk -l

[...]
Disk /dev/sdb: 28.65 GiB, 30765219840 bytes, 60088320 sectors
Disk model: Cruzer Blade
Units: sectors of 1 * 512 = 512 bytes
Sector size (logical/physical): 512 bytes / 512 bytes
I/O size (minimum/optimal): 512 bytes / 512 bytes
Disklabel type: dos
Disk identifier: 0x71a5b55b

Device     Boot    Start      End  Sectors  Size Id Type
/dev/sdb1  *        2048 60022783 60020736 28.6G  7 HPFS/NTFS/exFAT
/dev/sdb2       60022784 60088319    65536   32M ef EFI (FAT-12/16/32)
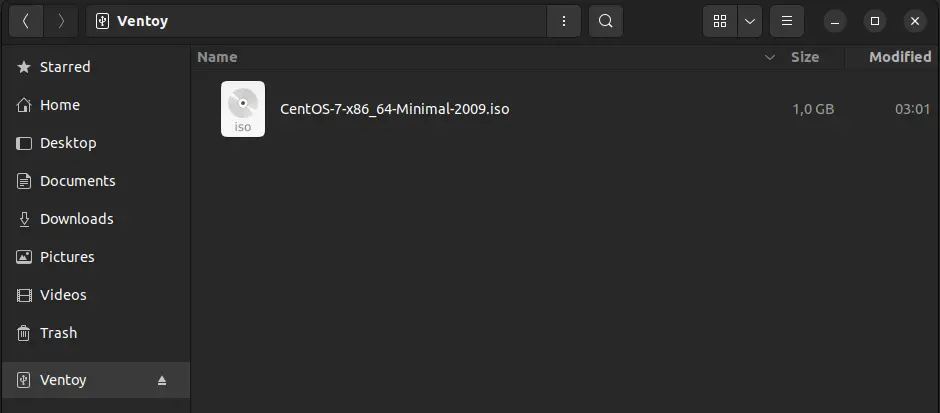
Step 4: Add ISO Files to Your Multiboot USB Drive
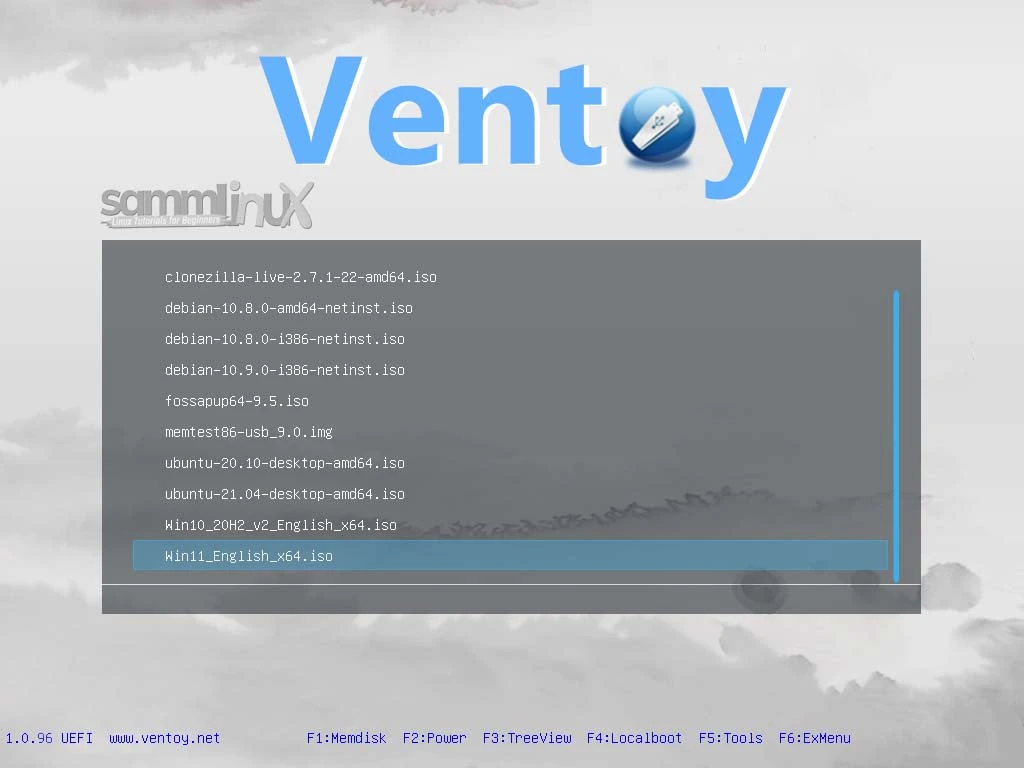
With Ventoy successfully installed on your USB drive, you can now add ISO files to it. Simply copy the ISO files of the operating systems or utility tools you want to include to the USB drive. Ventoy will automatically detect these files and make them available in the boot menu.
Step 5: Boot from Your Multiboot USB Drive
To test your newly created multiboot USB drive, plug it into the computer you want to boot from and restart the system. During startup, access the boot menu (usually by pressing F12 or another function key) and select the USB drive from the list of boot devices. Ventoy will present you with a menu listing the available ISO files. Choose the one you want to boot from, and you’re good to go.
Method 2: Create Multiboot USB Drive with Ventoy GUI
Initially, Ventoy lacked a graphical user interface on Linux platforms, limiting us to creating bootable USB drives solely through the command-line interface.
Setup Ventoy with GUI
Fortunately, starting from version 1.0.36, Ventoy introduced a web-based graphical user interface. Moreover, from version 1.0.52 onwards, it offers a native GUI using GTK/QT.
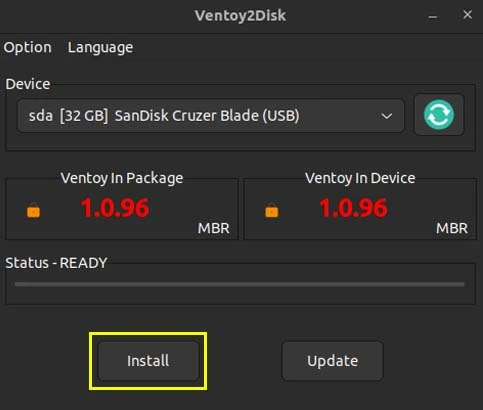
Compared to setup Ventoy with CLI, u sing the Ventoy GUI is incredibly straightforward. Despite its minimalistic design, it includes all the necessary tools to effortlessly create both single and multiboot bootable drives with just a couple of mouse clicks.
To begin, open your terminal and navigate to the directory where you’ve downloaded the latest Ventoy program.
$ cd Downloads/ventoy-1.0.96/
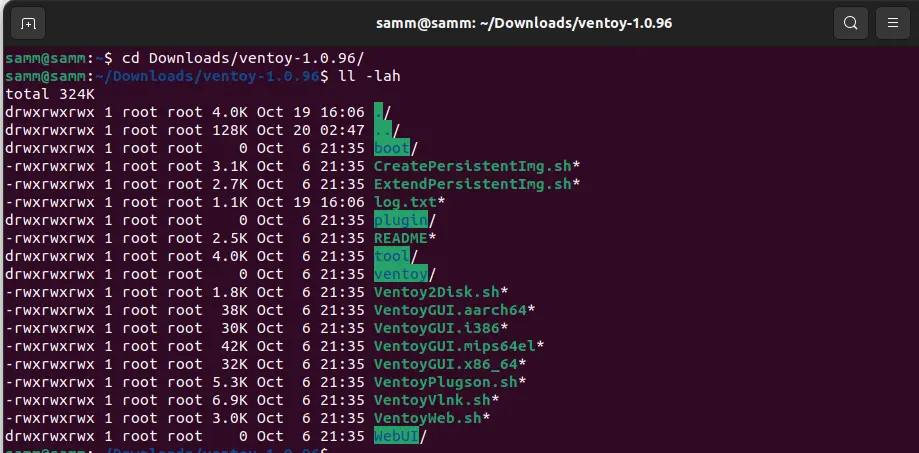
Select the relevant Ventoy GUI executable file based on your distribution’s architecture.
- If you are using an X86 32-bit OS, execute ‘VentoyGUI.i386.’
- For X86 64-bit OS, use ‘VentoyGUI.x86_64.’
- When working with an ARM64 OS, opt for ‘VentoyGUI.aarch64.’
- For Loongson 3A MIPS OS, the appropriate choice is ‘VentoyGUI.mips64el.’
In my case, as I’m using an Ubuntu X86 64-bit system, I run the following command:
$ ./VentoyGUI.x86_64
This is the appearance of the Ventoy GUI.
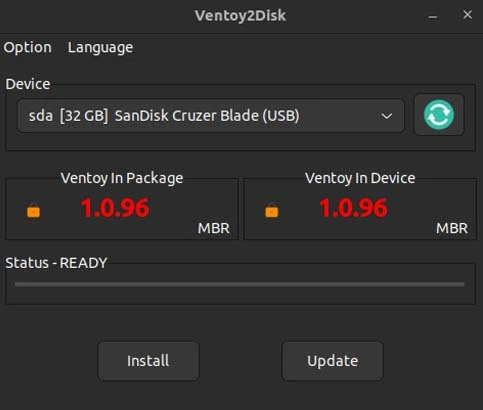
Ventoy automatically selects the connected USB drive. Nevertheless, I recommend verifying that the selected drive is indeed the USB drive you intend to format.
Ventoy Options and Language
To access the Ventoy options, click the ‘Options’ button in the menu bar.
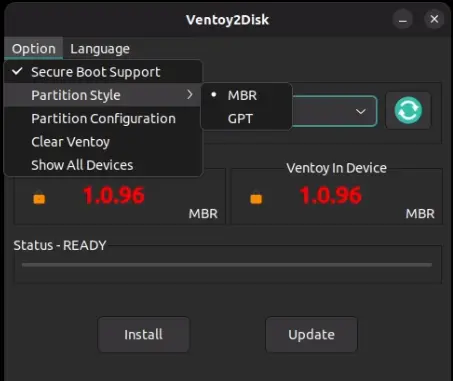
Within the ‘Options’ drop-down menu, you can perform the following actions:
- Secure Boot Support: Check or uncheck this option to enable or disable Secure Boot. By default, it is enabled (checked).
- Partition Style: Ventoy supports both MBR and GPT partition styles. The default setting is MBR.
- Partition Configuration: In this section, you can choose to reserve some free space at the end of the disk.
- Clear Ventoy: Use this option to remove Ventoy from your disk.
- Show All Devices: Check this option if you wish to display all connected devices, including your local disks. Exercise caution when using this option to avoid accidentally selecting and formatting a local disk.
Furthermore, the language button allows you to select your preferred language.
Updating Ventoy
You don’t have to recreate the bootable USB drive every time a new Ventoy version is released. Updating Ventoy to the latest version is a safe process that won’t result in any data loss on your USB drive.
To update your currently installed Ventoy version to the latest release, insert the USB drive and launch the Ventoy GUI as demonstrated earlier.
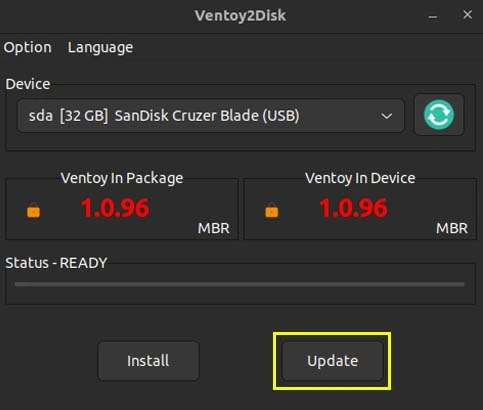
Within the Ventoy GUI, simply click on the ‘Update’ button.
Benefits of Using Ventoy
Ventoy offers several advantages when it comes to creating a multiboot USB drive:
- Simplicity: Ventoy is incredibly easy to set up and use. You don’t need to configure bootloader options or create bootable USB drives for each ISO file manually.
- Versatility: You can include a wide range of operating systems and tools on a single USB drive, making it an excellent tool for system administrators and IT professionals.
- Efficiency: Ventoy simplifies the process of keeping your multiboot USB drive up to date. Just copy or update the ISO files, and Ventoy will automatically detect and add them to the boot menu.
- Compatibility: In addition Ventoy is compatible with various Linux distributions, Windows, and macOS, making it a versatile solution for creating multiboot USB drives.
Tips and Troubleshooting
While Ventoy is a powerful tool, here are some tips and troubleshooting steps to ensure a smooth experience:
- Ensure your USB drive is large enough to accommodate the ISO files you intend to use.
- Always back up any important data on your USB drive before installing Ventoy, as the process will erase all existing data.
- If Ventoy doesn’t detect an ISO file, check its format and integrity. Ensure it’s a bootable ISO file.
- If you encounter issues with booting from the USB drive, make sure your system’s BIOS or UEFI settings are configured to allow booting from removable media.
Conclusion
Creating a multiboot USB drive with Ventoy in Linux is a practical and convenient way to carry multiple operating systems and utility tools in your pocket. Ventoy simplifies the process, and with our step-by-step guide, you can get started quickly.
Now, you have the power to choose the operating system or tool you need, whether you’re troubleshooting a system, installing a new operating system, or simply experimenting with different Linux distributions. Say goodbye to carrying multiple USB drives, and welcome the versatility of a Ventoy-powered multiboot USB drive!
First thing to remember with Ventoy, your USB drive becomes a versatile toolkit that can save you time and effort in various computing tasks. So, take the plunge and discover the world of multiboot USB drives with Ventoy in Linux.
Also Read Our Other Guides :
- How To Find Hard Disk Drive Information in Linux
- How To Use Rsync to Sync Local and Remote Directories in Linux
- How To Get Total Inodes and Increase Disk Inode Number in Linux
- How To Create and Use Swap File on Linux System
- How To Use Git Version Control on Linux: For Beginner
- The 40 Most-Used Linux Commands You Should Know
- 6 Methods To Search For Files By Name In Linux
Finally, now you have learned how to create Multiboot USB with Ventoy in Linux.


