


Are you looking to keep a close eye on your server’s performance and ensure it stays up and running smoothly? Uptime Kuma is the Open Source Monitoring tool like “Uptime Robot” that solution you need. In this step-by-step guide, we’ll show you how to install and setup Uptime Kuma on Ubuntu 22.04, making server uptime monitoring a breeze.
Table of Contents
Why Monitor Server Uptime?
Before we dive into the installation process, let’s briefly discuss why monitoring server uptime is essential. Your server is the heart of your online presence, whether it’s hosting a website, application, or critical services. Downtime can result in lost revenue, decreased productivity, and a negative impact on user experience. By tracking uptime, you can identify issues early, ensuring your server remains reliable.
Uptime Kuma Features
Here are some of important features:
- Open Source Monitoring, It monitors uptime for various protocols, including HTTP(s), TCP, HTTP(s) Keyword, Ping, DNS Record, Push, and Steam Game Server.
- It boasts an impressive, responsive, and fast user interface (UI/UX).
- Notifications can be sent through various channels, such as Telegram, Discord, Gotify, Slack, Pushover, Email (SMTP), and over 90 other notification services.
- It provides real-time monitoring at 20-second intervals.
- It supports multiple languages.
- Multiple status pages are available.
- You can easily map a status page to a domain.
- A visual ping chart is included.
- Certificate information is accessible.
- Proxy support is also included.
- Two-factor authentication (2FA) is an available security option.
Prerequisites
Before we dive into the installation process setup how to install Uptime Kuma on Ubuntu 22.04, there is prerequisite you need to ensure are in place:
- Ubuntu Server 22.04 : Make sure you have a clean installation of Ubuntu Server. You can deploy this on a physical machine or a virtual environment like Proxmox VE, VMware or VirtualBox. To set this up, follow our guide :
- NodeJS and NPM
- A stable internet connection.
Install Uptime Kuma on Ubuntu 22.04
Here’s a simple guide on how to setup or install and configure Open Source Server Monitoring Uptime Kuma on Ubuntu 22.04. By following these steps, you can tap into the advantages it offers.
To begin monitoring your server’s uptime with Uptime Kuma, follow these simple steps:
Step 1: Update Your Ubuntu System
Before installing any new software, it’s crucial to ensure your Ubuntu system is up to date. Open a terminal and run the following commands:
$ sudo apt update
$ sudo apt upgrade
This will update your package list and upgrade any outdated packages.
Step 2: Install NodeJS, NPM and PM2
Because Uptime Kuma is developed in Node.JS, it’s essential to install Node.JS before you proceed. We will install the most recent LTS release, which, as of writing this guide, is Node.JS 20.x.
Download and import the Nodesource GPG key
Install these dependencies by running following commands:
samm@ubuntu:~$ sudo apt-get install -y git curl
samm@ubuntu:~$ sudo mkdir -p /etc/apt/keyrings
samm@ubuntu:~$ curl -fsSL https://deb.nodesource.com/gpgkey/nodesource-repo.gpg.key | sudo gpg --dearmor -o /etc/apt/keyrings/nodesource.gpg
Create deb Repository
samm@ubuntu:~$ NODE_MAJOR=20
samm@ubuntu:~$ echo "deb [signed-by=/etc/apt/keyrings/nodesource.gpg] https://deb.nodesource.com/node_$NODE_MAJOR.x nodistro main" | sudo tee /etc/apt/sources.list.d/nodesource.list
Run Update and Install
$ sudo apt-get update
$ sudo apt-get install nodejs -y
Sample output:
Reading package lists... Done
Building dependency tree... Done
Reading state information... Done
The following NEW packages will be installed:
  nodejs
0 upgraded, 1 newly installed, 0 to remove and 1 not upgraded.
Need to get 31.1 MB of archives.
After this operation, 195 MB of additional disk space will be used.
Get:1 https://deb.nodesource.com/node_20.x nodistro/main amd64 nodejs amd64 20.8.1-1nodesource1 [31.1 MB]
Fetched 31.1 MB in 5s (5,829 kB/s)
Selecting previously unselected package nodejs.
(Reading database ... 109709 files and directories currently installed.)
Preparing to unpack .../nodejs_20.8.1-1nodesource1_amd64.deb ...
Unpacking nodejs (20.8.1-1nodesource1) ...
Setting up nodejs (20.8.1-1nodesource1) ...
Processing triggers for man-db (2.10.2-1) ...
Scanning processes...
Scanning linux images...
Verify NodeJS and NPM Installation
After that verify that you’ve installed the new version, by running following command:
samm@ubuntu:~$ node --version
v20.8.1
samm@ubuntu:~$ npm --version
10.1.0
Step 3: Download and Install Uptime Kuma
At this point, you’re ready to install the Uptime-Kuma application. Next, download the latest version of Uptime Kuma from the official repository on GitHub:
samm@ubuntu:~$ git clone https://github.com/louislam/uptime-kuma.git
The output will be similar to this:
Cloning into 'uptime-kuma'...
remote: Enumerating objects: 28972, done.
remote: Counting objects: 100% (181/181), done.
remote: Compressing objects: 100% (104/104), done.
remote: Total 28972 (delta 95), reused 130 (delta 77), pack-reused 28791
Receiving objects: 100% (28972/28972), 22.88 MiB | 4.94 MiB/s, done.
Resolving deltas: 100% (21756/21756), done.
Next, navigate to the Uptime Kuma directory.
samm@ubuntu:~$ cd uptime-kuma/
Then, set up the monitoring tool using the following command:
samm@ubuntu:~/uptime-kuma$ npm run setup
The command generates the following output.
> [email protected] setup
> git checkout 1.23.3 && npm ci --production && npm run download-dist

Note: switching to '1.23.3'.

You are in 'detached HEAD' state. You can look around, make experimental
changes and commit them, and you can discard any commits you make in this
state without impacting any branches by switching back to a branch.

If you want to create a new branch to retain commits you create, you may
do so (now or later) by using -c with the switch command. Example:

  git switch -c <new-branch-name>

Or undo this operation with:

  git switch -

Turn off this advice by setting config variable advice.detachedHead to false

.....

added 682 packages, and audited 683 packages in 16s

113 packages are looking for funding
  run `npm fund` for details

found 0 vulnerabilities

> [email protected] download-dist
> node extra/download-dist.js

Downloading dist
https://github.com/louislam/uptime-kuma/releases/download/1.23.3/dist.tar.gz
https://objects.githubusercontent.com/github-production-release-asset-2e65be/382496361/225854c9-f907-4097-b589-d51dec762f4b?X-Amz-Algorithm=AWS4-HMAC-SHA256&X-Amz-Credential=AKIAIWNJYAX4CSVEH53A%2F20231021%2Fus-east-1%2Fs3%2Faws4_request&X-Amz-Date=20231021T044034Z&X-Amz-Expires=300&X-Amz-Signature=e5a09b6bcf28b90cf007b76e66bc3d808867c29a8013b958ef9291c58c7de620&X-Amz-SignedHeaders=host&actor_id=0&key_id=0&repo_id=382496361&response-content-disposition=attachment%3B%20filename%3Ddist.tar.gz&response-content-type=application%2Foctet-stream
Extracting dist...
Done
Step 4: Run Uptime Kuma with PM2
Before we run uptime using PM2, it is important to relocate the folder to /opt.
samm@ubuntu:~$ sudo mv uptime-kuma/ /opt/
Install PM2
PM2 serves as a production process manager for NodeJS applications, offering a load balancer and ensuring applications stay active continuously. It also enables seamless reloading without causing any interruptions or service downtime. To install the PM2, run the following command :
samm@ubuntu:~$ cd /opt/uptime-kuma/
samm@ubuntu:/opt/uptime-kuma$ sudo npm install pm2 -g && pm2 install pm2-logrotate
Sample output:
npm WARN deprecated [email protected]: Please upgrade  to version 7 or higher.  Older versions may use Math.random() in certain circumstances, which is known to be problematic.  See https://v8.dev/blog/math-random for details.

added 156 packages in 14s

12 packages are looking for funding
  run `npm fund` for details
npm notice
npm notice New minor version of npm available! 10.1.0 -> 10.2.1
npm notice Changelog: https://github.com/npm/cli/releases/tag/v10.2.1
npm notice Run npm install -g [email protected] to update!
npm notice
After that, run the Uptime Kumar server in the background using PM2
samm@ubuntu:/opt/uptime-kuma$ pm2 start server/server.js --name uptime-kuma
The command generates the following output.
[PM2] Starting /opt/uptime-kuma/server/server.js in fork_mode (1 instance)
[PM2] Done.
┌────┬──────────────────┬─────────────┬─────────┬─────────┬──────────┬────────┬──────┬───────────┬──────────┬──────────┬──────────┬──────────┐
│ id │ name             │ namespace   │ version │ mode    │ pid      │ uptime │ ↺    │ status    │ cpu      │ mem      │ user     │ watching │
├────┼──────────────────┼─────────────┼─────────┼─────────┼──────────┼────────┼──────┼───────────┼──────────┼──────────┼──────────┼──────────┤
│ 1  │ uptime-kuma      │ default     │ 1.23.3  │ fork    │ 2330     │ 0s     │ 0    │ online    │ 0%       │ 37.6mb   │ samm     │ disabled │
└────┴──────────────────┴─────────────┴─────────┴─────────┴──────────┴────────┴──────┴───────────┴──────────┴──────────┴──────────┴──────────┘
Module
┌────┬──────────────────────────────┬───────────────┬──────────┬──────────┬──────┬──────────┬──────────┬──────────┐
│ id │ module                       │ version       │ pid      │ status   │ ↺    │ cpu      │ mem      │ user     │
├────┼──────────────────────────────┼───────────────┼──────────┼──────────┼──────┼──────────┼──────────┼──────────┤
│ 0  │ pm2-logrotate                │ 2.7.0         │ 2302     │ online   │ 0    │ 0%       │ 57.0mb   │ samm     │
└────┴──────────────────────────────┴───────────────┴──────────┴──────────┴──────┴──────────┴──────────┴──────────┘
Next, enable the Node.js application to start after a reboot.
samm@ubuntu:/opt/uptime-kuma$ pm2 startup
The command generates the following output.
[PM2] Init System found: systemd
[PM2] To setup the Startup Script, copy/paste the following command:
sudo env PATH=$PATH:/usr/bin /usr/lib/node_modules/pm2/bin/pm2 startup systemd -u samm --hp /home/samm
The command above examines your init system type and furnishes you with the necessary command to generate the PM2 service unit. Simply copy the script command provided by PM2 and execute it on your system.
samm@ubuntu:/opt/uptime-kuma$ sudo env PATH=$PATH:/usr/bin /usr/lib/node_modules/pm2/bin/pm2 startup systemd -u samm --hp /home/samm
The command generates the following output.
                        -------------

__/\\\\\\\\\\\\\____/\\\\____________/\\\\____/\\\\\\\\\_____
 _\/\\\/////////\\\_\/\\\\\\________/\\\\\\__/\\\///////\\\___
  _\/\\\_______\/\\\_\/\\\//\\\____/\\\//\\\_\///______\//\\\__
   _\/\\\\\\\\\\\\\/__\/\\\\///\\\/\\\/_\/\\\___________/\\\/___
    _\/\\\/////////____\/\\\__\///\\\/___\/\\\________/\\\//_____
     _\/\\\_____________\/\\\____\///_____\/\\\_____/\\\//________
      _\/\\\_____________\/\\\_____________\/\\\___/\\\/___________
       _\/\\\_____________\/\\\_____________\/\\\__/\\\\\\\\\\\\\\\_
        _\///______________\///______________\///__\///////////////__


                          Runtime Edition

        PM2 is a Production Process Manager for Node.js applications
                     with a built-in Load Balancer.

                Start and Daemonize any application:
                $ pm2 start app.js

                Load Balance 4 instances of api.js:
                $ pm2 start api.js -i 4

                Monitor in production:
                $ pm2 monitor

                Make pm2 auto-boot at server restart:
                $ pm2 startup

                To go further checkout:
                http://pm2.io/
.....
Step 5: Setup Proxy Server on Ubuntu 22.04 (optional)
To access the Uptime Kuma web interface, you can open a web browser on the local system where it’s installed. Simply direct the browser to the server’s IP address and utilize port number 3001, as Kuma typically runs on this port by default.
http://server-ip-address:3001
If you’re using a firewall, allow traffic on the port that Uptime Kuma is running on. By default, Uptime Kuma uses port 3001:
samm@ubuntu:~$ sudo ufw allow 3001/tcp
samm@ubuntu:~$ sudo ufw reload
However, if you want to use the reverse proxy server then here are the commands to do that.
Configure Nginx as a Reverse Proxy for Uptime-Kuma
To use nginx, you will be installing and configuring the nginx web server as a reverse proxy for the uptime-Kuma application. To set up this, you can follow theese guide:
- How To Build NGINX from Source (Compile) on Ubuntu Server 22.04
- How To Install Nginx on Ubuntu 22.04: A Comprehensive Guide
Create Nginx server block or virtual host file for Uptime-Kuma:
samm@ubuntu:~$ sudo vi /etc/nginx/conf.d/uptime-kuma.conf
Now, add the following lines:
server {
    listen                  80;
    listen                  [::]:80;
    server_name             uptime.sammlinux.com;
    server_tokens           off;

    location / {
        proxy_set_header    Host $host;
        proxy_set_header    X-Real-IP $remote_addr;
        proxy_set_header    X-Forwarded-For $proxy_add_x_forwarded_for;
        proxy_set_header    X-Forwarded-Proto $scheme;
        proxy_set_header    Upgrade $http_upgrade;
        proxy_set_header    Connection "upgrade";
        proxy_pass          http://localhost:3001/;
        }
    }
Replace the server_name with your domain. Then restart the Nginx web service for the changes to take effect.
samm@ubuntu:~$ sudo systemctl restart nginx
Configure Apache as a Reverse Proxy for Uptime-Kuma
Next, you need to install the Apache web and later configure it to serve as a reverse proxy for Uptime Kuma. To set up this, you can follow this guide:
Once installed, enable the following modules which will be required by the monitoring tool on Debian-based systems.
samm@ubuntu:~$ sudo a2enmod ssl proxy proxy_ajp proxy_wstunnel proxy_http rewrite deflate headers proxy_balancer proxy_connect proxy_html
Next, create a new virtual-host configuration ‘uptime-kuma.conf’ using following command:
samm@ubuntu:~$ sudo vi /etc/apache2/sites-available/uptime-kuma.conf
Now, add the following lines:
<VirtualHost *:80>
  ServerName uptime.sammlinux.com;

  ProxyPass / http://localhost:3001/
  RewriteEngine on
  RewriteCond %{HTTP:Upgrade} websocket [NC]
  RewriteCond %{HTTP:Connection} upgrade [NC]
  RewriteRule ^/?(.*) "ws://localhost:3001/$1" [P,L]
</VirtualHost>
Disable default Apache configuration:
samm@ubuntu:~$ sudo a2dissite 000-default.conf
Enable the one you have created for Uptime Kuma:
samm@ubuntu:~$ sudo a2ensite uptime-kuma.conf
Reload Apache
samm@ubuntu:~$ sudo systemctl reload apache2
Step 6: Configure the Firewall
If you’re using a firewall, allow traffic on the port that Uptime Kuma is running on. At this point allow HTTP (80) and HTTPS (443) traffic using following commands:
samm@ubuntu:~$ sudo ufw allow http
samm@ubuntu:~$ sudo ufw allow https
samm@ubuntu:~$ sudo ufw reload
Step 7: Access Uptime Kuma from the WebUI
Once you’ve setup Nginx or Apache as a proxy server, you can access Kuma’s web interface to configure it.
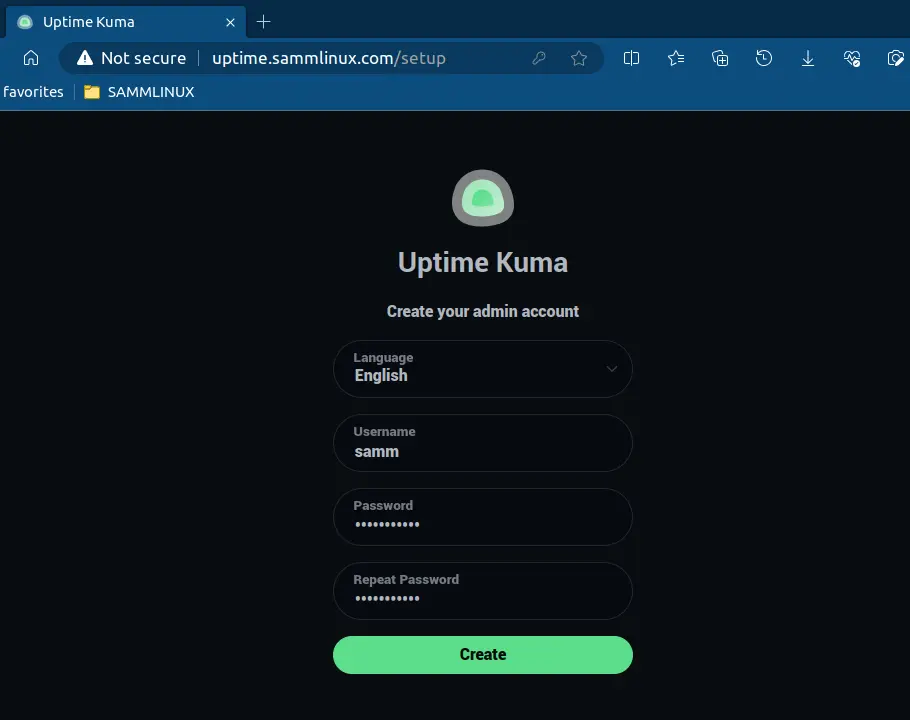
Open your web browser and access Uptime Kuma by entering your server’s IP address followed by port 3001 or domain (e.g., http://your_server_ip:3001 or uptime.sammlinux.com). You should see following the Uptime Kuma setup screen.
This will log you into Uptime Kuma’s dashboard.
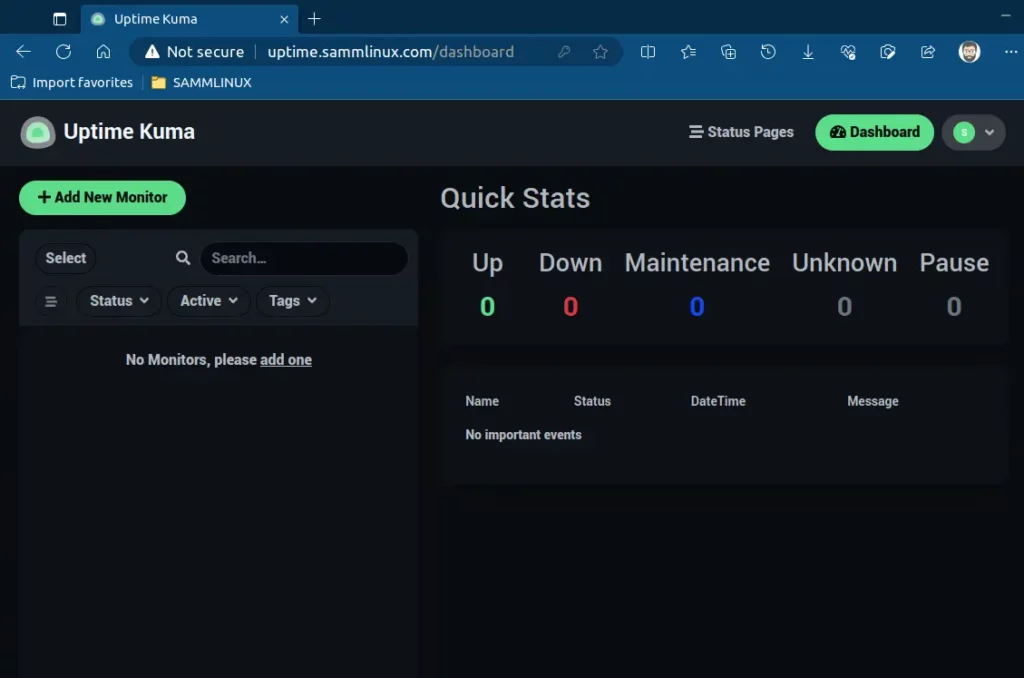
To initiate website monitoring, simply click the ‘Add New Monitor’ button and provide the necessary details for the site you wish to monitor.

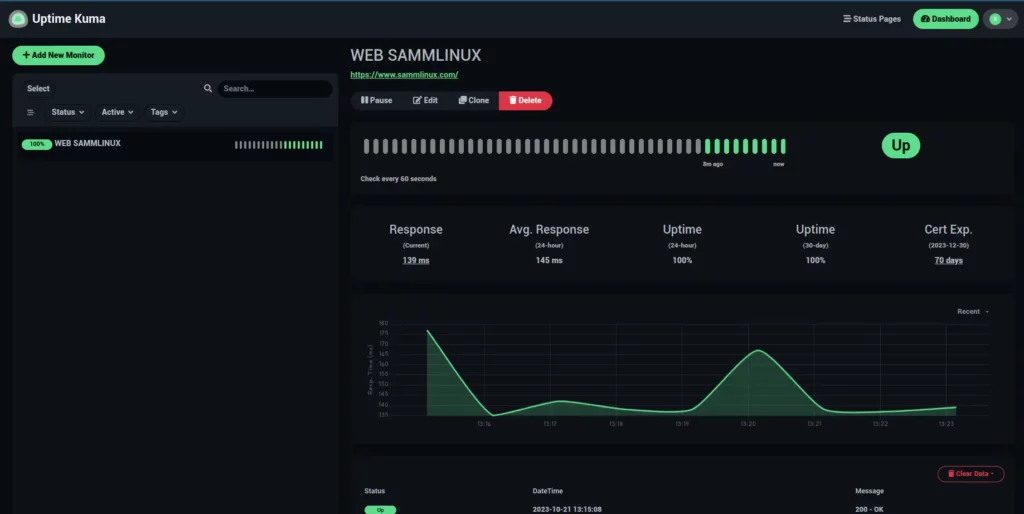
Soon after, Uptime Kuma will commence monitoring your site and display a range of uptime metrics, as demonstrated.
Conclusion
With Uptime Kuma installed and setup on your Ubuntu 22.04 server, you can effortlessly monitor your server’s uptime and address any issues promptly. Most important don’t let server downtime catch you off guard – take control of your server’s reliability today!
In this guide, we’ve covered the installation of Uptime Kuma, but remember that server monitoring is an ongoing process. Regularly check the Uptime Kuma interface to stay informed about your server’s performance and resolve any incidents as they arise. Enjoy the peace of mind that comes with knowing your server is up and running smoothly.
Also Read Our Other Guides :
- How To Install Ubuntu Server 22.04 LTS with Screenshots
- How To Install Python 3.11 on Rocky Linux 9
- How To Install MySQL 8.0 on Ubuntu Server 22.04
- How To Install MariaDB 10.6 on Debian 11 Server
- How To Create AWS CloudFront: A Step-by-Step Guide
- A Simple Guide: How To Manage Groups on Linux
Finally, now you have learned how to install Uptime Kuma on Ubuntu 22.04.


