


Introduction
In the world of data storage and management, object storage has gained significant traction due to its scalability, flexibility, and cost-effectiveness. MinIO, an open-source object storage server, has emerged as a popular choice for organizations seeking to harness the power of object storage. In this guide, we will walk you through the step-by-step process of installing MinIO Object Storage Server on a Rocky Linux distribution, enabling you to unlock the potential of distributed object storage.
Key Features
Key features of MinIO storage include:
- Scalability: MinIO can scale to accommodate large amounts of data, making it suitable for both small-scale deployments and large enterprise solutions.
- High Performance: MinIO is designed to deliver high throughput and low latency, optimized for data-intensive workloads.
- Elasticity: It can be easily deployed in a distributed mode, allowing for seamless expansion as the storage needs grow.
- Erasure Coding: MinIO supports erasure coding, a data protection technique that allows for data redundancy and fault tolerance without the need for traditional replication.
- Data Security: MinIO offers various security features, including encryption at rest and in transit, to ensure the confidentiality and integrity of stored data.
- S3 Compatibility: MinIO is API-compatible with Amazon S3, meaning applications and tools built to work with S3 can be easily adapted to use MinIO.
- Self-Healing: MinIO can automatically detect and recover from hardware failures, ensuring data availability.
- Lifecycle Management: It supports data lifecycle policies, allowing users to define rules for automatic data migration or deletion based on specified criteria.
- Integration with Kubernetes: MinIO can be deployed as a stateful set in Kubernetes, facilitating cloud-native storage setups.
Prerequisites
Before we dive into the installation process, ensure that you have:
- A server running Rocky Linux with root access or sudo privileges. To set this up, follow our guide : Initial Setup Ubuntu Server 22.04: Secure and Efficient
- A non-root user with sudo/root privileges.
- An additional disk or directory will be used as object storage.
- For production, you will need a domain name pointed to the Rocky Linux server IP address.
Install MinIO on Rocky Linux
As shown above, follow these detailed steps to Install MinIO on Rocky Linux server and streamline your object storage management processes:
Continuation from Part 1..
How To Install a MinIO Object Storage Server on Rocky Linux
Step 4: Configuring MinIO Object Storage
In this phase, a new configuration will be set up for MinIO, resulting in the formation of a fresh configuration file intended for the execution of the MinIO service. The MinIO configuration file is projected to be located within ‘/etc/minio’, with the necessary service-operating configuration expected to be found at ‘/etc/default/minio’.
To initiate the process, execute the subsequent command in order to establish a fresh, specialized system user intended for MinIO. This designated user will serve the purpose of operating the MinIO service.
[samm@minio ~]$ sudo useradd -r minio -s /sbin/nologin
Next, change the ownership of the object storage directory ‘/data’ to the user and group ‘minio’.
[samm@minio ~]$ sudo chown -R minio:minio /data
After changing ownership for the object storage directory, proceed to create a new configuration directory at ‘/etc/minio’. Generate the default configuration file for MinIO service execution, which can be found at ‘/etc/default/minio’.
Run the following command to create a configuration directory ‘/etc/minio’ and change the ownership of the new directory to user ‘minio’.
[samm@minio ~]$ sudo mkdir -p /etc/minio
[samm@minio ~]$ sudo chown -R minio:minio /etc/minio
Create a new MinIO configuration file ‘/etc/default/minio’
[samm@minio ~]$ sudo vi /etc/default/minio
Paste the following lines in the file.
MINIO_ROOT_USER="minio"
MINIO_VOLUMES="/data"
MINIO_OPTS="-C /etc/minio --address :9000 --console-address :9001"
MINIO_ROOT_USER=admin
MINIO_ROOT_PASSWORD="YourPassword"
Save the file and exit the editor once you have completed your changes.
Next, run the following command to change the ownership of the MinIO configuration file ‘/etc/default/minio’ to the correct user ‘minio’.
[samm@minio ~]$ sudo chown minio:minio /etc/default/minio
Congratulations! You’ve effectively established the MinIO configuration directory and settings for installation. With this accomplished, you’re ready to commence MinIO. To streamline the process, you’ll be launching MinIO as a systemd service.
Step 5: Configuring MinIO Object Storage as a Systemd Service
Once the configuration directory and file for MinIO have been successfully generated, the next step involves configuring MinIO as a systemd service. This configuration enables seamless management of MinIO through the utilization of the ‘systemctl’ command on your terminal server.
Create a new systemd service file ‘/lib/systemd/system/minio.service’.
[samm@minio ~]$ sudo vi /lib/systemd/system/minio.service
Paste the following lines in the file.
[Unit]
Description=Minio
Documentation=https://docs.minio.io
Wants=network-online.target
After=network-online.target
AssertFileIsExecutable=/usr/local/bin/minio

[Service]
WorkingDirectory=/usr/local/

User=minio
Group=minio

EnvironmentFile=-/etc/default/minio
ExecStartPre=/bin/bash -c "if [ -z \"${MINIO_VOLUMES}\" ]; then echo \"Variable MINIO_VOLUMES not set in /etc/default/minio\"; exit 1; fi"

ExecStart=/usr/local/bin/minio server $MINIO_OPTS $MINIO_VOLUMES

# Let systemd restart this service always
Restart=always

# Specifies the maximum file descriptor number that can be opened by this process
LimitNOFILE=65536

# Disable timeout logic and wait until the process is stopped
TimeoutStopSec=infinity
SendSIGKILL=no

[Install]
WantedBy=multi-user.target
Save the file and exit the editor once you have completed your changes.
Once you’ve established the systemd service for MinIO, execute the following command to refresh the systemd manager.
[samm@minio ~]$ sudo systemctl daemon-reload
Now start and enable the ‘minio’ service using the below command.
[samm@minio ~]$ sudo systemctl start minio.service

[samm@minio ~]$ sudo systemctl enable minio.service
Created symlink /etc/systemd/system/multi-user.target.wants/minio.service → /usr/lib/systemd/system/minio.service.
The ‘minio‘ service should now be running and enabled. verify the ‘minio‘ service via the systemctl command below.
[samm@minio ~]$ sudo systemctl status minio.service
● minio.service - Minio
     Loaded: loaded (/usr/lib/systemd/system/minio.service; enabled; preset: disabled)
     Active: active (running) since Tue 2023-07-25 12:24:18 EDT; 1min 29s ago
       Docs: https://docs.minio.io
   Main PID: 161612 (minio)
      Tasks: 10 (limit: 23169)
     Memory: 171.1M
        CPU: 961ms
     CGroup: /system.slice/minio.service
             └─161612 /usr/local/bin/minio server -C /etc/minio --address :9000 --console-address :9001 /data

Jul 25 12:24:18 minio minio[161612]: Copyright: 2015-2023 MinIO, Inc.
Jul 25 12:24:18 minio minio[161612]: License: GNU AGPLv3 <https://www.gnu.org/licenses/agpl-3.0.html>
Jul 25 12:24:18 minio minio[161612]: Version: RELEASE.2023-07-18T17-49-40Z (go1.19.11 linux/amd64)
Jul 25 12:24:18 minio minio[161612]: Status:         1 Online, 0 Offline.
Jul 25 12:24:18 minio minio[161612]: S3-API: http://172.32.1.222:9000  http://127.0.0.1:9000
Jul 25 12:24:18 minio minio[161612]: Console: http://172.32.1.222:9001 http://127.0.0.1:9001
Jul 25 12:24:18 minio minio[161612]: Documentation: https://min.io/docs/minio/linux/index.html
Jul 25 12:24:18 minio minio[161612]: Warning: The standard parity is set to 0. This can lead to data loss.
Jul 25 12:24:19 minio minio[161612]:  You are running an older version of MinIO released 3 days ago
Jul 25 12:24:19 minio minio[161612]:  Update: Run `mc admin update`
After completing the setup, MinIO is operational on the default port 9000. You can confirm its status by accessing your server’s IP address, followed by TCP port 9000. However, prior to this, it’s essential to configure port openings on firewalld.
Step 6: Configure Firewall for MinIO Object Storage
To begin, initiate the process by unlocking the essential ports 9000 and 9001 utilized by the MinIO server. Additionally, ensure the HTTP and HTTPS ports are accessible to facilitate SSL-enabled connections.
Use the following command to open the required firewall ports.
[samm@minio ~]$ sudo firewall-cmd –zone=public –add-port=9000/tcp –permanent
[samm@minio ~]$ sudo firewall-cmd –zone=public –add-port=9001/tcp –permanent
Enable HTTP and HTTPS access.
[samm@minio ~]$ sudo firewall-cmd --zone=public --add-service=http --permanent
[samm@minio ~]$ sudo firewall-cmd --zone=public --add-service=https --permanent
Reload the Firewall to apply the changes.
[samm@minio ~]$ sudo firewall-cmd --reload
Verify the list of enabled rules on firewalld, you should see ports 9000, 9001 and http, https service added to the firewalld.
[samm@minio ~]$ sudo firewall-cmd --list-all
public (active)
  target: default
  icmp-block-inversion: no
  interfaces: ens18
  sources:
  services: cockpit dhcpv6-client http https ssh
  ports: 80/tcp 443/tcp 9000/tcp 9001/tcp
  protocols:
  forward: yes
  masquerade: no
  forward-ports:
  source-ports:
  icmp-blocks:
  rich rules:
Step 7: Securing MinIO Object Storage with SSL Certificates
The Certbot tool employs the Let’s Encrypt API for SSL certificate requests, necessitating the installation of the EPEL repository.
Install EPEL repository.
[samm@minio ~]$ sudo dnf install epel-release
Install Certbot.
[samm@minio ~]$ sudo dnf install certbot
Request an SSL certificate for MinIO using standalone mode.
[samm@minio ~]$ sudo certbot certonly --standalone --agree-tos --no-eff-email --preferred-challenges http -m [email protected] -d minio.sammlinux.com
Now that the certificate is accessible in the /etc/letsencrypt/live/minio.sammlinux.com directory, proceed by transferring the certificate files to the /etc/minio/certs folder.
[samm@minio ~]$ sudo cp /etc/letsencrypt/live/minio.sammlinux.com/privkey.pem /etc/minio/certs/private.key
[samm@minio ~]$ sudo cp /etc/letsencrypt/live/minio.sammlinux.com/fullchain.pem /etc/minio/certs/public.crt
Change the ownership of the certificates.
[samm@minio ~]$ sudo chown minio:minio /etc/minio/certs/private.key
[samm@minio ~]$ sudo chown minio:minio /etc/minio/certs/public.crt
Next, open the MinIO configuration file ‘/etc/default/minio’
[samm@minio ~]$ sudo vi /etc/default/minio
Add the option ‘MINIO_SERVER_URL’ configuration and change the domain name with your domain.
MINIO_SERVER_URL="https://minio.sammlinux.com:9000"
Once you’ve completed your changes, save the file and exit the editor.
Whenever you make modifications to the ‘/etc/default/minio’ file, use the following systemctl command to restart the ‘minio’ service and apply the changes you’ve made.
[samm@minio ~]$ sudo systemctl restart minio
Create the file /etc/minio/copy-cert.sh to copy the certificates after every renewal and open it for editing.
[samm@minio ~]$ sudo vi /etc/minio/copy-cert.sh
Paste the following code.
#!/bin/sh
cp -f /etc/letsencrypt/live/minio.sammlinux.com/privkey.pem /etc/minio/certs/private.key
cp -f /etc/letsencrypt/live/minio.sammlinux.com/fullchain.pem /etc/minio/certs/public.crt
Make the file executable.
[samm@minio ~]$ sudo chmod +x /etc/minio/copy-cert.sh
Edit the file /etc/letsencrypt/renewal/minio.sammlinux.com.conf
[samm@minio ~]$ sudo nano /etc/letsencrypt/renewal/minio.sammlinux.com.conf
Add the following line at the bottom.
post_hook = /etc/minio/copy-cert.sh
Save the file. The post_hook option runs the copy-cert.sh script after every renewal eliminating the need to copy the certificates manually.
Step 8: Access MinIO Web Console
By simply opening the URL https://your-minio-domain:9001 in your browser, you can access MinIO. Enter the root username and password that you set up earlier to proceed with logging in.
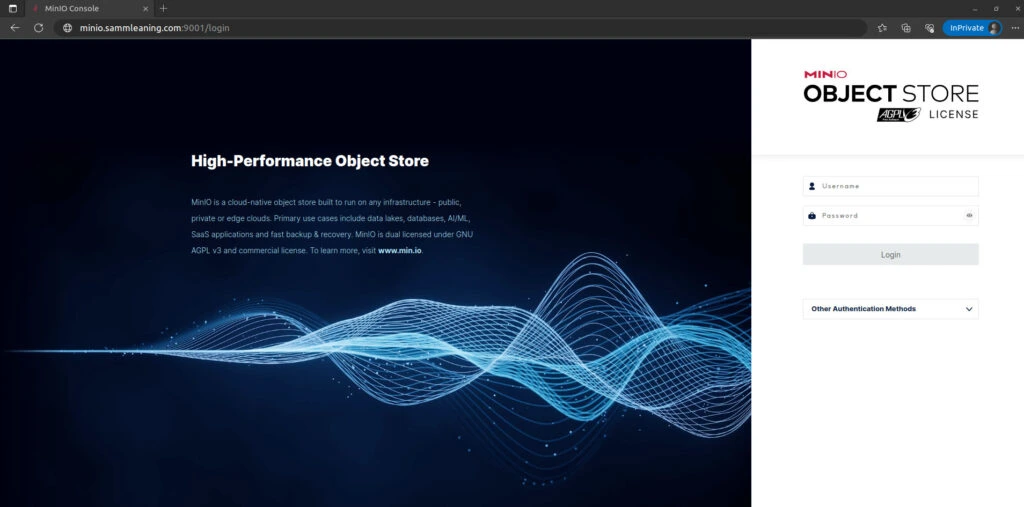
Assuming you possess the accurate user credentials, the resulting outcome should be the appearance of the MinIO user dashboard screen, as depicted below.
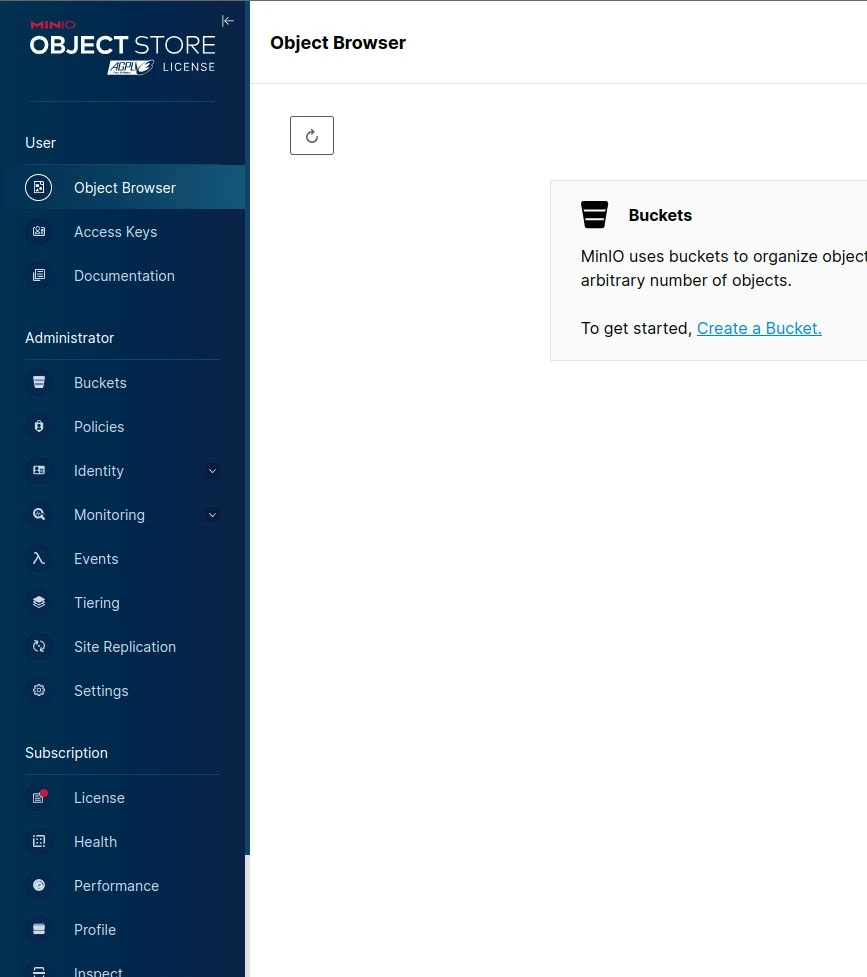
Step 9: Create Buckets and Upload Objects
After logging into the MinIO web interface, you can initiate the process of creating buckets to effectively organize your data. Buckets are logical containers for storing objects. You can upload, download, and manage objects within these buckets.
At this point, you have completed all configurations, and you have successfully implemented both the MinIO installation and security measures.
Conclusion
Congratulations! You’ve successfully installed MinIO, a powerful object storage server, on your Rocky Linux instance. With MinIO up and running, you have a reliable solution for managing and storing vast amounts of unstructured data while maintaining compatibility with S3 APIs. This guide has provided you with the essential steps to initiate your journey with MinIO. Now, you can delve into its features and seamlessly integrate it into your data management workflows.
Also Read Our Other Guides :
- How To Install Nginx on Rocky Linux 9: A Comprehensive Guide
- How To Install PHP 8.2 on Rocky Linux 9
- How To Install Python 3.11 on Rocky Linux 9
- How To Secure Nginx with Let’s Encrypt on Rocky Linux 9
- How To Install and Configure Ansible on Rocky Linux 9
- How To Install and Configure Elasticsearch on Ubuntu Server 22.04
Hopefully, now you have learned how to Install a MinIO Object Storage Server on Rocky Linux.


