• About Us
  • Disclaimers
  • Privacy Policy
  • Sitemap
Linux Tutorials for Beginners
Advertisement
  • Ubuntu
    Install and Secure phpMyAdmin on Ubuntu 22.04

    How To Install and Secure phpMyAdmin on Ubuntu 22.04

    Secure SSH with Fail2Ban

    How To Secure SSH with Fail2Ban on Ubuntu 22.04

    Install Uptime Kuma on Ubuntu 22.04

    How To Install Uptime Kuma on Ubuntu 22.04

    Install Ubuntu Server 22.04

    How To Install Ubuntu Server 22.04 LTS with Screenshots

    Set Up Firewall on Ubuntu 22.04

    How To Set Up a Firewall with UFW on Ubuntu 22.04

    Install Nginx on Ubuntu

    How To Install Nginx on Ubuntu 22.04: A Comprehensive Guide

    Install MySQL 8.0 on Ubuntu 22.04

    How To Install MySQL 8.0 on Ubuntu Server 22.04

    install-php74-ubuntu2204

    How To Install PHP 7.4 on Ubuntu 22.04

    Install Snipe-IT on Ubuntu 22.04

    How To Install Snipe-IT Asset Management on Ubuntu 22.04

  • Debian
    Secure SSH with Fail2Ban

    How To Secure SSH with Fail2Ban on Debian 11

    Install Debian 11 Server

    How To Install Debian 11 (Bullseye) Server with Pictures

    Install and Setup Node.js on Debian 11

    How To Install and Setup Node.js on Debian 11

    Install PHP 8.2 on Debian 11

    How To Install PHP 8.2 on Debian 11

    Install Nginx on Debian 11

    How To Install Nginx on Debian 11: A Comprehensive Guide

    Set Up Firewall with UFW on Debian

    How To Set Up a Firewall with UFW on Debian 11

    install php74 on debian 11

    How To Install PHP 7.4 on Debian 11

    Install MariaDB 10.9 on Debian 11

    How To Install MariaDB 10.9 on Debian 11 Server

    Initial Setup Debian Server

    Initial Setup Debian 11 Server: Secure and Efficient

  • Rocky Linux
    Install phpMyAdmin on Rocky Linux 9

    How To Install phpMyAdmin on Rocky Linux 9

    Secure SSH with Fail2Ban

    How To Secure SSH with Fail2Ban on Rocky Linux 9

    Install Rocky Linux 9.2 Server

    How To Install Rocky Linux 9.2 Server with Screenshots

    setup Firewall Using Firewalld Rocky Linux 9

    How To Set Up a Firewall Using FirewallD on Rocky Linux 9

    Install Nginx on Rocky Linux 9

    How To Install Nginx on Rocky Linux 9: A Comprehensive Guide

    Install Apache on Rocky Linux

    How To Install and Configure Apache on Rocky Linux 9

    Install MongoDB on Rocky Linux 9

    How To Install MongoDB 6.0 on Rocky Linux 9

    Install Docker on Rocky Linux

    How To Install Docker CE on Rocky Linux 9

  • CentOS
    Secure SSH with Fail2Ban

    How To Secure SSH with Fail2Ban on CentOS 7

    Install PHP8.2 on CentOS 7

    How To Install PHP 8.2 on CentOS 7 / RHEL 7

    Install Apache on CentOS 7

    How To Install Apache Web Server on CentOS 7

    Set Up FirewallD on CentOS 7

    How To Set Up a Firewall Using FirewallD on CentOS 7

    Initial Setup CentOS 7 Server

    Initial Setup CentOS 7 Server: Secure and Efficient

    Install Nginx on CentOS 7

    How To Install Nginx on CentOS 7: A Comprehensive Guide

    Build NGINX from Source on Centos 7

    How To Build NGINX from Source (Compile) on Centos7

    Install Docker Swarm on CentOS 7

    Install and Configure Docker Swarm Mode on Centos 7

    Install Docker Compose on Centos 7

    How To Install and Use Docker Compose on Centos 7

  • Linux
    Manage Groups on Linux

    A Simple Guide: How To Manage Groups on Linux

    Logrotate In Linux

    How To Manage Log Files Using Logrotate In Linux

    Check File Size in Linux

    The Easy Ways to Check File Size in Linux

    Linux server security system administrators

    Best Practices Linux Server Security for System Administrator

    Backup Files From Remote Linux VPS Using Rsync Script

    How To Backup Files From Remote Linux VPS Using Rsync Script

    SSH Key-based Authentication

    How To Configure SSH Key-based Authentication In Linux

    Linux File Permissions

    Understanding Linux File Permissions for Beginners

    Create Multiboot USB with Ventoy

    How To Create Multiboot USB with Ventoy in Linux

    Find Hard Disk Drive Information in Linux

    How To Find Hard Disk Drive Information in Linux

No Result
View All Result
Linux Tutorials for Beginners
No Result
View All Result

Home » Rocky Linux » How To Install PHP 8.2 on Rocky Linux 9

How To Install PHP 8.2 on Rocky Linux 9

sammbysamm
October 17, 2023
Install PHP8.2 on Rocky Linux

How To Install PHP8.2 on Rocky Linux 9

Share on FacebookShare on LinkedinShare on Whatsapp

Introduction

PHP is a flexible scripting language that drives a multitude of websites and applications. The introduction of PHP 8.2 brings forth a slew of fresh features and performance improvements for developers to explore. In this tutorial, we’ll guide you on how to install PHP 8.2 on Rocky Linux 9, in order to provide you with the necessary tools to make the most of its capabilities for your projects.

Rocky Linux 9 is a popular choice for hosting web applications and services due to its stability, security, and ease of use. PHP plays a vital role significantly in numerous web applications by enabling server-side scripting for dynamic content generation. In this guide, we’ll take you through the steps how to install PHP 8.2 on Rocky Linux 9. Let’s begin this process.

OTHER POSTS

How To Install phpMyAdmin on Rocky Linux 9

How To Secure SSH with Fail2Ban on Rocky Linux 9

How To Install Rocky Linux 9.2 Server with Screenshots

Table of Contents

  • Introduction
  • Prerequisites for PHP 8.2 Installation
  • Installing PHP8.2 on Rocky Linux 9
    • Step 1: System Update
    • Step 2: Enable EPEL and REMI repositories in Rocky Linux 9
    • Step 3: Install PHP8.2 on Rocky Linux 9
    • Step 4: Add Extensions for PHP8.2
    • Step 5: Using PHP 8.2 with Nginx on Rocky Linux 9
  • Conclusion

Prerequisites for PHP 8.2 Installation

Before beginning the installation process, make sure your system meets the prerequisites for installing PHP 8.2:

  • A Rocky Linux 9 system with root or sudo access. You can deploy this on a physical machine or a virtual environment like VMware or VirtualBox. To set this up, follow our guide : Initial Setup Rocky Linux 9 Server: Secure and Efficient 
  • A stable internet connection to download packages
  • Generally, Familiar with basic Linux commands

Installing PHP8.2 on Rocky Linux 9

Proceed with the following steps to install PHP 8.2 on your recently updated Rocky Linux 9 Servers.

Step 1: System Update

To ensure a smooth installation process of PHP 8.2 on your Rocky Linux 9, so you have to start by updating the system’s package repositories and installed packages. Open the terminal and run the following command:

Bash
[samm@php82 ~]$ sudo dnf upgrade --refresh
Extra Packages for Enterprise Linux 9 - x86_64                                                                                                                                     9.5 kB/s | 6.5 kB     00:00    
Extra Packages for Enterprise Linux 9 - x86_64                                                                                                                                     4.5 MB/s |  18 MB     00:04    
Rocky Linux 9 - BaseOS                                                                                                                                                             2.1 kB/s | 4.1 kB     00:01    
Rocky Linux 9 - AppStream                                                                                                                                                          3.3 kB/s | 4.5 kB     00:01    
Rocky Linux 9 - Extras                                                                                                                                                             1.8 kB/s | 2.9 kB     00:01    
Dependencies resolved.
Nothing to do.
Complete!

Step 2: Enable EPEL and REMI repositories in Rocky Linux 9

Basically, PHP 8.2 is currently unavailable within the default Rocky Linux repositories. However to access the latest PHP packages, it’s necessary to integrate the Remi repository, renowned for its up-to-date offerings. To enable the Remi repository, simply execute the subsequent commands:

In your terminal, employ the following command to successfully append this repository.

Bash
[samm@php82 ~]$ sudo dnf config-manager --set-enabled crb

[samm@php82 ~]$ sudo dnf install epel-release -y
Rocky Linux 9 - BaseOS                                                                                                                                                             3.1 kB/s | 4.1 kB     00:01    
Rocky Linux 9 - AppStream                                                                                                                                                          4.4 kB/s | 4.5 kB     00:01    
Rocky Linux 9 - CRB                                                                                                                                                                743 kB/s | 2.2 MB     00:03    
Package epel-release-9-5.el9.noarch is already installed.
Dependencies resolved.
Nothing to do.
Complete!

With CRB enabled, initiate the installation of EPEL versions by executing the following command.

Bash
[samm@php82 ~]$ sudo dnf install http://rpms.remirepo.net/enterprise/remi-release-9.rpm

[samm@php82 ~]$ sudo dnf update -y

After completing the previous steps, proceed to list the accessible PHP streams. Especially, the remi-8.2 php module will be visible among the options.

Bash
[samm@php82 ~]$ sudo dnf module list php
Last metadata expiration check: 0:00:09 ago on Fri 21 Jul 2023 03:55:01 AM EDT.
Rocky Linux 9 - AppStream
Name                                      Stream                                        Profiles                                                        Summary                                                    
php                                       8.1                                           common [d], devel, minimal                                      PHP scripting language                                     

Remi's Modular repository for Enterprise Linux 9 - x86_64
Name                                      Stream                                        Profiles                                                        Summary                                                    
php                                       remi-7.4                                      common [d], devel, minimal                                      PHP scripting language                                     
php                                       remi-8.0                                      common [d], devel, minimal                                      PHP scripting language                                     
php                                       remi-8.1                                      common [d], devel, minimal                                      PHP scripting language                                     
php                                       remi-8.2                                      common [d], devel, minimal                                      PHP scripting language                                     

Hint: [d]efault, [e]nabled, [x]disabled, [i]nstalled

Enable the module before installing PHP 8.2 on your Rocky Linux 9.

Bash
[samm@php82 ~]$ sudo dnf module enable php:remi-8.2 -y

Step 3: Install PHP8.2 on Rocky Linux 9

Once you adding the Remi repository, afterward you can proceed with the installation of PHP 8.2 on your Rocky Linux 9. Run the following command:

Bash
[samm@php82 ~]$ sudo dnf install php


When you enable the Remi PHP repository on your system, you’re laying the groundwork to install the PHP version that suits your needs. The available options provide you with flexibility, allowing you to seamlessly integrate with either Apache or Nginx. Additionally, those with the required expertise can amplify functionality by integrating tailored extensions that align precisely with their CMS or software development project needs.

Nginx PHP :

Bash
[samm@php82 ~]$ sudo dnf install php-fpm php-cli -y

Apache (httpd) PHP :

Bash
[samm@php82 ~]$ sudo dnf install php php-cli -y

Check for the currently active version of PHP with the following command:

Bash
[samm@php82 ~]$ php -v
PHP 8.2.8 (cli) (built: Jul  4 2023 14:52:54) (NTS gcc x86_64)
Copyright (c) The PHP Group
Zend Engine v4.2.8, Copyright (c) Zend Technologies
    with Zend OPcache v8.2.8, Copyright (c), by Zend Technologies

Step 4: Add Extensions for PHP8.2

In addition to PHP itself, you may find it necessary to install extra PHP modules. To do this, you can make use of the following command. Just replace [module-name] with the specific package you want to install:

Moreover, the option exists to install multiple packages concurrently. Below following are some suggestions for the most commonly required modules you might consider installing:

Bash
[samm@php82 ~]$ sudo dnf install php-cli php-fpm php-curl php-mysqlnd php-gd php-opcache php-zip php-intl php-common php-bcmath php-imagick php-xmlrpc php-json php-readline php-memcached php-redis php-mbstring php-apcu php-xml php-dom php-redis php-memcached php-memcache

You can run the following command to list all currently loaded PHP modules:

Bash
[samm@php82 ~]$ php -m
[PHP Modules]
apcu
bcmath
bz2
calendar
Core
ctype
curl
date
dom
exif
fileinfo
filter
ftp
gd
gettext
hash
iconv
igbinary
imagick
intl
json
libxml
mbstring
memcache
memcached
msgpack
mysqli
mysqlnd
openssl
pcntl
pcre
PDO
pdo_mysql
pdo_sqlite
Phar
random
readline
redis
Reflection
session
SimpleXML
sockets
SPL
sqlite3
standard
tokenizer
xml
xmlreader
xmlrpc
xmlwriter
xsl
Zend OPcache
zip
zlib

[Zend Modules]
Zend OPcache

Additionally, you can create a sample php file in the /usr/share/nginx/html/ folder as shown:

Bash
[samm@php82 ~]$ sudo vi /usr/share/nginx/html/info.php

Then add the following PHP code which will populate the version of PHP alongside installed modules.

PHP
<?php

phpinfo();

?>

Remember to save your changes and exit the file. Afterward, make sure to restart the Nginx web server, as demonstrated below:

Bash
[samm@php82 ~]$ sudo systemctl restart nginx.service

Then, open your web browser and go to the your ip address:

http://server-ip/info.php

The webpage offers a comprehensive array of information about the installed PHP version. This information includes details such as the build date, build system, architecture, and an extensive list of PHP extensions.

Install PHP8.2 on Rocky Linux
Info PHP 8.2 on Rocky Linux

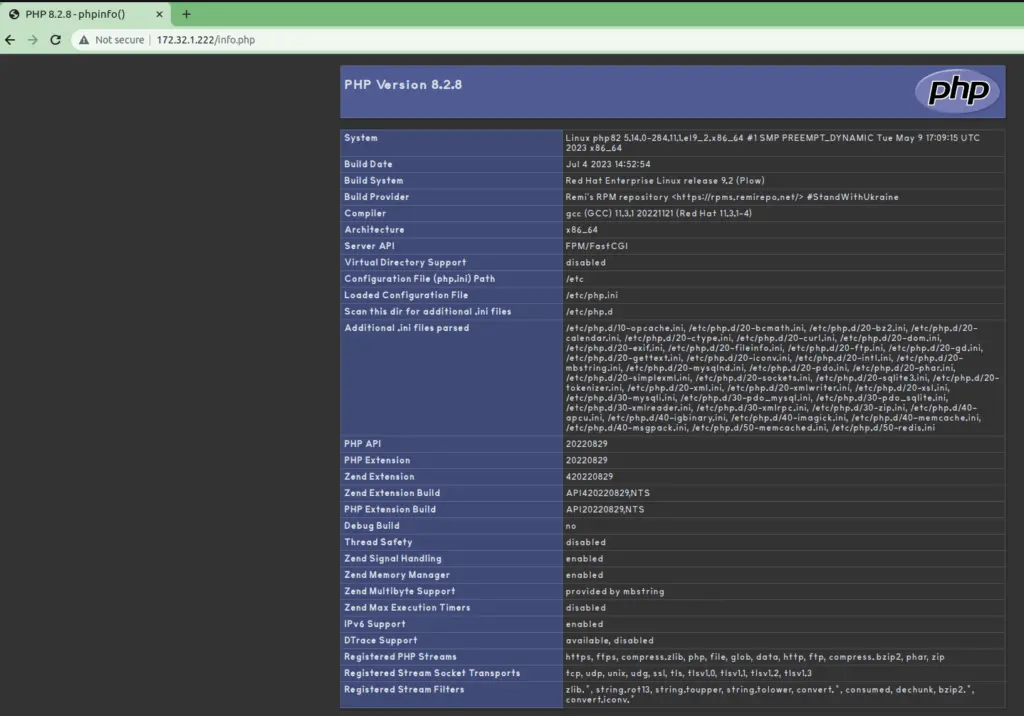
Finally, you should see a PHP info page displaying detailed information about your PHP installation.

Step 5: Using PHP 8.2 with Nginx on Rocky Linux 9

We will explore web server configurations for both Nginx and Apache to effectively host your PHP application.

PHP Application with Nginx web server

Another key point in the Nginx environment, PHP code is typically handled by a separate process known as PHP-FPM (FastCGI Process Manager). PHP-FPM acts as a kind of background service that’s always ready to process PHP requests as they come in. In this configuration, Nginx acts as a bridge, sending incoming requests over to PHP-FPM for smooth execution .

Initially, you need to install php-fpm.

Bash
[samm@php82 ~]$ sudo dnf install php-fpm

Open your Nginx server configuration and incorporate the following block within the existing http block. This addition will configure the Nginx server to forward PHP requests to PHP-FPM for execution, indeed.

Bash
[samm@php82 ~]$ sudo vi /etc/nginx/conf.d/samm.conf
Nginx
### HTTP ###
server {
        listen          8080;
        listen          [::]:8080;
        server_name     samm.com;

        root            /opt/app-samm;
        index           index.html index.htm index.php;

        location / {
                try_files       $uri $uri/ /index.php?$query_string;
                index           index.html index.htm index.php;
        }

    location ~ \.php$ {
        try_files                       $uri =404;
        fastcgi_split_path_info         ^(.+\.php)(/.+)$;
         fastcgi_pass                   unix:/run/php-fpm/www.sock;
        fastcgi_index                   index.php;
        fastcgi_param                   SCRIPT_FILENAME $document_root$fastcgi_script_name;
        include                         fastcgi_params;
    }

    location ~ /\.ht {
        deny  all;
    }
}

Validate Nginx configuration is ok.

Bash
[samm@php82 ~]$ sudo nginx -t
nginx: the configuration file /etc/nginx/nginx.conf syntax is ok
nginx: configuration file /etc/nginx/nginx.conf test is successful

After making these changes, then restart the Nginx web server.

Bash
[samm@php82 ~]$ sudo systemctl restart nginx

PHP Application with Apache web server

Meanwhile, combining PHP with the Apache web server on Rocky Linux opens up possibilities for building dynamic and interactive web applications. In this tutorial, we’ll take you through the process of setting up PHP alongside Apache on your Rocky Linux system.

Once PHP is installed, the next step is to configure Apache to handle PHP files appropriately. To achieve this, open the Apache configuration file using your preferred text editor. For example, we’ll use the vim text editor:

Bash
[samm@php82 ~]$ sudo vi /etc/httpd/conf.d/sammlinux.conf

Inside the file, you can define your virtual host. Here’s a basic example:

Apache
<VirtualHost *:80>
    ServerAdmin   [email protected]
    ServerName    www.sammlinux.com
    ServerAlias   sammlinux.com
    DocumentRoot  /var/www/sammlinux
    ErrorLog      /var/log/httpd/sammlinux.com-error.log
    CustomLog     /var/log/httpd/sammlinux.com-access.log combined
</VirtualHost>  

Then, save the changes and exit the text editor.

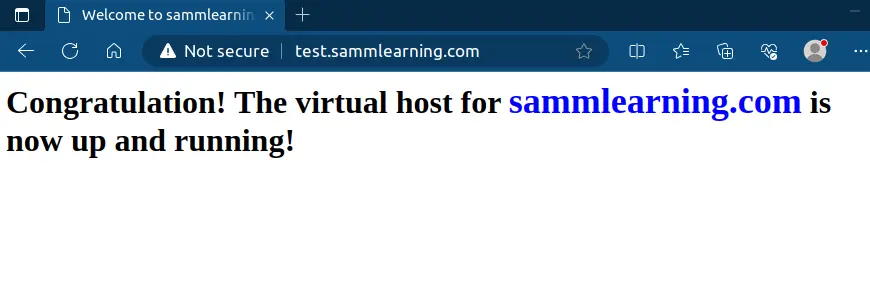
After that you can create a sample index.html file to test the webserver.

Bash
[samm@apache ~]$ sudo vi /var/www/sammlinux/index.html

Paste the following lines in the file.

HTML
<html>
<head>
<title>Welcome to sammlinux.com!</title>
</head>
<body>
<h1>Congratulation! The virtual host for <span style="color:blue; font-size: 24px;">sammlinux.net</span> is now up and running!</h1>
</body>
</html>

Then save the file and exit the text editor.

Once you’ve made adjustments to the Apache configuration, be sure to restart the Apache service to ensure the changes take effect:

Bash
[samm@php82 ~]$ sudo systemctl restart httpd

Eventually to ensure that PHP is working correctly with Apache, create a test PHP file in your web directory. Use the following command to create the file:

Bash
[samm@php82 ~]$ sudo vi /var/www/html/info.php

Add the following PHP code to the file:

PHP
<?php
phpinfo();
?>

Then save the file and exit the text editor.

Open a web browser and navigate to http://your_server_ip. You should see a page displaying detailed information about example of your newly configured virtual hosting page.

Install Apache on Rocky Linux
Test Web Domain Using Apache

Conclusion

Finally you’ve successfully installed PHP 8.2 on your Rocky Linux 9 server, configured it to your needs, and verified its functionality. With PHP 8.2, you have access to the latest features and improvements for building powerful web applications.

This guide has provided you with a clear, step-by-step approach to get PHP 8.2 up and running on Rocky Linux 9. Whether you’re working on a small project or managing a complex web application, having the latest PHP version ensures you’re equipped with the best tools for the job. Moreover, we’ve showcased the process of configuring PHP to seamlessly interact with both Apache and Nginx web servers.

Also Read Our Other Guides :

  • How To Install PHP 7.4 on Ubuntu Server 22.04
  • How To Install PHP 8.2 on Debian 11
  • How To Install PHP8.2 on Ubuntu Server 22.04
  • How To Install PHP 8.2 on CentOS 7 / RHEL 7

Lastly, now you have learned how to install PHP 8.2 on Rocky Linux 9.

Tags: CentOSLampPHPPHP 8PHP 8.2PHP-FPMProgramming LanguageRocky LinuxWebserver

If you got help by our tutorials, please buy me a coffee..!

Buy Me a Coffee

Thank you so much for your support!!

Previous Post

How To Build NGINX from Source (Compile) on Rocky Linux 9

Next Post

How To Install MySQL 8.0 on Rocky Linux 9

Leave a Reply Cancel reply

Your email address will not be published. Required fields are marked *

RECENT POST

Install and Secure phpMyAdmin on Ubuntu 22.04

How To Install and Secure phpMyAdmin on Ubuntu 22.04

by samm
July 22, 2024
0

Are you ready to take control of your MySQL databases on Ubuntu 22.04? In this step-by-step guide, we'll walk you...

Manage Groups on Linux

A Simple Guide: How To Manage Groups on Linux

by samm
November 12, 2023
0

Are you a Linux enthusiast looking to enhance your system administration skills? One fundamental aspect you should master is how...

Install phpMyAdmin on Rocky Linux 9

How To Install phpMyAdmin on Rocky Linux 9

by samm
November 11, 2023
0

If you're navigating the world of Rocky Linux 9 and looking to streamline your MariaDB or MySQL database management, installing...

Logrotate In Linux

How To Manage Log Files Using Logrotate In Linux

by samm
November 10, 2023
0

Log files are an essential part of any Linux system. They provide valuable insights into the system's activities, helping administrators...

Load More

RECOMMENDED.

Install Redis on Debian

How To Install Redis on Debian 11 Server

October 16, 2023
Secure SSH with Fail2Ban

How To Secure SSH with Fail2Ban on Rocky Linux 9

October 29, 2023
sammlinux sammlinux sammlinux

Related Posts

Install phpMyAdmin on Rocky Linux 9
Rocky Linux

How To Install phpMyAdmin on Rocky Linux 9

November 11, 2023
Secure SSH with Fail2Ban
Rocky Linux

How To Secure SSH with Fail2Ban on Rocky Linux 9

October 29, 2023
Install Rocky Linux 9.2 Server
Rocky Linux

How To Install Rocky Linux 9.2 Server with Screenshots

October 20, 2023
setup Firewall Using Firewalld Rocky Linux 9
Rocky Linux

How To Set Up a Firewall Using FirewallD on Rocky Linux 9

October 18, 2023
Load More
Next Post
Install MySQL on Rocky Linux

How To Install MySQL 8.0 on Rocky Linux 9

  • About Us
  • Disclaimers
  • Privacy Policy
  • Sitemap

© 2023 sammlinux - Learn Today for Lead Tomorrow.

No Result
View All Result
  • Ubuntu
  • Debian
  • Rocky Linux
  • CentOS
  • Linux

© 2023 sammlinux - Learn Today for Lead Tomorrow.