Asset Management with Snipe-IT
Effective asset management is crucial for organizations of all sizes, enabling them to track and manage their valuable resources efficiently. Notably, Snipe-IT is a free, open-source IT asset management system written in PHP for those who might not be aware. Furthermore, Snipe-IT, as open-source asset management software, streamlines this process by offering a centralized platform for tracking assets, managing warranties, and optimizing workflows. In this comprehensive guide, we will walk you through the step-by-step process of How to install Snipe-IT on an Ubuntu 22.04 server, empowering you to enhance your organization’s asset management capabilities.
Table of Contents
- Asset Management with Snipe-IT
- Install Snipe-IT on Ubuntu 22.04
- Conclusion
Why Choose Snipe-IT for Asset Management?
Before delving into the installation steps, it’s important to understand why Snipe-IT is a popular choice for asset management:
- Asset Tracking: Snipe-IT enables users to keep detailed records of IT assets, including hardware specifications, software details, purchase history, and current status.
- Customizable Fields: Users can define custom fields to capture specific information relevant to their organization’s assets, allowing for flexibility in data management.
- Check-in and Check-out: The system allows for the easy tracking of assets as they are assigned to users, checked in, or checked out for repairs or maintenance.
- Location and Ownership: Snipe-IT allows assets to be assigned to specific locations or users, making it simpler to keep track of their whereabouts.
- Software License Management: Users can manage software licenses, track installations, and ensure compliance with licensing agreements.
- Reporting and Analytics: The platform provides reporting and analytics features, allowing users to generate insights and reports about their asset inventory and usage.
- Notifications: Snipe-IT can send notifications about upcoming maintenance, warranty expirations, or other important asset-related events.
- Integration: It offers integration capabilities with other tools and services, enhancing its usability within an organization’s existing ecosystem.
Snipe-IT is particularly useful for businesses and institutions of all sizes, as well as IT departments, where efficient asset management is essential for optimizing resources, reducing costs, and maintaining compliance.
Before choosing Snipe-IT or any other asset management solution, it’s important to assess your organization’s specific requirements, budget, and existing IT infrastructure. Conduct a thorough evaluation to determine if Snipe-IT aligns with your needs and can effectively support your asset management goals.
Prerequisites
Before we dive into install Snipe-IT on Ubuntu, there are a few prerequisites you need to ensure are in place:
- Ubuntu Server: Make sure you have a clean installation of Ubuntu Server. You can deploy this on a physical machine or a virtual environment like VMware or VirtualBox.
- LAMP Stack: Snipe-IT requires a LAMP (Linux, Apache or Nginx, MariaDB or MySQL, PHP) stack. Ensure that Apache or Nginx, MariaDB or MySQL, and PHP are installed and configured correctly on your Ubuntu server. You can follow these guides to :
- How To Install Apache 2.4 on Ubuntu Server 22.04
- How To Build NGINX from Source (Compile) on Ubuntu Server 22.04
- How To Install MySQL 8.0 on Ubuntu Server 22.04
- How To Install MariaDB 10.6 on Ubuntu Server 22.04
- How To Install PHP 7.4 on Ubuntu Server 22.04
- How To Install PHP 8.2 on Ubuntu Server 22.04
- Composer: Composer is a dependency manager for PHP. Install it on your system. You can follow this guide :
For your information, in this guide we use Server Database different from server Application :
- Server MySQL (172.32.1.235)
- Server MariaDB (172.32.1.236)
- Server Application : Snipe-IT, Apache or Nginx, PHP and Composer (172.32.1.221).
You can see the official documentations requirements for install Snipe-IT on Ubuntu are fairly standard for a modern web server all things considered, and most servers will have most or all of these components already installed.
Install Snipe-IT on Ubuntu 22.04
As shown above, follow these detailed steps to install Snipe-IT on your Ubuntu 22.04 server and streamline your asset management processes:
Step 1: System Update Ubuntu
Begin by ensuring your system’s package list is up-to-date:
samm@snipe-it:~$ sudo apt-get update
samm@snipe-it:~$ sudo apt-get upgrade
By updating your system’s packages, you establish a robust foundation for the installation, as this action ensures you have the most up-to-date software versions available.
Step 2: Install Essential Packages
Before go to next step, let’s first install some essential packages:
samm@snipe-it:~$ sudo apt-get install git curl zip unzip
Step 3: Create a Database
To create the Snipe-IT database, log in as a root user to your MySQL/MariaDB server using the command below.
Using MySQL
Log in to the MySQL Server using:
samm@mysql:~$ mysql -u root -p
Once logged in, create a new database and user for Snipe-IT:
mysql> CREATE DATABASE asset_management_db;

mysql> CREATE USER 'snipe_user'@'%' IDENTIFIED WITH mysql_native_password BY 'your-password';

mysql> GRANT ALL PRIVILEGES ON asset_management_db.* TO 'snipe_user'@'%';

mysql> FLUSH PRIVILEGES;

mysql> EXIT;
Using MariaDB
Log in to the MariaDB Server using:
samm@mariadb:~$ mysql -u root -p
Once logged in, create a new database and user :
MariaDB [(none)]> CREATE DATABASE asset_management_db;

MariaDB [(none)]> CREATE USER 'snipe_user'@'%' IDENTIFIED BY 'your-password';

MariaDB [(none)]> GRANT ALL PRIVILEGES ON asset_management_db.* TO 'snipe_user'@'%';

MariaDB [(none)]> FLUSH PRIVILEGES;

MariaDB [(none)]> EXIT;
Step 4: Download and Install Snipe-IT
Navigate to the directory where you want to install Snipe-IT and clone the repository:
samm@snipe-it:~$ cd /opt
samm@snipe-it:/opt$ git clone https://github.com/snipe/snipe-it snipe-it
Finally switch to the snipe directory.
samm@snipe-it:/opt$ cd snipe-it/
We need .env configuration file to set up the application details. Copy the example config file and rename it .env.example to .env using the following command.
samm@snipe-it:/opt/snipe-it$ sudo cp .env.example .env
Edit the configuration file.
samm@snipe-it:/opt/snipe-it$ sudo vi .env
# --------------------------------------------
# REQUIRED: BASIC APP SETTINGS
# --------------------------------------------
APP_ENV=production
APP_DEBUG=false
APP_KEY=base64:D5I6ZcSQ5LA7crvWeVRWQMjfS1zLbQuQCJBhVStaxb0=
APP_URL=https://snipe-it.sammlinux.com
APP_TIMEZONE='Asia/Jakarta'
APP_LOCALE=en
MAX_RESULTS=500

# --------------------------------------------
# REQUIRED: DATABASE SETTINGS
# --------------------------------------------
DB_CONNECTION=mysql
DB_HOST=172.32.1.235
DB_PORT=3306
DB_DATABASE=asset_management_db
DB_USERNAME=snipe_user
DB_PASSWORD=5n1pE-IT!!
DB_PREFIX=null
DB_DUMP_PATH='/usr/bin'
DB_CHARSET=utf8mb4
DB_COLLATION=utf8mb4_unicode_ci
Save and close the file.
Step 5: Install Dependecies and Generate API with Composer
Install the Snipe-IT dependencies with Composer.
samm@snipe-it:/opt/snipe-it$ sudo composer update --no-plugins --no-scripts
samm@snipe-it:/opt/snipe-it$ sudo composer install --no-dev --prefer-source --no-plugins --no-scripts
Generate an application key to secure your installation:
samm@snipe-it:/opt/snipe-it$ sudo php artisan key:generate
Set the ownership and permission for the Snipe-IT data directory.
samm@snipe-it:~$ sudo chown -R www-data:www-data /opt/snipe-it/
samm@snipe-it:~$ sudo chmod -R 755 /opt/snipe-it/
Step 6: Configure Webserver for Snipe-IT on Ubuntu
Snipe-IT relies on several prerequisites, including Webserver (Apache or Nginx). Config them using the following guides:
Using Apache
The most common setup for Snipe-IT on a linux server is to use Apache, so if you’re not sure what to pick, Apache might be the best bet, as it’s free, easy to configure, and well documented.
For the Snipe-IT, create an apache configuration file. But before that you can disable the default configuration file of apache with the similar command as shown below.
samm@snipe-it:~$ sudo a2dissite 000-default.conf
Create a new Apache configuration file.
samm@snipe-it:~$ sudo vi /etc/apache2/sites-available/snipe-it.conf
Paste the information below and replace domain with your server’s domain name or public IP address.
<VirtualHost *:80>

     ServerAdmin        [email protected]
     DocumentRoot       /opt/snipe-it/public
     ServerName         snipe-it.sammlinux.com
     ServerAlias        snipe-it.sammlinux.com
     ErrorLog           /var/log/apache2/snipe-it-error.log
     CustomLog          /var/log/apache2/snipe-it-access.log combined

    <Directory /opt/snipe-it/public>
     Options            +FollowSymlinks
     AllowOverride      All
        Require all granted
     SetEnv HOME        /opt/snipe-it/public
     SetEnv HTTP_HOME   /opt/snipe-it/public

    <IfModule mod_headers.c>
     Header always set  Strict-Transport-Security "max-age=63072000; includeSubDomains; preload"
     Header always set  X-Frame-Options DENY
     Header always set  X-Content-Type-Options nosniff
    </IfModule>

    <IfModule mod_dav.c>
     Dav off
        </IfModule>
    </Directory>

</VirtualHost>
Save and exit the file. then enable your new configuration file.
samm@snipe-it:~$ sudo a2ensite snipe-it.conf
samm@snipe-it:~$ sudo a2enmod rewrite
samm@snipe-it:~$ sudo service apache2 restart
Using Nginx
If you wish to use Nginx and PHP-FPM instead of Apache, PHP-FPM will need to be installed and setup to listen on a socket.
samm@snipe-it:~$ sudo vi /etc/nginx/conf.d/snipt-it.conf
Then add and modify the line below in your nginx config file (use your domain or server IP address here).
server {
       listen               80;
       listen               [::]:80;
       server_name          snipeit.sammlinux.com;
       server_tokens        off;
       root                 /opt/snipe-it/public;
       index                index.html index.htm index.php;

       access_log           /var/log/nginx/ams.teknex.com.au.access.log;
       error_log            /var/log/nginx/ams.teknex.com.au.error.log;

       location / {
              if ($http_user_agent ~* (ApacheBench/2.3|codepad.co) ) {
                                   return 403;
              }
                try_files   $uri $uri/ /index.php?$query_string;
                index       index.html index.htm index.php;
        }

    location ~ .php$ {
        fastcgi_buffers 8          1600k;
        fastcgi_buffer_size        3200k;
        fastcgi_connect_timeout    300s;
        fastcgi_send_timeout       300s;
        fastcgi_read_timeout       300s;
        try_files                  $uri =404;
        fastcgi_split_path_info    ^(.+.php)(/.+)$;
        fastcgi_pass               unix:/run/php/php7.4-fpm.sock;
        fastcgi_index              index.php;
        fastcgi_param              SCRIPT_FILENAME $document_root$fastcgi_script_name;
        proxy_read_timeout         600;
        include                    fastcgi_params;
    }

    location ~ /.ht {
        deny  all;
    }
}
Next, you have to enable, start php7.4-fpm and restart the nginx server for the changes the new configuration file to be applied.
samm@snipe-it:~$ sudo systemctl enable php7.4-fpm
samm@snipe-it:~$ sudo systemctl start php7.4-fpm
samm@snipe-it:~$ sudo systemctl restart nginx
Step 7: Setup Snipe-IT Web Interface
Begin by opening a web browser and navigating to your server’s IP address or domain name. Upon arrival, the Snipe-IT setup page should be visible. Proceed by following the on-screen instructions to finalize the installation, which involves configuring the admin account.
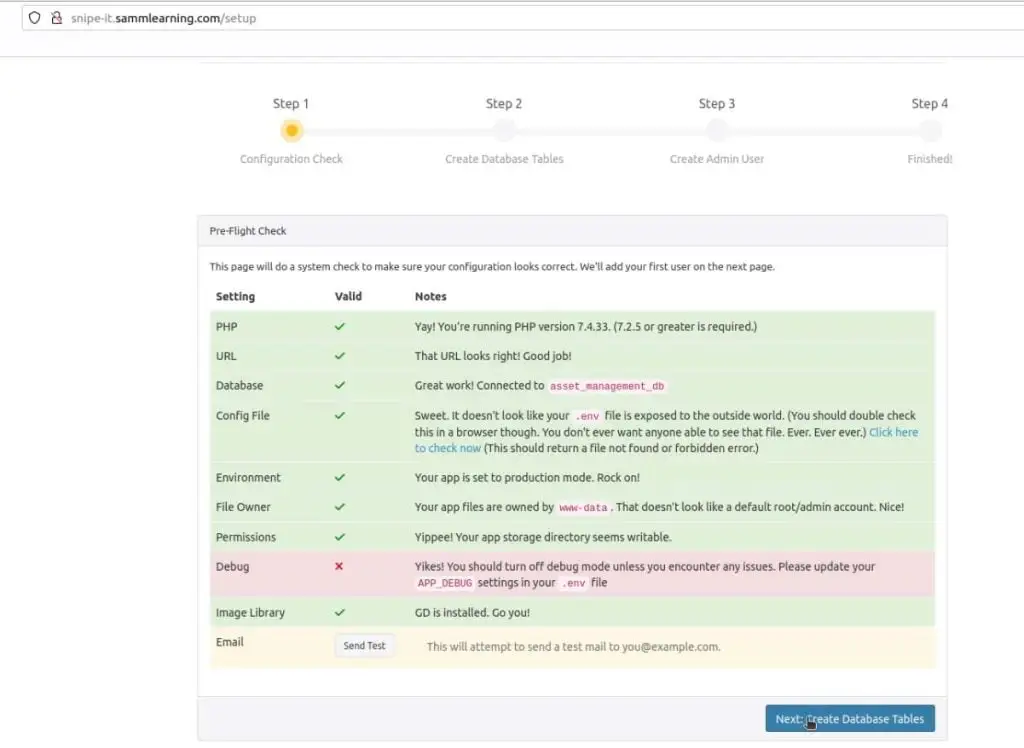
First, you will see the Pre-Flight Check page below, click Next: Create Database Tables.
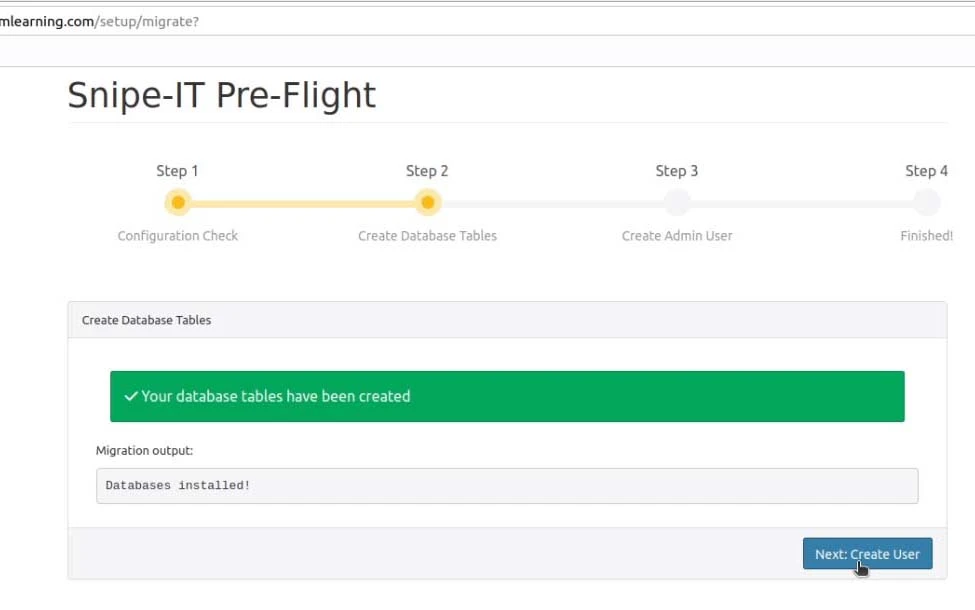
You will now see all the tables created, click Next: Create User.
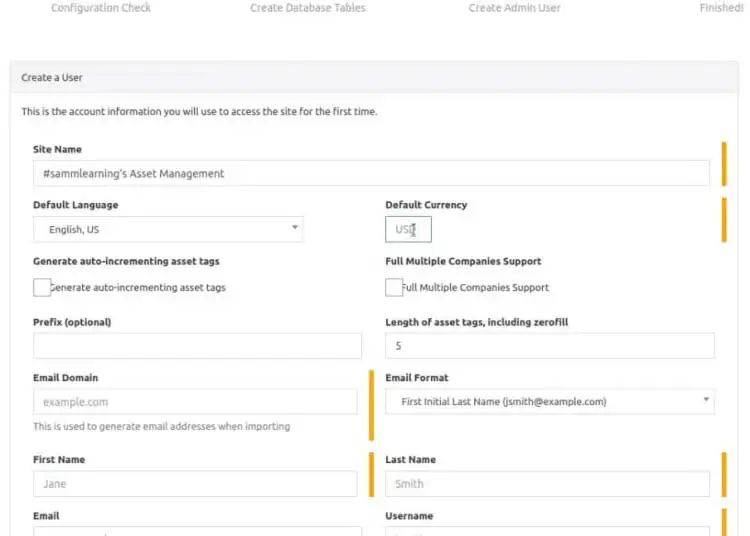
Here, provide all the admin user information and click Next: Save User.
Finally, open the login page using your URL http://you_domain or http://your_server_ip as shown below and login to view the Snipe-IT dashboard.
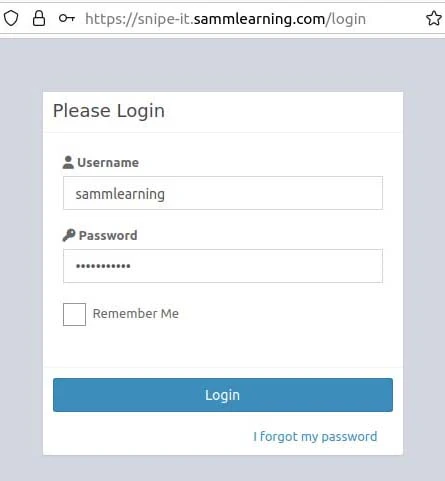
When login successful, you should see the dashboard.

Conclusion
Congratulations! You have successfully installed Snipe-IT on your Ubuntu 22.04 Server, creating a robust platform for managing your IT assets efficiently. With Snipe-IT, you can now keep track of your hardware and software resources, streamline workflows, and enhance productivity across your organization. Remember, this is just the beginning – explore Snipe-IT’s features and customization options to tailor it to your specific asset management needs.
Also Read Our Other Guides :
- How To Install and Configure Go (Golang) on Ubuntu 22.04
- How To Install and Configure NFS Server Client on Ubuntu 22.04
- How To Install Nginx on Ubuntu 22.04: A Comprehensive Guide
- How To Install a MinIO Object Storage Server on Rocky Linux
- How To Install RTMP Server with Nginx on CentOS 7
Hopefully, now you have learned how to install and configure Snipe-IT on your Ubuntu 22.04 Server.