This article provides an in-depth, step-by-step guide on how to install and config PHP7.4 on Ubuntu 22.04, you to take full advantage of its capabilities and streamline your development workflows “How To Install PHP 7.4 on Ubuntu Server 22.04”.
Ubuntu Server 22.04 is a popular choice for hosting web applications and services due to its stability, security, and ease of use.
PHP is a crucial component for many web applications, providing the server-side scripting needed to generate dynamic content. In this step-by-step guide, we’ll walk you through the process of how to install PHP 7.4 on Ubuntu Server 22.04, ensuring that your server is equipped to handle a wide range of web-based tasks. Let’s get started.
PHP 7.4, often referred to as PHP 7.4.x, is a version of the PHP programming language. PHP is a widely-used open-source scripting language that is particularly suited for web development. Each new version of PHP brings improvements in terms of performance, security, features, and bug fixes.
Table of Contents
Key Features PHP 7.4
PHP 7.4 is one of the intermediate versions in the PHP 7 series, which was a major milestone for the language. It introduced significant performance enhancements compared to PHP 5.x, along with a number of new features and improvements. Some of the key features and improvements introduced in PHP 7.4 include:
- Typed Properties: PHP 7.4 introduced the ability to declare type hints for class properties. This improves code clarity and helps catch type-related errors during development.
- Arrow Functions: Arrow functions provide a shorter syntax for defining anonymous functions, making code more concise and readable.
- Covariant Returns and Contravariant Parameters: PHP 7.4 introduced better support for covariance and contravariance in method signatures, which helps with improving type flexibility and safety.
- Preloading: This feature allows certain files to be preloaded into memory, resulting in improved performance by reducing the need to load and parse files on each request.
- Shorter Syntax for Exceptions: PHP 7.4 introduced a shorter syntax for throwing exceptions, making error handling more streamlined.
- Improved Error Messages: Error messages and warnings in PHP 7.4 are more descriptive and helpful, aiding developers in identifying and resolving issues more effectively.
- Numeric Literal Separator: Developers can now use underscores to separate groups of digits in numeric literals, enhancing code readability for large numbers.
- Weak References: PHP 7.4 introduced support for weak references, which allows developers to maintain references to objects without preventing them from being garbage-collected when they’re no longer needed.
These are just a few highlights of the improvements and features introduced in PHP 7.4. As with any programming language, using the latest version ensures that you have access to the most up-to-date tools, performance enhancements, and security improvements, along with access to a larger ecosystem of packages and libraries developed by the community.
Prerequisites to Install PHP 7.4 on Ubuntu
Before we dive into the installation process, there is prerequisite you need to ensure are in place:
- Ubuntu Server: Make sure you have a clean installation of Ubuntu Server. You can deploy this on a physical machine or a virtual environment like VMware or VirtualBox. To set this up, follow our guide :
Install PHP 7.4 on Ubuntu Server 22.04
Step 1: Update System Packages
Before you begin, it’s essential to update your server’s package list to ensure you’re working with the latest software versions. Open a terminal window and enter the following commands:
$ sudo apt update
$ sudo apt upgrade
This command fetches the latest package information from the Ubuntu repositories, ensuring that you install the most recent version of PHP.
Step 2: Add PPA Repository
Ubuntu 22.04 doesn’t include PHP 7.4 in its default repositories, so you’ll need to add the repository that contains it. We will use the Ondrej PPA for installing PHP on Ubuntu 22.04 LTS system. Enter the following command:
$ sudo add-apt-repository ppa:ondrej/php
Step 3: Update Package List
After adding the repository, update the package list again to include the new repository’s contents:
$ sudo apt update
Step 4: Install PHP 7.4 on Ubuntu
To install PHP 7.4, you can use the following command:
$ sudo apt install php7.4
This command will install the core PHP 7.4 packages, along with the most commonly used extensions. Once the installation is complete, you’ll have PHP 7.4 ready to go on your server.
Step 5: Verify PHP 7.4 Installation
After the installation is finished, you should verify that PHP 7.4 is installed correctly. You can do this by running:
$ php -v
This command will display the installed PHP version. You should see output indicating that PHP 7.4 is installed along with the version number.
PHP 7.4.33 (cli) (built: Jun  8 2023 15:23:32) ( NTS )
Copyright (c) The PHP Group
Zend Engine v3.4.0, Copyright (c) Zend Technologies
    with Zend OPcache v7.4.33, Copyright (c), by Zend Technologies
Step 6: Install Additional PHP 7.4 Extensions
Depending on the requirements of your web applications, you may need to install additional PHP extensions. Common extensions for various web applications include mysql, gd, curl, json, and more. To install an extension, use the following syntax:
sudo apt install php7.4-<extension-name>
For example, to install the extension, you would run:
$ sudo apt install php7.4-{cli,fpm,common,zip,gd,mcrypt,mbstring,curl,xml,bcmath,json,ldap,fileinfo,tokenizer,opcache,apcu,pdo,mysql,mysqlnd,mysqli,pgsql,mongodb,redis,memcache,memcached,sockets,imagick,iconv,exif,simplexml,dom}
Repeat this step for each extension you need.
Step 7: Configure PHP 7.4
Optimize PHP’s configuration to enhance performance for your website. Open the php.ini file using your preferred text editor. For example:
$ sudo vi /etc/php/7.4/cli/php.ini
Adjust the following settings to optimize PHP:
- Increase the memory limit:
memory_limit = 256M
- Enable OPCache for opcode caching:
zend_extension=opcache.so
opcache.enable=1
opcache.enable_cli=1
opcache.memory_consumption=128
opcache.interned_strings_buffer=8
opcache.max_accelerated_files=10000
opcache.revalidate_freq=60
opcache.fast_shutdown=1
Step 8: Restart PHP-FPM Service
After making configuration changes, restart the PHP-FPM service for the changes to take effect:
$ sudo systemctl restart php7.4-fpm.service
Step 9: Test PHP
To ensure that PHP is working correctly, you can create a simple test PHP file and access it through your web browser. Create a file named info.php/var/www/html/):
$ sudo vi /var/www/html/info.php
Add the following content to the info.php file:
<?php

phpinfo();

?>
Save the file and exit the text editor. Now, open your web browser and navigate to http://your-server-ip/info.php.
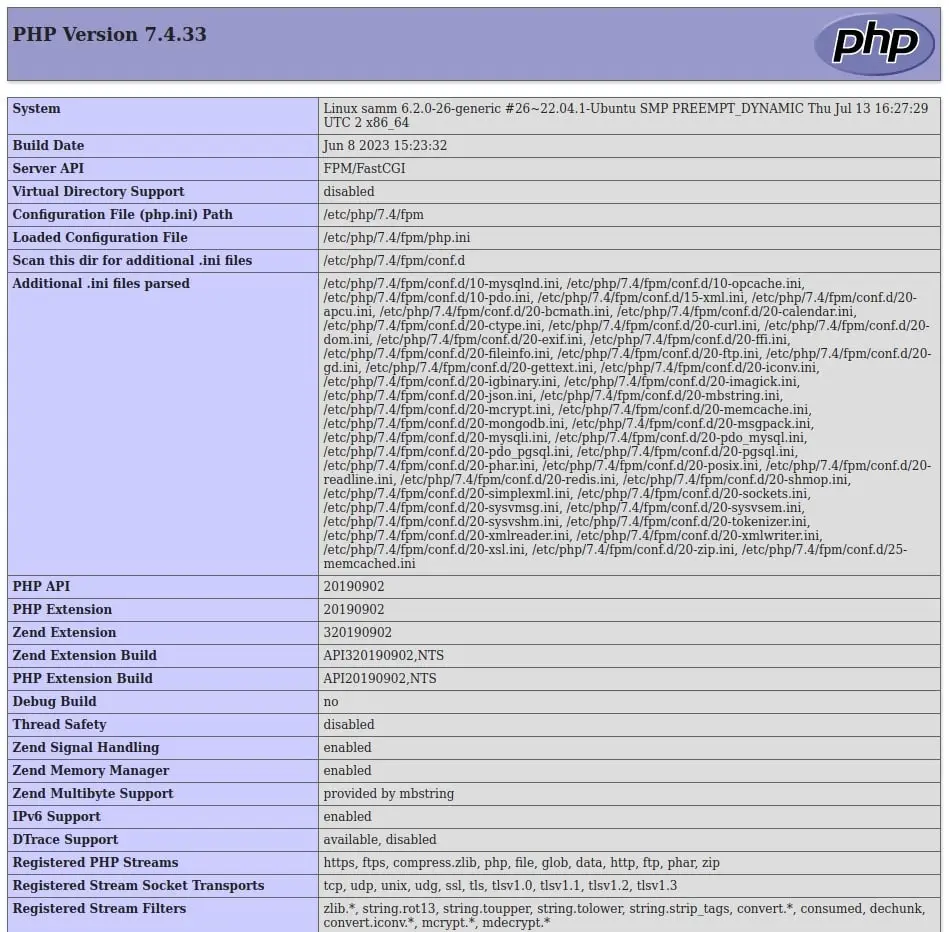
You should see a page displaying detailed information about your PHP installation.
Step 10: Clean Up
Once you’ve verified that PHP 7.4 is working as expected, you can remove the info.php file, as it contains sensitive information about your PHP installation:
$ sudo rm /var/www/html/info.php
Conclusion
By following this step-by-step guide, you’ve successfully install PHP 7.4 on Ubuntu Server 22.04. PHP is a powerful tool for developing dynamic web applications, and with the right extensions, you can handle a wide range of tasks.
Also Read Our Other Guides :
- How To Install PHP 7.4 on Debian 11
- How To Install PHP8.2 on Ubuntu Server 22.04
- How To Install PHP 8.2 on Debian 11
- How To Install PHP8.2 on Rocky Linux 9
- How To Install PHP 8.2 on CentOS 7 / RHEL 7
Keep in mind that security updates are essential, so regularly update your server to stay protected. Now that you have PHP up and running, you’re ready to start building and deploying your web applications. Hopefully, now you have learned how to install PHP 7.4 on Ubuntu Server 22.04.