In today’s digital landscape, securing your server is of utmost importance. Basically one of the fundamental components of server security is setting up a firewall. In this article, specifically we’ll walk you through the step-by-step process of how to set up a firewall using firewalld on Rocky Linux 9. On Rocky Linux 9, you can easily achieve this using the “firewalld” utility.
Table of Contents
- What is firewalld?
- Step 1: Installation FirewallD on Rocky Linux 9
- Step 2: Starting FirewallD
- Step 3: Basic Configuration FirewallD
- Step 4: Adding Rules
- Step 5: Enabling SSH Access on Rocky Linux 9
- Step 6: Checking Rules
- Step 7: Custom Rules
- Step 8: Port Forwarding
- Step 9: Removing Rules
- Step 10: Managing Services FirewallD
- Step 11: Troubleshooting FirewallD on Rocky Linux 9
- Conclusion
What is firewalld?
Before diving into the setup process, let’s briefly discuss what firewalld is and why it’s essential for server security. Firewalld is a dynamic firewall management tool that simplifies the process of configuring and managing firewalls on Linux systems. Generally it provides a user-friendly interface and allows you to define rules and zones to control incoming and outgoing network traffic.
Step 1: Installation FirewallD on Rocky Linux 9
The first step in setting up a firewall with firewalld on Rocky Linux 9 is to ensure that the software is installed on your system. You can do this by running the following command in your terminal:
$ sudo dnf install firewalldStep 2: Starting FirewallD
Once firewalld is installed on your Rocky Linux 9, you need to start the service and enable it to start at boot. Execute the following commands:
$ sudo systemctl start firewalld
$ sudo systemctl enable firewalld
$ sudo systemctl status firewalld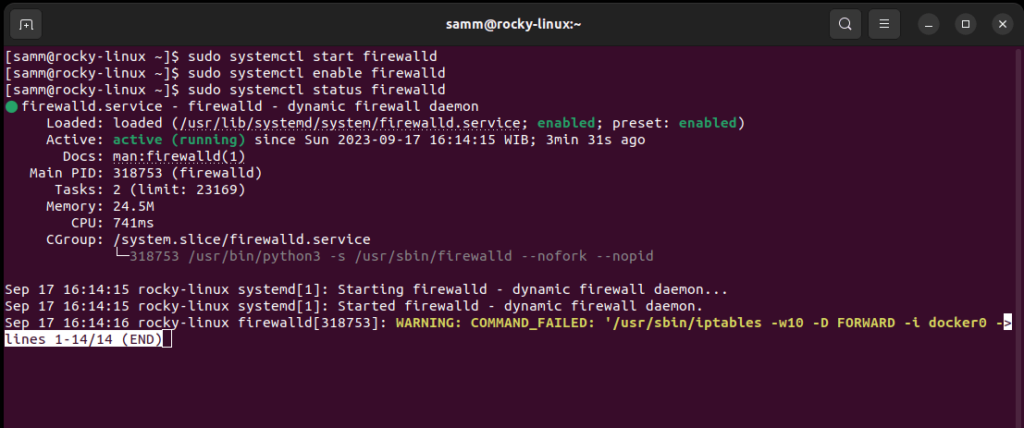
Step 3: Basic Configuration FirewallD
Now that firewalld is up and running, let’s configure some basic firewall settings. The primary unit of configuration in firewalld is the “zone.” Zones determine how traffic is filtered and what level of trust is assigned to a network connection. Rocky Linux 9 includes several predefined zones, such as “public,” “home,” and “work.” You can view the available zones by running following command:
$ sudo firewall-cmd --get-zonesTo assign a zone to your network interface (e.g., “public”), use the following command:
$ sudo firewall-cmd --zone=public --change-interface=eth0Step 4: Adding Rules
With the zone configured, thus you can now define rules for controlling traffic. Let’s say you want to allow incoming traffic on port 80 (HTTP). You can add the rule like this, use the following command:
$ sudo firewall-cmd --zone=public --add-service=http --permanentDon’t forget to reload the firewall to apply the changes, use the following command:
$ sudo firewall-cmd --reloadStep 5: Enabling SSH Access on Rocky Linux 9
If you’re remotely managing your Rocky Linux 9 server, you’ll want to enable SSH access. To do this, use the following command:
$ sudo firewall-cmd --zone=public --add-service=ssh --permanentAfterwards remember to reload the firewall:
$ sudo firewall-cmd --reloadStep 6: Checking Rules
You can verify the rules that have been added to your firewall by running:
$ sudo firewall-cmd --list-allThis command will display a list of active zones, services, and ports, allowing you to ensure that your firewall is configured as intended.
Now that we’ve covered the basic setup of firewalld on Rocky Linux 9, let’s explore some advanced configurations to enhance your server’s security.
Step 7: Custom Rules
Firewalld allows you to create custom rules tailored to your specific requirements. For example, if you want to block a specific IP address, you can use the following command:
$ sudo firewall-cmd --zone=public --add-rich-rule='rule family="ipv4" source address="x.x.x.x" reject'Replace “x.x.x.x” with the actual IP address you want to block.
Step 8: Port Forwarding
If you’re hosting services on your server, you may need to set up port forwarding. This can be achieved with firewalld as well. To forward incoming traffic from one port to another, use the following syntax:
$ sudo firewall-cmd --zone=public --add-forward-port=port=8080:proto=tcp:toport=80This command forwards incoming TCP traffic from port 8080 to port 80.
Step 9: Removing Rules
To remove a rule, use the “–remove” flag followed by the rule specification. For example, to remove the HTTP rule, execute:
$ sudo firewall-cmd --zone=public --remove-service=http --permanentRemember to reload the firewall after making changes.
In the final section of this guide, we’ll cover some essential maintenance tasks for your firewalld configuration.
Step 10: Managing Services FirewallD
You can enable or disable services in specific zones with ease. To disable a service, use the following command::
$ sudo firewall-cmd --zone=public --remove-service=service-name --permanentAnd to enable a service:
$ sudo firewall-cmd --zone=public --add-service=service-name --permanentDon’t forget to reload the firewall after any changes.
Step 11: Troubleshooting FirewallD on Rocky Linux 9
If you encounter any issues with your firewall configuration, firewalld on Rocky Linux 9 provides helpful logging to diagnose problems. Check the logs with the following command::
$ sudo journalctl -u firewalldThis command will display firewall-related log entries, aiding you in identifying and resolving issues.
Conclusion
In this comprehensive guide, we’ve walked you through the process of setting up a firewall using firewalld on Rocky Linux 9. By following these steps, you’ve taken a crucial step in securing your server and protecting it from unauthorized access and potential threats. First thing to remember regularly review and update your firewall rules to adapt to changing security needs. With firewalld on Rocky Linux 9, you have a powerful tool at your disposal to maintain a robust and secure server environment. Stay safe, and happy server management!
Also Read Our Other Guides :
- How To Set Up a Firewall Using FirewallD on CentOS 7
- How To Set Up a Firewall with UFW on Debian 11
- How To Set Up a Firewall with UFW on Ubuntu 22.04
- Initial Setup Debian 11 Server: Secure and Efficient
- Initial Setup Ubuntu Server 22.04: Secure and Efficient
- Initial Setup Rocky Linux 9 Server: Secure and Efficient
- How To Install Rocky Linux 9.2 Server with Screenshots
Finally, now you have learned how to set up a firewall using FirewallD on Rocky Linux 9.