Introduction
In the digital age, the need for secure and efficient data management and sharing has become paramount. Nextcloud, an open-source, self-hosted file sync, and sharing solution, provides individuals and organizations with a versatile platform to manage and collaborate on data while maintaining control over their privacy. This guide will walk you through the process of how to install Nextcloud using the Apache web server and the MariaDB database system on an Ubuntu Server 22.04.
Table of Contents
- Introduction
- Prerequisites for Install Nextcloud on Ubuntu
- System Requirements
- Install Nextcloud on Ubuntu Server 22.04
- Step 1: Update and Upgrade packages
- Step 2: Install Apache 2.4, PHP 8.2, MariaDB 10.6, Redis 7 (LAMP Stack)
- Step 3: Create a Database and User
- Step 4: Config PHP and Apache
- Step 5: Download NextCloud
- Step 6: Create an Apache Virtual Host for Nextcloud
- Step 7: Complete Nextcloud Installation via GUI
- Step 8: Enable HTTPS (Optional)
- Step 9: Configure Redis Cache for NextCloud
- Step 10: Fixing Some Warnings Nextcloud
- Conclusion
With Nextcloud, you can synchronize your files across multiple devices such as computers, smartphones, and tablets. It supports various file types, including documents, images, videos, and more. You can organize your files into folders, share them with others, and collaborate on them in real-time. It also offers features like versioning, allowing you to access previous versions of a file, and file encryption for enhanced security.
Nextcloud extends beyond just file sharing and includes additional functionalities such as calendars, contacts, tasks, and bookmarks. It also supports integration with popular productivity tools like Collabora Online (for document editing), OnlyOffice, and others.
Prerequisites for Install Nextcloud on Ubuntu
Before you dive into install Nextcloud on Ubuntu Server 22.04, ensure you have the following prerequisites in place:
- Ubuntu Server 22.04: Make sure you have a clean of Ubuntu Server 22.04. To set this up, follow our guide Initial Setup Ubuntu Server 22.04. You can deploy this on a physical machine or a virtual environment like VMware or VirtualBox.
- Static IP Address: Assign a static IP address.
System Requirements
For best performance, stability and functionality we have documented some recommendations for running a Nextcloud server.
- Operating System (64-bit)
- Ubuntu 22.04 LTS (recommended)
- Ubuntu 20.04 LTS
- Red Hat Enterprise Linux 8 (recommended)
- Debian 11 (Bullseye)
- SUSE Linux Enterprise Server 15
- openSUSE Leap 15.4
- CentOS Stream
- Database
- MySQL 8.0+ or MariaDB 10.3/10.4/10.5/10.6 (recommended)
- Oracle Database 11g (only as part of an enterprise subscription)
- PostgreSQL 10/11/12/13/14/15
- SQLite (only recommended for testing and minimal-instances)
- Webserver
- Apache 2.4 with
mod_phporphp-fpm(recommended) - nginx with
php-fpm
- Apache 2.4 with
- PHP Runtime
- 8.0 (deprecated)
- 8.1
- 8.2 (recommended)
Install Nextcloud on Ubuntu Server 22.04
For Install Nextcloud with Apache and MariaDB on Ubuntu Server 22.04, you have the option to set up NextCloud either on your personal home server or a VPS (virtual private server). Additionally, acquiring a domain name is essential as it will enable you to implement HTTPS for encrypting your HTTP traffic in the future. While it’s possible to install Nextcloud without a domain name, it’s not advisable since securing the HTTP connection through encryption is crucial to prevent unauthorized access. If you’re genuinely interested in exploring server software and unlocking their complete capabilities, I highly recommend investing in a domain name.
Step 1: Update and Upgrade packages
To begin, ensure that your server is up-to-date by executing the following commands:
samm@nextcloud:~$ sudo apt-get update -y && sudo apt-get upgrade -y

samm@nextcloud:~$ sudo apt install -y wget unzip
Step 2: Install Apache 2.4, PHP 8.2, MariaDB 10.6, Redis 7 (LAMP Stack)
NextCloud is coded using the PHP programming language. To proceed with this guide, your initial step involves installing the LAMP Stack on Ubuntu Server 22.04. In case you haven’t completed this process yet, I recommend referring to the accompanying tutorial provided below.
- How To Install Apache 2.4 on Ubuntu Server 22.04
- How To Install PHP8.2 on Ubuntu Server 22.04
- How To Install MariaDB 10.6 on Ubuntu Server 22.04
- How To Install Redis on Ubuntu Server 22.04
Step 3: Create a Database and User
Once MariaDB has been successfully installed, the next step is to establish a fresh database tailored for Nextcloud’s requirements. This process also entails generating a dedicated user for the database and assigning specific permissions to this user. To configure the database accurately, please adhere to the following guidelines.
Log into MariaDB as the root user. If you added a root password, provide it when requested. The MariaDB prompt appears.
samm@nextcloud:~$ mysql -u root -p
Create the nextcloud database. For this and all remaining commands, MariaDB should reply with Query OK.
MariaDB [(none)]> CREATE DATABASE IF NOT EXISTS nextcloud_db CHARACTER SET utf8mb4 COLLATE utf8mb4_general_ci;
Query OK, 1 row affected (0.001 sec)
Create a user and grant them all rights to access the database. In place of password, provide a more secure password.
MariaDB [(none)]> CREATE USER 'youruser'@'localhost' IDENTIFIED BY 'yourpassword';
Query OK, 0 rows affected (0.004 sec)

MariaDB [(none)]> GRANT ALL PRIVILEGES ON nextcloud_db.* TO 'youruser'@'localhost';
Query OK, 0 rows affected (0.002 sec)
Flush the privileges to apply the recent changes:
MariaDB [(none)]> FLUSH PRIVILEGES;
Query OK, 0 rows affected (0.001 sec)

MariaDB [(none)]> exit
Bye
Step 4: Config PHP and Apache
samm@nextcloud:~$ sudo apt install libapache2-mod-php8.2

samm@nextcloud:~$ sudo a2enmod php8.2

samm@nextcloud:~$ sudo a2enconf php8.2-fpm
Enabling conf php8.2-fpm.
To activate the new configuration, you need to run:
  systemctl reload apache2

samm@nextcloud:~$ sudo systemctl reload apache2

samm@nextcloud:~$ sudo a2enmod http2
Enabling module http2.
To activate the new configuration, you need to run:
  systemctl restart apache2

samm@nextcloud:~$ sudo systemctl restart apache2
- php.ini
samm@nextcloud:~$ sudo vi /etc/php/8.2/apache2/php.ini

expose_php = Off
max_execution_time = 300
max_input_time = 120
memory_limit = 2048M
upload_max_filesize = 2000M
max_file_uploads = 200
post_max_size = 2000M
short_open_tag = On
- opcache.ini
samm@nextcloud:~$ sudo vi /etc/php/8.0/apache2/conf.d/10-opcache.ini

opcache.enable=1
opcache.enable_cli=1
opcache.interned_strings_buffer=8
opcache.max_accelerated_files=10000
opcache.memory_consumption=2048
opcache.save_comments=1
opcache.revalidate_freq=1
- php www.conf
samm@nextcloud:~$ sudo vi /etc/php/8.2/fpm/pool.d/www.conf

user = www-data
group = www-data
listen = /run/php/php8.2-fpm.sock
listen.owner = www-data
listen.group = www-data
clear_env = no
env[PATH] = /usr/local/bin:/usr/bin:/bin
env[TMP] = /tmp
Restart the “php-fpm” to apply the changes:
samm@nextcloud:~$ sudo systemctl restart php8.2-fpm
Step 5: Download NextCloud
Using your Ubuntu 22.04 server’s terminal, proceed to download the NextCloud zip archive directly onto your server. As of the current moment, the most recent stable version is 26.0.2. However, please note that this version number might vary. To acquire the accurate version, navigate to https://nextcloud.com/install and select the “Download for Server” option to access the latest release.
samm@nextcloud:~$ wget https://download.nextcloud.com/server/releases/latest.zip
samm@nextcloud:~$ sudo unzip latest.zip
samm@nextcloud:~$ sudo mv nextcloud /opt
Change the folder permissions for the nextcloud directory:
samm@nextcloud:~$ sudo chown -R www-data:www-data /opt/nextcloud
samm@nextcloud:~$ sudo chmod -R 755 /opt/nextcloud
Step 6: Create an Apache Virtual Host for Nextcloud
Create a file named “nextcloud.conf” within the “/etc/apache2/sites-enable/” directory using a command-line text editor such as vim.
samm@nextcloud:~$ sudo vi /etc/apache2/conf-enabled/nextcloud.conf
Copy and paste the provided text below into the file. Make sure to substitute “nextcloud.sammlinux.com” with your desired sub-domain. Remember to establish a DNS A record for this particular sub-domain in your DNS zone editor.
<VirtualHost *:80>

     ServerAdmin        [email protected]
     DocumentRoot       /opt/nextcloud/
     ServerName         nextcloud.sammlinux.com
     ServerAlias        nextcloud.sammlinux.com
     ErrorLog           /var/log/apache2/nextcloud-error.log
     CustomLog          /var/log/apache2/nextcloud-access.log combined

    <Directory /opt/nextcloud/>
     Options            +FollowSymlinks
     AllowOverride      All
        Require all granted
     SetEnv HOME        /opt/nextcloud
     SetEnv HTTP_HOME   /opt/nextcloud

    <IfModule mod_headers.c>
     Header always set  Strict-Transport-Security "max-age=63072000; includeSubDomains; preload"
     Header always set  X-Frame-Options DENY
     Header always set  X-Content-Type-Options nosniff
    </IfModule>

    <IfModule mod_dav.c>
     Dav off
        </IfModule>
    </Directory>

</VirtualHost>
Save and close the file, then enable this virtual host.
Enable ReWrite Mode and Restart Server
Using the following command to enable required Apache modules and restart the service:
samm@nextcloud:~$ sudo a2enmod rewrite dir mime env headers
Enabling module rewrite.
Module dir already enabled
Module mime already enabled
Module env already enabled
Enabling module headers.
To activate the new configuration, you need to run:
  systemctl restart apache2

samm@nextcloud:~$ sudo systemctl restart apache2
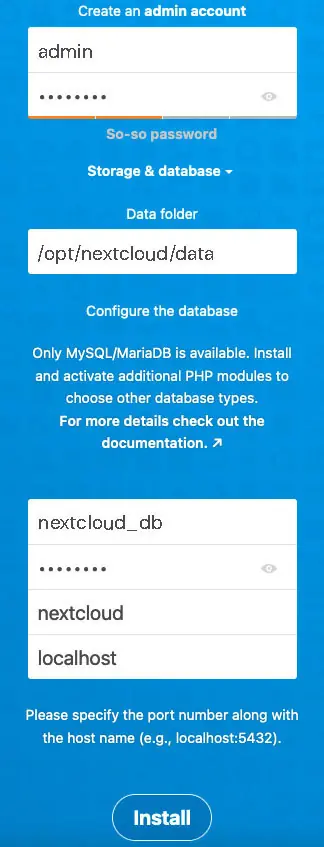
Step 7: Complete Nextcloud Installation via GUI
To finalize the configuration for Nextcloud, use the web interface to complete the necessary tasks. Follow these steps to set up and activate Nextcloud:
- Open a web browser and navigate to the domain linked with the server. The Nextcloud configuration page will be displayed. This could be accessed either through the domain name, such as http://nextcloud.sammlinux.com, or by utilizing the server’s IP address [http://SERVER_IP].
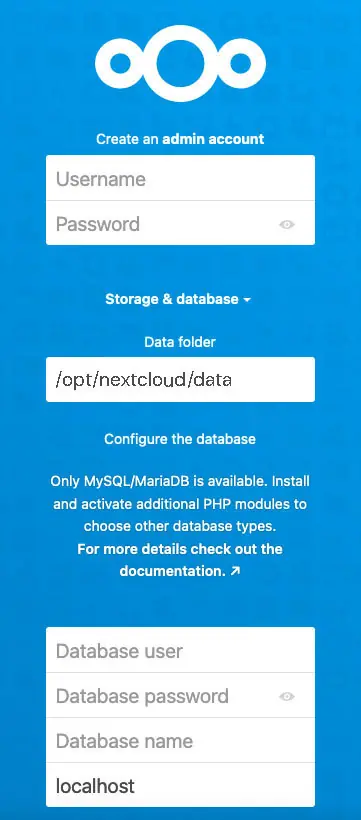
- On this page, perform the following tasks:
- Create an administrative account. Provide a user name and password for the account.
- Leave the address for the Data Folder at the current value.
- In the Configure the database section, add information about the nextcloud database. Enter the user name and password for the account created in MariaDB earlier. The database name is nextcloud. Leave the final field set to localhost.
- Click Install to complete the form.
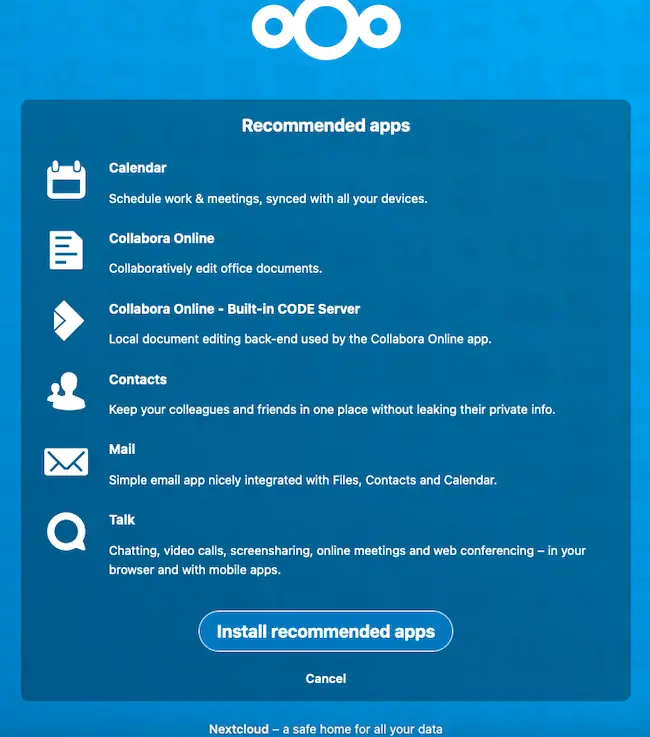
Nextcloud will initiate the application setup process, which could take a minute or two. On the following page, you’ll be prompted by Nextcloud about install a collection of recommended applications.
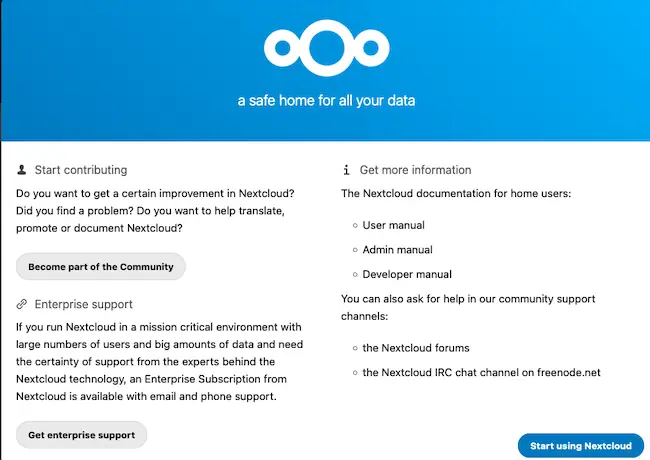
Nextcloud presents a sequence of welcome slides. To navigate through them, click the right-pointing arrow icon located on the right side of the page. Take your time to go through each slide, noting down any significant details presented.

Upon reaching the last welcome page, opt for the “Start using Nextcloud” option to advance to the Nextcloud dashboard.
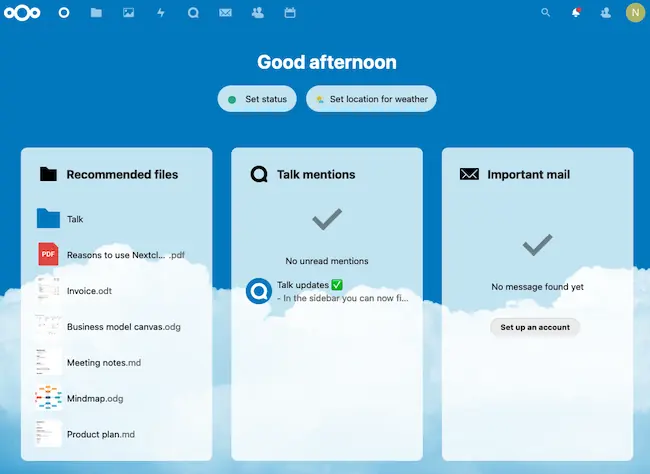
The browser now displays the Nextcloud Dashboard page.
Step 8: Enable HTTPS (Optional)
Prior to entering any confidential information, it’s advisable to establish a secure HTTPS connection for Nextcloud. To achieve this, you can acquire a complimentary TLS certificate from Let’s Encrypt. Begin by installing the Let’s Encrypt client (certbot) from the Ubuntu 22.04 repository.
samm@nextcloud:~$ sudo apt install certbot python3-certbot-apache
python3-certbot-apache is the Apache plugin. Next, run the following command to obtain a free TLS certificate using the Apache plugin.
samm@nextcloud:~$ sudo certbot --apache --agree-tos --redirect --staple-ocsp --email [email protected] -d nextcloud.sammlinux.com
Where:
- apache2: Use the Apache authenticator and installer
- agree-tos: Agree to Let’s Encrypt terms of service
- redirect: Enforce HTTPS by adding 301 redirect.
- staple-ocsp: Enable OCSP Stapling.
- email: Email used for registration and recovery contact.
- -d flag is followed by a list of domain names, separated by comma. You can add up to 100 domain names.
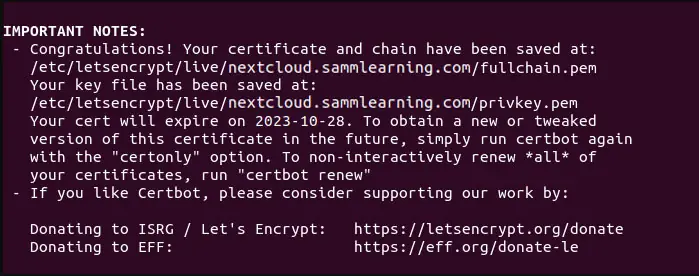
During the installation process, you will be prompted to decide whether you wish to receive emails from the Electronic Frontier Foundation (EFF). After selecting either “Y” or “N,” the TLS certificate will be obtained and configured for you automatically. This successful configuration will be confirmed by the message displayed below.
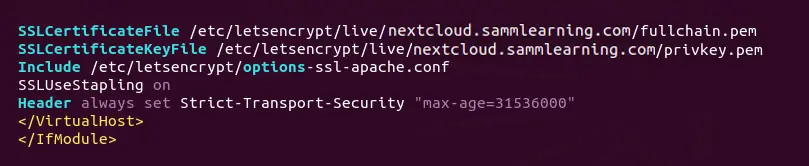
I found that Certbot doesn’t have the capability to automatically insert an HSTS header into the Apache configuration file for Nextcloud. If you desire to enable HSTS (HTTP Strict Transport Security), you will need to manually edit the file.
samm@nextcloud:~$ sudo vi /etc/apache2/sites-enabled/nextcloud-le-ssl.conf
We can then add the following line in the SSL server block to enable HSTS header.
Header always set Strict-Transport-Security "max-age=31536000"
Save and close the file. Then text Apache configurations.
samm@nextcloud:~$ sudo apache2ctl -t
If the test is successful, reload Apache for the change to take effect.
samm@nextcloud:~$ sudo systemctl reload apache2
The above configuration will get A+ score on SSL test.
Step 9: Configure Redis Cache for NextCloud
When you navigate to the overview page in your NextCloud settings, you might come across the following advisory:
No memory cache has been configured. To enhance your performance please configure a memcache if available.In order to configure Redis as a cache for nextCloud, we need to install the PHP extension for interfacing with Redis.
samm@nextcloud:~$ sudo apt install php8.2-redis
Check if the extension is enabled.
samm@samm:~$ php --ri redis

redis

Redis Support => enabled
Redis Version => 5.3.7
Redis Sentinel Version => 0.1
Available serializers => php, json, igbinary
Available compression => lzf, zstd, lz4

Directive => Local Value => Master Value
redis.arrays.algorithm => no value => no value
redis.arrays.auth => no value => no value
redis.arrays.autorehash => 0 => 0
redis.arrays.connecttimeout => 0 => 0
redis.arrays.distributor => no value => no value
redis.arrays.functions => no value => no value
redis.arrays.hosts => no value => no value
redis.arrays.index => 0 => 0
redis.arrays.lazyconnect => 0 => 0
redis.arrays.names => no value => no value
redis.arrays.pconnect => 0 => 0
redis.arrays.previous => no value => no value
redis.arrays.readtimeout => 0 => 0
redis.arrays.retryinterval => 0 => 0
redis.arrays.consistent => 0 => 0
redis.clusters.cache_slots => 0 => 0
redis.clusters.auth => no value => no value
redis.clusters.persistent => 0 => 0
redis.clusters.read_timeout => 0 => 0
redis.clusters.seeds => no value => no value
redis.clusters.timeout => 0 => 0
redis.pconnect.pooling_enabled => 1 => 1
redis.pconnect.connection_limit => 0 => 0
redis.pconnect.echo_check_liveness => 1 => 1
redis.pconnect.pool_detect_dirty => 0 => 0
redis.pconnect.pool_poll_timeout => 0 => 0
redis.pconnect.pool_pattern => no value => no value
redis.session.locking_enabled => 0 => 0
redis.session.lock_expire => 0 => 0
redis.session.lock_retries => 10 => 10
redis.session.lock_wait_time => 2000 => 2000
We can see that Redis extension is enabled. If it’s not enabled, run the following command:
samm@nextcloud:~$ sudo phpenmod redis
You may also need to reload Apache if the redis extension is still not enabled.
samm@nextcloud:~$ sudo systemctl reload apache2
Next, edit nextCloud configuration file.
samm@nextcloud:~$ sudo vi /opt/nextcloud/config/config.php
Add the following lines above the ending ); line.
'memcache.distributed' => 'OCMemcacheRedis',
'memcache.local' => 'OCMemcacheRedis',
'memcache.locking' => 'OCMemcacheRedis',
'redis' => array(
     'host' => 'localhost',
     'port' => 6379,
     ),
);
Save and close the file. Then restart Apache and PHP-FPM.
samm@nextcloud:~$ sudo systemctl restart apache2 php8.2-fpm
Now, return to the NextCloud settings and revisit the overview page. After refreshing the webpage, the warning regarding memory caching should no longer be displayed.
Step 10: Fixing Some Warnings Nextcloud
Adding Missing Indexes
If you see the following message in the NextCloud Settings -> Overview page,
The database is missing some indexes. Due to the fact that adding indexes on big tables could take some time they were not added automatically.Subsequently, you’ll need to add these indexes manually. Navigate to the webroot directory of Nextcloud.
samm@nextcloud:~$ cd /opt/nextcloud/
Run the following command to add indexes to the Nextcloud database.
samm@nextcloud:~$ sudo -u www-data php occ db:add-missing-indices
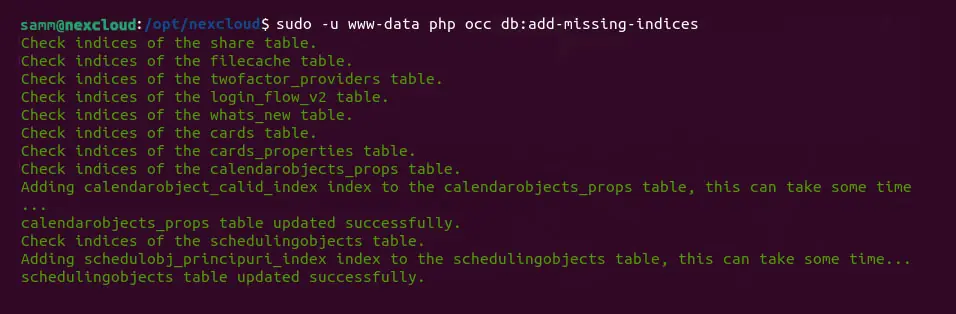
Now if you refresh the NextCloud Settings -> Overview page, the warning about missing indexes should be gone.
Conversion to Big Int
If you see the following message in the NextCloud Settings -> Overview page,
Some columns in the database are missing a conversion to big int. Due to the fact that changing column types on big tables could take some time they were not changed automatically.Then you need to manually change the column type. Change to the Nextcloud webroot directory.
samm@nextcloud:~$ cd /opt/nextcloud/
Switch your Nextcloud instance to maintenance mode in order to prevent users from logging in and making alterations.
samm@nextcloud:~$ sudo -u www-data php occ maintenance:mode --on
Next, execute the provided command to modify the column type.
samm@nextcloud:~$ sudo -u www-data php occ db:convert-filecache-bigint
Once it’s done, switch off the maintenance mode.
sudo -u www-data php occ maintenance:mode --off
Upon refreshing the NextCloud Settings -> Overview page, you will notice that the warning concerning big integers is no longer present.
Conclusion
Congratulations! You’ve successfully installed Nextcloud on your Ubuntu Server 22.04 using Apache as the web server and MariaDB as the database system. This self-hosted solution empowers you to manage and share your data securely, putting you in control of your privacy and collaboration. Enjoy the benefits of Nextcloud’s feature-rich environment while reaping the rewards of a well-organized and secure data management system.
Also Read Our Other Guides :
- How To Install and Configure Go (Golang) on Ubuntu 22.04
- How To Install and Configure Elasticsearch on Ubuntu Server 22.04
- How To Install and Configure NFS Server Client on Ubuntu 22.04
- How To Install Snipe-IT Asset Management on Ubuntu 22.04
- How To Install a MinIO Object Storage Server on Rocky Linux
- How To Install RTMP Server with Nginx on CentOS 7
Finally, now you have learned how to Install Nextcloud with Apache and MariaDB on Ubuntu Server 22.04