If you’re into web development, PHP is undoubtedly a key player in your toolkit. The release of PHP 8.2 brings several exciting features and improvements. In this step-by-step guide, we will show you how to install PHP 8.2 on your Debian 11 system. Whether you’re a seasoned developer or just starting, getting your PHP development environment up and running smoothly is essential.
Table of Contents
- Why PHP 8.2 on Debian 11?
- Key Features PHP 8.2
- Install and Configure PHP 8.2 on Debian 11
- Conclusion
Why PHP 8.2 on Debian 11?
Before we dive into the installation process, let’s briefly discuss why PHP 8.2 on Debian 11 is a great choice. PHP 8.2 introduces various performance enhancements and new features, making it a valuable asset for web developers. Debian 11, on the other hand, is known for its stability and security, making it an ideal platform for hosting PHP applications.
Key Features PHP 8.2
Basically some key features and characteristics of PHP include:
- Easy to Learn and Use: besides PHP has a relatively low learning curve, making it accessible to beginners.
- Wide Platform Support: PHP is compatible with major operating systems like Windows, macOS, Linux, and various web servers such as Apache and Nginx. It can also connect to a wide range of databases, including MySQL, MariaDB, PostgreSQL, and more.
- Extensive Library and Framework Ecosystem: PHP has a vast collection of libraries and frameworks that provide pre-built functions, classes, and components, saving development time and effort. Popular PHP frameworks include Laravel, Symfony, and CodeIgniter.
- Web Development Capabilities: PHP enables various web development tasks, including form handling, file manipulation, session management, authentication and authorization, and integration with third-party APIs.
Install and Configure PHP 8.2 on Debian 11
Here’s a simple guide on how to install and configure PHP 8.2 on Debian 11. By following these steps, you can tap into the advantages it offers:
Step 1: Update Your System
Before you begin install PHP 8.2, it’s essential to ensure that your Debian 11 system is up to date. Open a terminal and run the following commands:
$ sudo apt update
$ sudo apt upgrade
By doing this, thus you’ll refresh your list of packages and update any installed packages to their most up-to-date versions.
Step 2: Add PHP Repository on Debian 11
To install PHP 8.2, you’ll need to add the PHP repository to your Debian 11 system. Use the following command:
$ sudo apt install -y software-properties-common
$ sudo add-apt-repository ppa:ondrej/php
This command adds the repository maintained by Ondřej Surý, which provides the latest PHP versions.
Step 3: Install PHP 8.2
Now that you’ve added the PHP repository, it’s time to install PHP 8.2. Run the following command:
$ sudo apt update
$ sudo apt install php8.2
This command fetches PHP 8.2 from the repository and installs it on your Debian 11 system.
Step 4: Verify PHP Installation
To confirm that PHP 8.2 has been successfully installed on your Debian 11, you can run the following command:
$ php -vCorrespondingly you should see output indicating that PHP 8.2 is installed on your Debian 11, along with some additional information about the PHP configuration.
PHP 8.2.8 (cli) (built: Jul 16 2023 11:01:56) (NTS)
Copyright (c) The PHP Group
Zend Engine v4.2.8, Copyright (c) Zend Technologies
    with Zend OPcache v8.2.8, Copyright (c), by Zend Technologies
Step 5: Install Required PHP Extensions
Depending on your specific development needs, you may need to install additional PHP 8.2 extensions on your Debian 11. You can search for available extensions using the following command:
$ sudo apt search php8.2-Now that you should see output available extensions of PHP 8.2 on Debian 11.
.......
php8.2-memcached-dbgsym/bullseye 3.2.0++-1+0~20230622.54+debian11~1.gbp8f3995 amd64
  debug symbols for php8.2-memcached

php8.2-mongodb/bullseye,now 1.15.3-1+0~20230614.40+debian11~1.gbp73474f amd64
  MongoDB driver for PHP

php8.2-mongodb-dbgsym/bullseye 1.15.3-1+0~20230614.40+debian11~1.gbp73474f amd64
  debug symbols for php8.2-mongodb

php8.2-msgpack/bullseye,now 1:2.2.0~rc2-3+0~20230620.38+debian11~1.gbp2bc756 amd64
  PHP extension for interfacing with MessagePack

php8.2-msgpack-dbgsym/bullseye 1:2.2.0~rc2-3+0~20230620.38+debian11~1.gbp2bc756 amd64
  debug symbols for php8.2-msgpack

php8.2-mysql/bullseye,now 8.2.8-1+0~20230716.25+debian11~1.gbp5cf2f6 amd64
  MySQL module for PHP

php8.2-mysql-dbgsym/bullseye 8.2.8-1+0~20230716.25+debian11~1.gbp5cf2f6 amd64
  debug symbols for php8.2-mysql

php8.2-oauth/bullseye 2.0.7++-1+0~20230612.32+debian11~1.gbpc77731 amd64
  OAuth 1.0 consumer and provider extension

php8.2-oauth-dbgsym/bullseye 2.0.7++-1+0~20230612.32+debian11~1.gbpc77731 amd64
  debug symbols for php8.2-oauth

php8.2-odbc/bullseye 8.2.8-1+0~20230716.25+debian11~1.gbp5cf2f6 amd64
  ODBC module for PHP

php8.2-odbc-dbgsym/bullseye 8.2.8-1+0~20230716.25+debian11~1.gbp5cf2f6 amd64
  debug symbols for php8.2-odbc

php8.2-opcache/bullseye,now 8.2.8-1+0~20230716.25+debian11~1.gbp5cf2f6 amd64
........
To install a specific extension of PHP 8.2 on your Debian 11. Replace extension-name with the desired extension name. Use following command:
$ sudo apt install php8.2-extension-nameYou can install multiple packages PHP 8.2 at the same time, and at the same time, you should think about installing the modules that are commonly needed based on these suggestions, use following command.
$ sudo apt-get install php8.2-{common,cli,fpm,mbstring,zip,pgsql,mysql,mongodb,redis,memcache,memcached,opcache,gd,mcrypt,apcu,curl,xml,xmlreader,bcmath,readline,sockets,imagick,bz2,pdo,dom}When you run this command, it will lead to the installation of the following modules:
php8.2-cli– command interpreter, useful for testing PHP scripts from a shell or performing general shell scripting tasksphp8.2-common– documentation, examples, and common modules for PHPphp8.2-mysql– for working with MySQL databasesphp8.2-zip– for working with compressed filesphp8.2-gd– for working with imagesphp8.2-mbstring– used to manage non-ASCII stringsphp8.2-curl– lets you make HTTP requests in PHPphp8.2-xml– for working with XML dataphp8.2-bcmath– used when working with precision floats
Step 6: Configure PHP
On Debian 11 PHP 8.2 comes with a default configuration, but you may need to make adjustments based on your project requirements. The PHP configuration files are located in the /etc/php/8.2/ directory. You can use a text editor of your choice to edit these files.
Step 7: Using PHP 8.2 with Nginx/ Apache web server
We will explore configurations for both Nginx and Apache web servers to host your PHP 8.2 application on Debian 11.
PHP 8.2 application with Nginx web server
Explicitly in the case of Nginx, PHP code is commonly executed through a distinct process known as PHP-FPM (FastCGI Process Manager). First thing to remember PHP-FPM, operating as a daemon, actively awaits incoming PHP requests and processes them in dedicated instances. In this setup, Nginx’s role is to forward incoming requests to PHP-FPM, thus facilitating the actual execution process.
Before proceeding, ensure you have installed the Nginx web server.
$ sudo apt install nginx php8.2-fpmFirstly, open up your Nginx server configuration. Then, inside the current ‘http’ block, add the following code block. This configuration will ensure that PHP requests are directed to PHP-FPM and executed smoothly.
$ sudo vi /etc/nginx/nginx.confserver {
listen 80;
server_name example.com;
root /var/www/myweb;
index index.php index.html;
location ~ .php$ {
include snippets/fastcgi-php.conf;
fastcgi_pass unix:/var/run/php/php8.2-fpm.sock;
}
}Then validate Nginx configuration is ok.
$ sudo nginx -t
nginx: the configuration file /etc/nginx/nginx.conf syntax is ok
nginx: configuration file /etc/nginx/nginx.conf test is successful
Then restart Nginx web server after the configuration.
$ sudo systemctl restart nginxPHP 8.2 application with Apache web server
Within Apache, we can utilize an integrated module called mod_php to directly handle PHP code within the Apache process itself.
However, before proceeding, ensure you have installed the Apache web server package, as well as PHP and the Apache PHP module.
$ sudo apt install apache2 libapache2-mod-php8.2 Afterwards enable mod_php module:
$ sudo a2enmod php8.2Then restart Apache web server after the configuration with following command.
$ sudo systemctl restart apache2Step 8: Test PHP 8.2
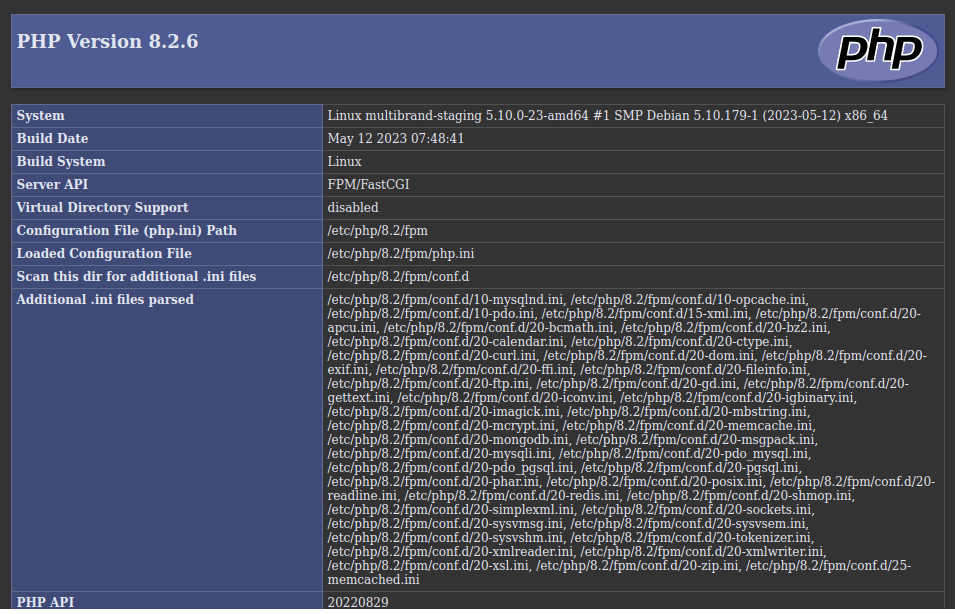
To ensure that PHP 8.2 is working correctly on your Debian 11, you can create a simple PHP file and run it in your web browser. Use the following command to create a new PHP file:
$ echo "<?php phpinfo(); ?>" > /var/www/html/phpinfo.phpThis command creates a phpinfo.php file in the web server’s root directory. You can access this file in your web browser by entering http://localhost/phpinfo.php in the address bar. You should see a page displaying detailed information about your PHP configuration.
Conclusion
Congratulations! You’ve successfully installed PHP 8.2 on your Debian 11 system. With PHP 8.2’s enhanced features and Debian 11’s stability, you’re well-equipped to tackle web development projects with confidence.
In this guide, as I have shown we covered the essential steps for installing PHP 8.2 on Debian 11, including updating your system, adding the PHP repository, installing PHP, verifying the installation, adding extensions, configuring PHP, and testing your setup. With PHP 8.2 at your disposal, you’re ready to explore its new features and enhance your web development projects. Happy coding!
Also Read Our Other Guides :
- How To Install PHP 8.2 on Ubuntu Server 22.04
- How To Install PHP8.2 on Rocky Linux 9
- How To Install PHP 8.2 on CentOS 7 / RHEL 7
- How To Install PHP 7.4 on Ubuntu 22.04
- How To Install PHP 7.4 on Debian 11
Finally, now you have learned how to install PHP 8.2 on Debian 11.